
These Oreo no-bake cheesecake cups started because Lily begged me for a fancy dessert and I absolutely refused to turn the oven on in July in Austin. I had a block of cream cheese, a sleeve of Oreos, and about twenty minutes before Noah woke up from his nap. That was all it took. I threw everything together, popped the cups in the fridge, and honestly could not believe how good they turned out. These Oreo no-bake cheesecake cups have been in our regular rotation ever since.
What I love most about this recipe is how impressive it looks for how little effort it actually takes. You get a buttery, crunchy Oreo crust at the bottom, a cloud-like cream cheese filling that is rich without being heavy, and then more crushed Oreos on top because more is always more. Each Oreo no-bake cheesecake cup is perfectly portioned, which means no slicing, no serving mess, and no fighting over who got the bigger piece. Jake took three of them before dinner one night and I cannot even be mad about it.
If you are looking for a no-bake dessert that truly delivers on every level, these Oreo no-bake cheesecake cups are your answer. They set up beautifully in the fridge, travel well to potlucks, and make even the fussiest guests feel like you spent all day in the kitchen. I am going to walk you through every single step so yours come out perfect on the first try.
💌 Love this one? There are 19 more.
I gathered the 20 most beloved recipes on Fresher Recipes into one free printable cookbook. These are the dishes readers tell me changed their weeknights. Pop in your email and it’s yours in seconds.
Instant download. Unsubscribe anytime.
Why You'll Love This Oreo No-Bake Cheesecake Cups
- Zero oven required. These Oreo no-bake cheesecake cups come together without any baking at all, which makes them perfect for warm weather or any time you just want a quick, fuss-free dessert.
- Ready in 20 minutes of active time. After a quick mix and assemble, the fridge does all the work. You can make these the night before and they are ready to serve whenever you need them.
- Individual servings are a game changer. Every person gets their own perfectly portioned cup, which means no slicing, no mess, and no awkward serving moments at the table.
- That crunchy Oreo crust is everything. The crushed cookies mixed with butter create a base that stays firm but still crumbles beautifully when you dig in with a spoon.
- Endlessly customizable. You can swap in flavored Oreos, fold in strawberry jam, or drizzle with chocolate sauce and each variation still tastes absolutely incredible.

Oreo No-Bake Cheesecake Cups Ingredients
The ingredient list for these Oreo no-bake cheesecake cups is short, simple, and uses things you can find at any grocery store. No special equipment, no obscure ingredients, and no stress. Here is everything you will need to make a batch that serves six.
- 24 Oreo cookies (about 250g / 8.8 oz), divided. Half go into the crust and half get crushed for the filling and topping. These are the backbone of every Oreo no-bake cheesecake cup.
- 4 tablespoons (60g / 2 oz) unsalted butter, melted. This binds the crust together so it holds its shape at the bottom of each cup.
- 450g (16 oz) full-fat cream cheese, softened to room temperature. Full-fat gives you the richest, creamiest filling. Do not substitute low-fat here or the filling will be too soft.
- 120ml (1/2 cup) powdered sugar, sifted. Sifting prevents lumps and gives the filling that silky smooth texture.
- 1 teaspoon pure vanilla extract. This adds a warm background note that makes the filling taste like a real cheesecake.
- 240ml (1 cup) heavy whipping cream, cold. Cold cream whips faster and holds its shape better, giving the filling that airy, mousse-like texture.
- Extra whipped cream and crushed Oreos for topping, optional but highly recommended.
Use full-fat cream cheese and make sure it is fully softened. Cold cream cheese will not blend smoothly no matter how long you beat it, and you will end up with small lumps in your filling. Set it on the counter for at least an hour before you start. According to Serious Eats’ food science coverage, fat content and temperature both dramatically affect the texture of cream cheese-based fillings, so this step is worth taking seriously.
The cold heavy cream is non-negotiable. I always pop my mixing bowl in the freezer for ten minutes before whipping. It makes such a difference in how quickly the cream forms stiff peaks. If your cream is even slightly warm, it will take twice as long and the peaks will be softer. Also, if you love this kind of easy, crowd-pleasing dessert, you might also want to try my Mini Egg Cheesecakes, which use a very similar no-bake filling technique with a fun seasonal twist.
On the Oreos themselves: Classic Oreos give you the most reliable flavor, but Double Stuf works great too since the extra cream means a richer crust. Golden Oreos make a beautiful blonde version of these cups if you want something a little different.
Note: These Oreo no-bake cheesecake cups need at least 2 hours in the refrigerator to set properly. For the best texture and cleanest layers, I always make them the night before. They will keep well in the fridge for up to 4 days, making them a perfect make-ahead dessert for parties or busy weeks.
How to Make Oreo No-Bake Cheesecake Cups
Making Oreo no-bake cheesecake cups is so much simpler than it looks. There are just three main stages: the crust, the filling, and the assembly. I am going to walk you through each one in detail so your cups come out smooth, creamy, and perfectly layered every single time.
Step 1: Make the Oreo Crust.
Grab 12 Oreo cookies and add them to a zip-lock bag. Use a rolling pin to crush them into fine crumbs, or pulse them in a food processor if you have one. You want the crumbs to look like dark sand with no large chunks remaining. Transfer the crumbs to a bowl and pour in the 4 tablespoons (60g) of melted butter. Stir until every crumb is coated and the mixture holds together when you press it between your fingers. It should feel a little like wet sand.
Lora’s Tip: Do not over-crush the Oreos. A few slightly larger crumb pieces actually give the crust a better texture in your finished Oreo no-bake cheesecake cups.
Step 2: Press the Crust into the Cups.
Divide the Oreo crumb mixture evenly between six serving cups or glasses. I use clear glass cups so you can see all the beautiful layers. Use the back of a spoon or the bottom of a small jar to press the crumbs down firmly into an even layer. Once pressed, pop the cups into the fridge while you make the filling. That ten-minute chill helps the crust firm up and stay in place.
Step 3: Whip the Cream Cheese Filling.
In a large bowl, beat the softened cream cheese with a hand mixer on medium speed for about 2 minutes until it is completely smooth and fluffy. There should be absolutely no lumps. Add the 120ml (1/2 cup) of sifted powdered sugar and 1 teaspoon of vanilla extract, then beat again until fully combined. The mixture will smell warm and sweet and look like thick frosting at this stage. This is what makes the Oreo no-bake cheesecake filling so irresistible.
In a separate cold bowl, whip the 240ml (1 cup) of heavy cream to stiff peaks. You will hear the mixer start to slow down slightly as the cream thickens, which is your cue that it is almost ready. Stiff peaks mean the cream holds its shape when you lift the beaters without flopping over. Gently fold the whipped cream into the cream cheese mixture in three additions, using a spatula and slow circular motions from the bottom of the bowl. Do not rush this part. Folding keeps the filling light and airy, which is exactly what you want in these cups.
Lora’s Tip: If your filling looks a little streaky after the first fold, that is completely fine. Keep going until no white streaks remain. The Cheesecake Brownies on the site use a similar folding technique and that post has a great visual guide if you need it.
Step 4: Assemble the Oreo No-Bake Cheesecake Cups.
Take your chilled cups out of the fridge. Spoon or pipe the cheesecake filling on top of each Oreo crust, dividing it evenly among the six cups. If you have a piping bag, use a large round tip for a bakery-style look. If not, a spoon works perfectly. Smooth the tops with the back of a spoon. Your Oreo no-bake cheesecake cups should already look beautiful at this point.
Crush the remaining 12 Oreos into a mix of fine crumbs and slightly chunky pieces for contrast, then sprinkle them generously over the top of each cup. Add a swirl of whipped cream if you like. The finished cups should look tall, layered, and a little rustic, not perfect. That is the charm of a homemade dessert.
Lora’s Tip: For clean, defined layers, use a piping bag for the filling and tap each cup gently on the counter after filling to remove any air pockets.
Step 5: Chill and Serve.
Cover the cups with plastic wrap and refrigerate for at least 2 hours. Overnight is even better. When you pull them out, the Oreo no-bake cheesecake cups will be perfectly set with a firm but creamy filling that slices cleanly with a spoon. Serve straight from the fridge for the best texture.

Lora's Kitchen Tips
- Soften cream cheese completely before starting. This is the most important step for smooth Oreo no-bake cheesecake cups. Cold cream cheese creates a lumpy filling no matter how long you mix it. Give it a full hour on the counter before you begin.
- Chill your mixing bowl before whipping cream. I put my stainless steel bowl in the freezer for 10 minutes before whipping the heavy cream. The cold bowl helps the cream reach stiff peaks faster, which means a fluffier, more stable filling in your Oreo no-bake cheesecake cups.
- Use a piping bag for the neatest presentation. If you want your Oreo no-bake cheesecake cups to look like they came from a bakery, transfer the filling to a piping bag fitted with a large round or star tip. It takes 30 extra seconds and makes a huge visual difference.
- If the filling looks too soft, do not panic. Sometimes humidity or slightly warm cream can make the filling looser than expected. Just pop the assembled cups into the fridge for an extra hour. The filling will firm up as it chills and will still taste incredible.
- Press the crust firmly for clean layers. A loosely packed crust will crumble and mix into the filling when you spoon it up. Use the bottom of a small jar or a shot glass to press the Oreo crumbs down firmly before adding the cheesecake layer.
Oreo No-Bake Cheesecake Cups Variations and Substitutions
One of the best things about Oreo no-bake cheesecake cups is how easily you can customize them. Once you have the base recipe down, the flavor combinations are practically endless.
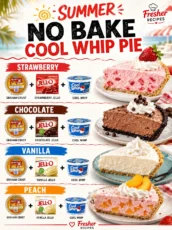
Strawberry Oreo Cheesecake Cups: Fold 3 tablespoons of strawberry jam into the cheesecake filling before piping it into the cups. Top with fresh sliced strawberries and crushed Golden Oreos. The pink and white layers look stunning in a clear glass.
Chocolate Lover’s Version: Add 2 tablespoons of unsweetened cocoa powder to the cream cheese mixture for a double chocolate Oreo no-bake cheesecake cup. Finish with a drizzle of melted dark chocolate over the top before chilling.
Mint Chocolate Cups: Swap the vanilla extract for 1/2 teaspoon of peppermint extract and use Mint Oreos in the crust. The combination is cool, refreshing, and absolutely addictive. This variation is Lily’s absolute favorite.
Peanut Butter Swirl: Beat 3 tablespoons of creamy peanut butter into the cream cheese filling before folding in the whipped cream. Swirl a little extra peanut butter on top of each Oreo no-bake cheesecake cup for a dramatic finish. For another take on a no-bake crowd-pleaser, check out the No-Bake Peanut Butter Energy Bites on the site.
Golden Oreo Lemon Cups: Use Golden Oreos in the crust and add 1 tablespoon of fresh lemon zest and 1 tablespoon of lemon juice to the filling. The bright citrus flavor cuts through the richness beautifully. According to Food Network’s no-bake dessert guides, citrus additions are one of the easiest ways to brighten a cream cheese filling without altering its texture.
What to Serve with Oreo No-Bake Cheesecake Cups

These Oreo no-bake cheesecake cups are a complete dessert all on their own, but a few small additions can really take them over the top. I love serving them alongside a simple fruit plate with fresh raspberries and sliced strawberries. The tartness of the berries balances the richness of the cheesecake filling perfectly.
For a full dessert spread at a party, pair these Oreo no-bake cheesecake cups with something warm and chocolatey on the side. My Chocolate Brownie Cookies are a perfect companion because the fudgy, chewy cookie contrasts beautifully with the cold, creamy cups.
If you are serving these at a brunch or daytime gathering, a hot cup of coffee or a cold glass of milk alongside each cup is all you need. The bittersweet coffee flavor is one of the best pairings with the sweet Oreo crust. For something a little more fun, serve them with an iced drink like my Prebiotic Iced Tea Lemonade, which is bright and refreshing and keeps things feeling light even after a rich dessert.
How to Store Oreo No-Bake Cheesecake Cups
- Refrigerator Storage: Store leftover Oreo no-bake cheesecake cups covered tightly with plastic wrap or in an airtight container in the fridge for up to 4 days. The crust may soften slightly over time but the flavor stays great.
- Freezing: You can freeze Oreo no-bake cheesecake cups without the Oreo topping for up to 1 month. Wrap each cup tightly in plastic wrap, then place them in a freezer-safe bag. Add fresh toppings after thawing.
- Thawing: Move frozen cups to the refrigerator the night before serving and let them thaw slowly overnight. Do not thaw at room temperature or the filling can become too soft.
- Reheating: These Oreo no-bake cheesecake cups are meant to be served cold. There is no reheating needed. Just serve them straight from the fridge for the best texture and flavor.
- Make-Ahead Tip: These cups are ideal for making 24 hours in advance. The filling firms up beautifully overnight and the flavors deepen, making next-day Oreo no-bake cheesecake cups taste even better than freshly made ones.
Oreo No-Bake Cheesecake Cups FAQ
Here are the questions I get asked most about this recipe:
Can I make Oreo no-bake cheesecake cups ahead of time?
Yes, and I actually recommend it. These Oreo no-bake cheesecake cups taste even better after a full night in the fridge because the filling firms up completely and the flavors have time to meld together. Make them up to 24 hours in advance and keep them covered in the refrigerator. Add the crushed Oreo topping right before serving so it stays crisp.
Why is my cheesecake filling not firm enough?
The most common reason is that the cream cheese was not softened enough before mixing, or the heavy cream was not cold enough before whipping. Both issues affect how well the filling holds its structure. If your filling is too soft after assembly, just add another hour or two of chilling time. The cold fridge will firm up your Oreo no-bake cheesecake cups without any extra steps needed.
Can I use reduced-fat cream cheese in Oreo no-bake cheesecake cups?
I really do not recommend it. Reduced-fat cream cheese has a higher water content, which means your filling will be too loose to hold its shape even after chilling. Full-fat cream cheese is what gives these Oreo no-bake cheesecake cups that thick, rich, bakery-style texture. It is worth the extra calories for a dessert this good.
How many Oreo cookies do I need for this recipe?
You will need 24 Oreo cookies total for a batch of six cups. Twelve go into the crust, and the remaining twelve are divided between the filling and the topping. If you want an extra thick crust or a more generous topping on your Oreo no-bake cheesecake cups, grab an extra sleeve just in case. It never hurts to have more Oreos on hand.
Can I use whipped topping instead of heavy cream?
Yes, you can substitute 240ml (1 cup) of thawed whipped topping like Cool Whip for the heavy cream if that is what you have. The texture will be slightly lighter and less rich, but your Oreo no-bake cheesecake cups will still taste delicious. Just fold it in gently the same way you would fold in freshly whipped cream, and do not over-mix or you will deflate the filling.
I really hope these Oreo no-bake cheesecake cups become your new go-to dessert for every occasion. They are the kind of recipe that looks like you tried really hard but secretly takes almost no effort at all. That is my favorite kind of cooking. Make a batch, share them with someone you love, and watch their face light up when they take that first spoonful.
With love and crushed Oreos,
Lora x

Oreo No-Bake Cheesecake Cups
6
servings20
minutes420
kcalIngredients
12 Oreo cookies (about 125g / 4.4 oz), crushed into fine crumbs
4 tablespoons (60g / 2 oz) unsalted butter, melted
450g (16 oz) full-fat cream cheese, softened to room temperature
120ml (1/2 cup) powdered sugar, sifted
1 teaspoon pure vanilla extract
240ml (1 cup) heavy whipping cream, cold
12 Oreo cookies (about 125g / 4.4 oz), roughly crushed
Whipped cream for serving, optional
Directions
Crush 12 Oreo cookies into fine crumbs using a zip-lock bag and rolling pin or a food processor. Mix with 4 tablespoons of melted butter until the crumbs are evenly coated and hold together when pressed. Divide evenly among 6 serving cups and press down firmly. Chill in the fridge while you make the filling.
Beat the softened cream cheese in a large bowl with a hand mixer on medium speed for 2 minutes until completely smooth. Add the sifted powdered sugar and vanilla extract and beat until fully combined and fluffy.
In a separate cold bowl, whip the cold heavy cream to stiff peaks. Gently fold the whipped cream into the cream cheese mixture in three additions using a spatula, keeping the filling light and airy.
Spoon or pipe the cheesecake filling evenly over the chilled Oreo crusts in each cup. Smooth the tops. Sprinkle the roughly crushed Oreos generously over each Oreo no-bake cheesecake cup and add a swirl of whipped cream if desired.
Cover the cups with plastic wrap and refrigerate for at least 2 hours or overnight. Serve the Oreo no-bake cheesecake cups cold straight from the fridge for the best texture.
🛒 My Kitchen Essentials for Easy Dinners
These are the tools I reach for again and again — a few tried-and-true favorites that make these recipes faster and easier to cook.
As an Amazon Associate, I earn from qualifying purchases — at no extra cost to you.


