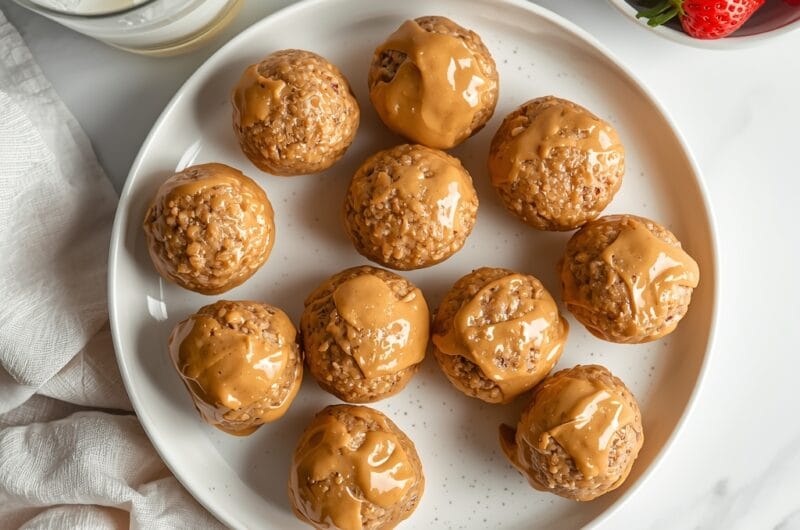
I discovered these no-bake peanut butter energy bites on one of those mornings when I needed something quick for Lily’s lunch box but didn’t want to turn on the oven. The result? These little powerhouse bites that taste like a cross between a peanut butter cookie and a protein bar, except they’re actually good for you.
What I love most is that they come together in about 15 minutes and require almost nothing more than a mixing bowl. Jake jokes that they’re the perfect snack for when you want something sweet but your conscience is telling you to make it count. These energy bites are packed with protein, natural sweetness, and that creamy peanut butter flavor everyone craves, but they won’t leave you feeling sluggish an hour later.
Why You'll Love This Recipe
- No oven required: These are ready in 15 minutes with just a mixing bowl and your hands. No baking, no mess, no heat.
- Packed with protein: Each bite delivers serious staying power thanks to peanut butter, oats, and optional protein powder. Perfect for high-protein snacking.
- Customizable sweetness: You control exactly how much honey goes in, so they're not teeth-achingly sweet like store-bought bars.
- Perfect for meal prep: Make a batch on Sunday and you've got grab-and-go snacks for the entire week in your fridge.
- Kid-friendly and adult-approved: Noah loves rolling these, and Jake sneaks them as his afternoon pick-me-up. Everyone's happy.

Ingredients You'll Need
The beauty of these energy bites is their simplicity. You’re working with whole ingredients that you probably already have on hand, and each one plays a specific role in creating the perfect texture and flavor. The peanut butter is your star, but the oats and honey are just as important for holding everything together.
- 240ml (1 cup) creamy peanut butter, the base of these bites. Natural works fine, just make sure it’s well-stirred if it separates.
- 120g (1 cup) old-fashioned rolled oats, they add texture and help bind everything together while boosting the fiber content.
- 60ml (1/4 cup) honey, this sweetens the mixture naturally and helps the bites hold their shape. You can reduce this if you prefer them less sweet.
- 60g (1/2 cup) powdered sugar, optional but recommended. It adds a subtle sweetness and makes the bites less sticky to handle.
- 30g (1/4 cup) chocolate chips or cacao nibs, optional add-in for extra flavor. I often skip these when making them for Lily’s lunch.
- Pinch of sea salt, just a tiny amount to balance the sweetness and enhance the peanut butter flavor.
- 30g (1 scoop) vanilla protein powder, completely optional but adds about 5g of protein per bite.
About the peanut butter: Creamy peanut butter works best for these since chunky pieces can make rolling difficult. If you’re using natural peanut butter with oil on top, stir it in well before measuring.
The oats matter: Use old-fashioned rolled oats, not instant. Instant oats will make the texture too dense. Look for them in the breakfast aisle near the granola section.
Honey consistency tip: If your honey is crystallized or very thick, warm it in the microwave for 20-30 seconds to make it easier to mix. This makes a huge difference in how smoothly everything combines.
Note: These bites are soft and will hold together best when refrigerated, but they're also delicious at room temperature. If your kitchen is very warm, keep them in the fridge until just before eating.
How to Make No-Bake Peanut Butter Energy Bites
The process is honestly so simple that even Noah gets excited to help. We mix, we roll, we chill, and we’re done. There’s real magic in how something so few ingredients can taste so satisfying.
Step 1: Combine the dry ingredients.
In a large mixing bowl, combine the oats, powdered sugar (if using), protein powder, and sea salt. Mix these together with a spoon or your hands until everything is evenly distributed. This takes about 30 seconds and ensures the protein powder gets dispersed throughout rather than clumping.
Lora’s Tip: I always mix the dry ingredients first, even though it seems like an extra step. It prevents protein powder clumps in the final mixture.
Step 2: Add the wet ingredients.
Add the peanut butter and honey to the bowl. Using a sturdy spoon or clean hands, mix everything together until you have a thick, uniform dough. It should feel similar to cookie dough, holding together when you squeeze it but not wet or greasy.
Lora’s Tip: This is where having slightly softened peanut butter really helps. Cold peanut butter straight from the fridge will be harder to mix in.
Step 3: Add optional mix-ins.
If you’re adding chocolate chips, cacao nibs, or any other mix-ins, fold them in gently now. You don’t want to crush them while mixing, so a gentle hand with a spoon works better than vigorous stirring.
Step 4: Roll the bites.
Using a spoon or small cookie scoop, portion out the dough into roughly 30ml (1 tablespoon) sized pieces onto a plate lined with parchment paper. Then roll each piece between your palms into a smooth ball. This sounds tedious, but it goes faster than you’d think. Noah actually enjoys this part, which makes it feel less like a chore.
Lora’s Tip: If the dough gets too sticky while rolling, wipe your hands on a damp towel. A tiny bit of moisture helps more than you’d expect.
Step 5: Refrigerate until firm.
Place the rolled bites in an airtight container and refrigerate for at least 2 hours, though overnight is ideal. This gives them time to firm up and makes them easier to grab without falling apart. They’ll keep in the fridge for up to 5 days, which makes them perfect for meal prep.
If you want them to last longer, freeze them in a single layer on a baking sheet for 2 hours, then transfer to a freezer-safe container where they’ll stay good for up to 3 weeks.

Lora's Kitchen Tips
- Make them ahead: These bites are even better when you make them the night before. The flavors meld together and they firm up beautifully in the fridge.
- Size consistency: Use a small cookie scoop if you have one. It ensures every bite is roughly the same size and looks more professional on the plate.
- Prevent sticking: If your mixture seems too sticky, chill it in the freezer for 30 minutes before rolling. Cold dough is much easier to work with.
- Flavor combinations: Try rolling some bites in unsweetened cocoa powder, ground cinnamon, or finely chopped nuts for different looks and flavors without changing the recipe.
- Peanut butter temperature: Room-temperature peanut butter mixes much more smoothly than cold. Pull it out of the pantry about 30 minutes before making these.
Variations and Substitutions
The beauty of energy bites is how flexible they are. Once you make the basic recipe, you can take them in so many directions based on what you have on hand or what you’re in the mood for.
Almond butter version: Swap the peanut butter for almond butter in the same amount. You might need slightly less honey since almond butter has a different consistency, so add it gradually and adjust.
Double chocolate: Add 15g (2 tablespoons) of unsweetened cocoa powder to the dry ingredients and use chocolate chips as your mix-in. It’s like biting into a little fudgy moment.
Cinnamon roll: Add 5ml (1 teaspoon) of ground cinnamon to the dry ingredients and 2ml (1/2 teaspoon) of vanilla extract to the wet ingredients. You could even roll them in cinnamon sugar at the end.
Tropical twist: Add 30g (1/4 cup) of shredded unsweetened coconut and 30g (1/4 cup) of chopped dried pineapple or mango. These feel like a little vacation in bite form.
High-protein boost: If you want maximum protein without making them taste like a gym supplement, use 45g (slightly less than 2 scoops) of vanilla or chocolate protein powder instead of 30g.
What to Serve with No-Bake Peanut Butter Energy Bites

These are perfect as a standalone snack, but they’re even better when paired with other foods that complement their sweetness and richness. I’ve found that they work best alongside something fresh or slightly tangy.
Serve them with fresh fruit like apple slices, strawberries, or banana. The brightness cuts through the richness of the peanut butter in a really nice way. They’re also amazing alongside a cold glass of milk or a cup of strong coffee.
For a more substantial snack, pair them with a protein like chicken salad or some cheese. The combination keeps you satisfied for hours. In Lily’s lunch box, I usually tuck one of these next to some yogurt or cheese cubes for a balanced snack.
If you’re serving these at a gathering, arrange them on a pretty platter with some raw nuts and dried fruit. They look like you spent way more effort than you actually did.
Storage, Freezing, and Reheating
- Storage: Keep them in an airtight container in the refrigerator for up to 5 days. The cold keeps them firm and prevents them from drying out.
- Freezing: Layer them between parchment paper in a freezer-safe container and freeze for up to 3 weeks. They thaw at room temperature in about 30 minutes.
- Thawing: Remove from the freezer and let them sit at room temperature for 20-30 minutes until they're soft enough to eat. This prevents them from being rock hard.
- Reheating: These don't need reheating, but if you prefer them warmer, let them sit out at room temperature. Never microwave them as they'll become too soft.
- Make-ahead tip: Make a double batch on Sunday and freeze half. You'll have snacks ready to grab for the entire month without extra effort.
Frequently Asked Questions
Here are the questions I get asked most about this recipe:
Can I use natural peanut butter?
Yes, absolutely. Just make sure to stir it really well first since the oil separates on top. If your mixture ends up too runny, add an extra tablespoon or two of oats to thicken it up.
Do I need to refrigerate these?
Not necessarily, but refrigerating them for at least 2 hours helps them firm up significantly and makes them easier to handle and eat. If you’re in a warm climate or your kitchen is hot, they’ll definitely hold together better when cold.
Can I use maple syrup instead of honey?
Yes, and honestly maple syrup adds a really nice depth of flavor. The texture will be slightly softer since maple syrup has more moisture than honey, but they’ll still taste amazing. You might need to add an extra tablespoon of oats to compensate.
Can I double the recipe?
Absolutely. This recipe doubles easily, just mix everything in a larger bowl and roll into about 24 bites instead of 12. The mixing and rolling time might take a bit longer, but it’s worth it for having snacks for two weeks.
What if I don't want to use protein powder?
You don’t need it at all. The peanut butter and oats already provide plenty of protein. If you skip the powder, you might want to add the powdered sugar just for a little extra sweetness since the protein powder adds a subtle flavor that balances things out.
I really hope these energy bites become a staple in your kitchen like they have in ours. They’re the kind of recipe that feels almost too easy, which is exactly when you know you’ve found something good. When something takes 15 minutes and tastes this satisfying, you’ve basically won at snacking.
With love and peanut butter,
Lora x

No-Bake Peanut Butter Energy Bites
12
servings15
minutes140
kcalIngredients
240ml (1 cup) creamy peanut butter
120g (1 cup) old-fashioned rolled oats
60ml (1/4 cup) honey
60g (1/2 cup) powdered sugar, optional
Pinch of sea salt
30g (1/4 cup) chocolate chips or cacao nibs
30g (1 scoop) vanilla protein powder
Directions
In a large mixing bowl, combine oats, powdered sugar (if using), protein powder, and sea salt. Mix until evenly distributed.
Add peanut butter and honey to the bowl. Mix with a sturdy spoon or your hands until you have a thick, uniform dough similar to cookie dough.
If adding chocolate chips or cacao nibs, fold them in gently with a spoon.
Using a spoon or small cookie scoop, portion dough into roughly 30ml (1 tablespoon) sized pieces onto a parchment-lined plate. Roll each piece between your palms into a smooth ball.
Place rolled bites in an airtight container and refrigerate for at least 2 hours before serving. Store in the fridge for up to 5 days or freeze for up to 3 weeks.

