Last Tuesday afternoon, Noah was tugging at my leg asking for something sweet right before dinner, and I had nothing ready that I felt good about giving him. I remembered I had plain gelatin sitting in the pantry from a batch I made for myself, so I poured some into his little dinosaur cup, and he thought it was the coolest thing he had ever seen.
This bariatric gelatin recipe has honestly become one of my favorite things to keep stocked in the fridge. It is light, barely sweet, takes about five minutes of actual hands-on time, and comes in under 30 calories per serving. If you are looking for a no-fuss snack that supports your goals without feeling like a punishment, this gelatin recipe is the one. I also love pairing lighter snacks like this with my lemon balm for weight loss routine on days when I want to keep things really clean.
Why You'll Love This Recipe
- Proven Low-Calorie Win: Each cup clocks in at around 25 calories, which means you can snack without second-guessing yourself. Gelatin made with plain powder and unsweetened juice is one of the lightest options I have ever found that still feels like a real treat.
- Effortless Meal Prep: You can make a whole batch of these gelatin cups on Sunday and have ready-to-grab snacks for the entire week. No cooking, no complicated steps, just stir and chill.
- Beginner-Friendly: If you have ever made a boxed gelatin dessert, this is easier. Seriously. There are only four real ingredients, and the hardest part is waiting for it to set in the fridge.
- Kid-Approved Too: Noah and Lily both love these, especially the pink cranberry version. Lily calls them her wobbly cups, which I think is the best product name anyone has ever come up with.
- Flexible and Customizable: You can switch up the juice, add collagen peptides for a protein boost, or go completely plain with just lemon water. The base recipe works as a starting point for whatever your body needs that day.

Ingredients You'll Need
The beauty of this bariatric gelatin recipe is that the ingredient list is genuinely short. You probably have most of this in your kitchen already.
- 30g (2 tablespoons) unflavored gelatin powder — plain Knox or any brand works here. Do not use flavored or sweetened gelatin packets.
- 240ml (1 cup) cold water — this is the blooming liquid. Cold is key, not lukewarm.
- 180ml (3/4 cup) hot water — just-boiled water works perfectly to dissolve the bloomed gelatin completely.
- 60ml (1/4 cup) unsweetened cranberry juice or lemon water — cranberry gives you that pretty pink color. Lemon water keeps it totally neutral and crisp.
- 10ml (1 to 2 teaspoons) fresh lemon juice — optional but I always add it. Brightens everything up.
- Small pinch of salt — optional. It rounds out the flavor in a subtle way that is hard to explain but easy to taste.
- 10g (1 tablespoon) collagen peptides — optional, for a higher protein version. Stir it in with the hot water and it dissolves completely.
The gelatin powder is the hero ingredient here. Plain unflavored gelatin is what separates this bariatric gelatin recipe from boxed Jello, which is loaded with artificial dyes, sweeteners, and flavor additives. Plain gelatin gives you total control. I buy mine in the baking aisle, and a single canister lasts for weeks of batch prep.
For the juice, unsweetened cranberry is my first choice because it gives the cups a gorgeous pale pink color and a mild tartness without adding much sugar. Pomegranate juice is a lovely swap if you want something slightly sweeter. If you want to skip the juice entirely, just use all water with a squeeze of fresh lemon. The gelatin will still set perfectly.
Adding collagen peptides is completely optional, but on days when I am coming off a strength training session and want a little more protein from my snack, I stir a tablespoon right into the hot water. It dissolves without any clumping and you genuinely cannot taste it. This one swap turns a plain snack into something that supports muscle recovery too.
Note: The blooming step is not optional. Sprinkling the gelatin into cold water first and waiting five minutes allows the granules to absorb the liquid and swell up properly. If you skip this and just dump everything into hot water, you will end up with grainy, unset cups that never firm up the way they should. I learned this the hard way on my very first batch.
How to Make Bariatric Gelatin Recipe: Easy Low-Calorie Cups That Actually Work
I tested this bariatric gelatin recipe five times before I landed on the ratios I love, and I promise the process is simpler than it looks on paper. Give yourself about five minutes of active time, then let the fridge do the rest.
Step 1: Bloom the Gelatin in Cold Water.
Pour 240ml (1 cup) of cold water into a medium bowl or a large measuring cup. Sprinkle the 30g (2 tablespoons) of unflavored gelatin powder evenly over the surface of the water. Do not stir yet. Let it sit for exactly five minutes. You will see it puff up and turn slightly opaque, almost like wet sand getting firm. That is exactly what you want.
Lora’s Tip: Use a wide, shallow bowl for blooming rather than a tall narrow one. The gelatin covers more surface area and blooms more evenly, which means it dissolves faster in the next step.
Step 2: Add the Hot Water and Dissolve Completely.
Pour 180ml (3/4 cup) of just-boiled water directly into the bloomed gelatin mixture. Stir slowly and steadily for about two minutes. The mixture should become completely clear with no lumps, granules, or streaks visible. On my second test batch, I rushed this step and stirred for only about 30 seconds. Half the cups never set properly and had a grainy texture at the bottom. Patience here makes all the difference.
Step 3: Add the Juice and Flavor.
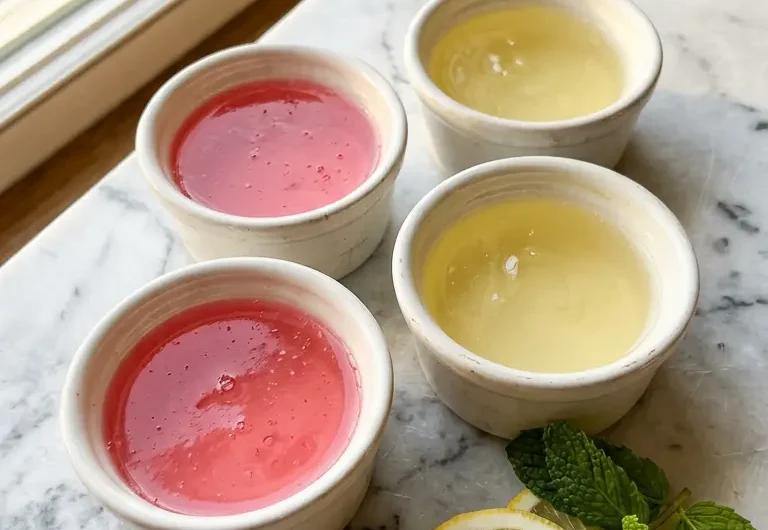
Stir in the 60ml (1/4 cup) of unsweetened cranberry juice or lemon water. Add a squeeze of fresh lemon juice if you like and a small pinch of salt. The mixture will turn a soft blush pink if you are using cranberry, or stay pale yellow if you went with lemon water. Give it one final stir to make sure everything is evenly combined.
Lora’s Tip: If you are adding collagen peptides, this is the moment to stir them in. The liquid is still warm enough to dissolve them fully without needing any extra effort.
Step 4: Pour into Molds or Cups.
Carefully pour the liquid gelatin mixture into four small ramekins, silicone molds, or even a standard muffin tin lined with paper cups. I use silicone molds because they make removing the set gelatin cups so easy. Fill each one about three-quarters of the way up to leave a little room. The cups will be slightly wobbly when you pick them up, and that is completely normal.
Step 5: Chill Until Fully Set.
Transfer the filled cups to the refrigerator and leave them undisturbed for two to three hours. You can also make these the night before and let them chill overnight. Once set, the gelatin should feel firm to the touch and pull away slightly from the edges of the mold. Serve them straight from the fridge while they are cold and slightly jiggly.
Lora’s Tip: Do not try to speed up the setting by putting them in the freezer. Frozen gelatin turns grainy and weeps water when it thaws. The fridge is the only way to get that smooth, silky texture.

Lora's Kitchen Tips
- Foolproof Ratio Rule: The ratio that works every time for a firm but not rubbery cup is 2 tablespoons of gelatin to 2 full cups of liquid total. If you change the juice amount, adjust the cold or hot water to keep the total liquid at 480ml (2 cups).
- Perfect Make-Ahead Method: These bariatric gelatin cups are genuinely better after 8 hours in the fridge than after 2. Make a batch Sunday night and you have snacks for Monday through Wednesday without lifting a finger.
- Simple Demolding Trick: If you want to turn the cups out onto a plate, run the outside of the silicone mold under warm water for about 10 seconds, then press gently from underneath. They pop out cleanly every time.
- Quick Flavor Boost: A tiny splash of vanilla extract or a drop of almond extract stirred in with the juice takes the flavor from plain to something that actually tastes like a real dessert without adding any meaningful calories.
- Tested Protein Addition: One tablespoon of collagen peptides adds roughly 10 grams of protein per batch, which works out to about 2.5 grams per cup. Not massive, but it makes a real difference when you are stacking small protein sources throughout the day.
Variations and Substitutions
This bariatric gelatin recipe is one of the most flexible recipes I make, and I have probably made a dozen different versions since I first figured out the base formula.
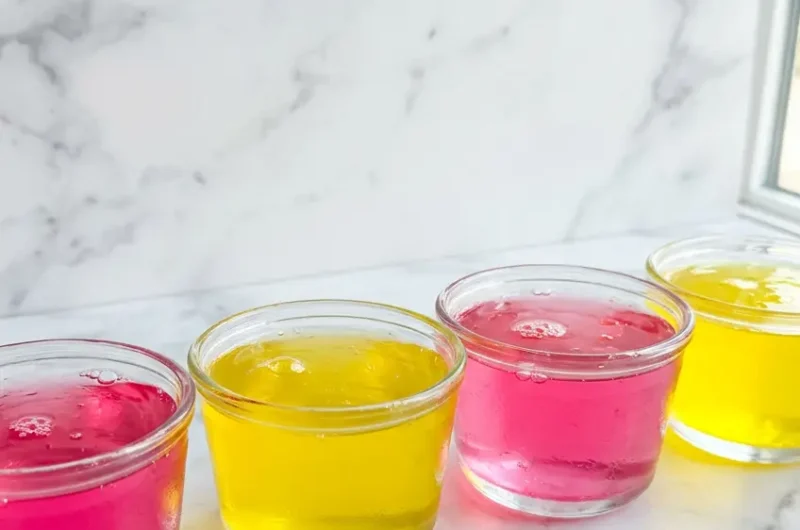
Pink Gelatin Version: Use unsweetened cranberry or pomegranate juice for that pretty blush color. The result is what a lot of people are searching for when they look up a pink gelatin weight loss recipe. It looks beautiful, it tastes light and tart, and it feels like a treat even though it is barely over 20 calories per cup.
Lemon Version: Skip the cranberry and use all lemon water with an extra squeeze of fresh lemon and a very small pinch of zest. The cups come out pale yellow and taste clean and bright. This is the version I make most often because it pairs well with almost anything.
Collagen Protein Version: Stir one tablespoon of collagen peptides into the hot water before adding the juice. This makes a higher protein gelatin that is ideal as a post-workout snack. I wrote more about how I pair light, protein-forward snacks with movement in my easy clean high protein meal guide if you want to explore that side of things further.
Kid-Friendly Version: Pour the mixture into fun silicone molds shaped like stars or dinosaurs. Lily asked me once if these were made of magic juice, and I said yes because technically I was not lying. You can also layer two colors in the same mold by letting the first layer firm up for 45 minutes before adding the second.
Completely Unflavored Version: Use only plain water with no juice and no lemon. Add a drop of vanilla extract instead. These come out crystal clear and have the most neutral, clean flavor of any version.
What to Serve with Bariatric Gelatin Recipe: Easy Low-Calorie Cups That Actually Work

I usually serve these bariatric gelatin cups straight from the fridge as an afternoon snack, often right around that 3pm stretch when both kids are getting restless and I am starting to crave something sweet. They are cold, slightly firm, and refreshing in a way that feels genuinely satisfying without sitting heavy.
If you want to make them feel a little more special, serve a cup alongside a light drink. My tart cherry magnesium mocktail is one of my favorite pairings because the flavors complement each other beautifully and it makes the whole snack feel like something you would get at a nice spa. For a post-workout setup, pair the collagen version of these cups with a small portion of my blender protein sorbet for a cold, refreshing dessert plate that still supports your nutrition goals.
These also work really well as a light dessert after a heavier dinner. On nights when Jake makes something rich and filling, I put out a few of these alongside dinner instead of a full dessert and everyone is happy. Noah always grabs the pink ones first, without exception.
Storage, Freezing, and Reheating
- Fridge Storage: Store the set gelatin cups covered in the refrigerator for up to four days. A loose piece of plastic wrap or an airtight lid works well to keep them from absorbing any fridge odors.
- Freezing: I do not recommend freezing these. Gelatin does not freeze well and will become grainy and watery once thawed. Make only what you will eat within the week.
- Batch Prep Tip: You can make the liquid mixture and store it in the fridge before pouring it into molds, but only for about 30 minutes before it starts to set in the container. It is easier to pour first, then chill.
- Serving from Cold: These are best served straight from the fridge. Leaving them at room temperature for more than 30 minutes will cause them to soften significantly and eventually lose their shape.
- Weekly Meal Prep: Make a double batch on Sunday using two different juice flavors so you have variety all week. Store them in separate covered containers and you have a grab-and-go snack ready every day.
Frequently Asked Questions
Here are the questions I get asked most about this bariatric gelatin recipe:
Can I use flavored gelatin packets instead of plain gelatin powder?
You can, but flavored gelatin packets contain added sugar or artificial sweeteners that change the nutrition profile significantly. The whole point of a bariatric gelatin recipe is keeping calories and additives low, so plain unflavored powder gives you the most control. If you want flavor, add a small amount of unsweetened juice instead.
Why did my gelatin cups not set properly?
The most common reason gelatin cups fail to set is skipping or rushing the blooming step. If you pour gelatin directly into hot water without blooming it in cold water first, it will not dissolve evenly and the cups will stay liquid or set unevenly. Always bloom in cold water for five full minutes before adding hot water.
Can I add fruit to these gelatin cups?
Yes, but only use canned or cooked fruit, not fresh pineapple, kiwi, papaya, or mango. Those fruits contain enzymes that break down gelatin and prevent it from setting. Berries, sliced peaches from a can, or mandarin orange segments all work beautifully and add almost no extra calories.
Can I make these gelatin cups the night before?
Yes, and I actually prefer making them the night before because they have more time to set fully and the texture is firmer and smoother. Pour them into their molds before bed and they will be perfectly set by morning. They keep well for up to four days in the fridge, so a Sunday batch carries you well into the week.
How many gelatin cups does this recipe make and can I double it?
This recipe makes four small cups, which is a perfect batch for a few days of snacking. You can absolutely double it by doubling every ingredient including the water. Use a larger bowl for blooming and make sure you have enough molds or ramekins ready before you start, since the liquid sets faster than you might expect once it is poured.
This bariatric gelatin recipe has become a staple in my fridge, and I genuinely look forward to it in a way I never expected from something this simple. It keeps my sweet cravings in check, it is something the kids will actually eat, and it takes almost no effort to make. Give it a try this week and let me know which variation you love most. I have a feeling the pink cranberry version is going to be your go-to.
With love and way too many wobbly cups,
Lora x
Bariatric Gelatin Recipe: Easy Low-Calorie Cups That Actually Work
4
servings5
minutes5
minutes25
kcalIngredients
30g (2 tablespoons) unflavored gelatin powder
240ml (1 cup) cold water
180ml (3/4 cup) hot water
60ml (1/4 cup) unsweetened cranberry juice or lemon water
10ml (1 to 2 teaspoons) fresh lemon juice, optional
Small pinch of salt, optional
10g (1 tablespoon) collagen peptides
Directions
Sprinkle the gelatin powder over the cold water in a medium bowl and let it bloom for 5 minutes without stirring.
Pour the hot water into the bloomed gelatin and stir for 2 minutes until completely clear and dissolved.
Stir in the cranberry juice or lemon water, fresh lemon juice, and salt. Add collagen peptides here if using.
Pour the mixture evenly into four small ramekins or silicone molds.
Refrigerate for 2 to 3 hours until fully set, then serve cold.


