
Every year when those pastel bags of Cadbury Mini Eggs show up at the grocery store, Lily grabs my hand and starts doing a little happy dance in the aisle. I am not even exaggerating. She has done it since she was three years old and I hope she never stops. That is my cue to buy three bags, because one is definitely going straight into my mouth before we even get home.
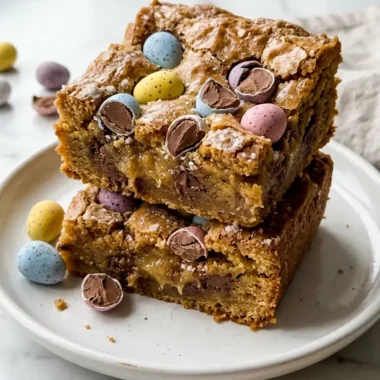
These Cadbury Mini Egg Cookies are the reason I started hoarding those bags every spring. They are soft and chewy in the center with slightly crisp edges, studded with chocolate chips and loaded with those crunchy, crackly mini eggs. The candy shells shatter into little bursts of sweetness against the buttery dough and every single bite is completely over the top in the best possible way. Jake ate four in one sitting and did not even apologize.
Why You'll Love This Recipe
- Perfect Easter treat: These cookies scream spring and Easter in the most delicious way. The pastel mini eggs make them look almost too pretty to eat. Almost.
- Soft and chewy texture: The dough is built for that bakery-style chew. Brown sugar and a little extra yolk keep the center tender while the edges get just the right amount of crisp.
- Double chocolate: Chocolate chips AND mini eggs means you are getting rich chocolate flavor in every single bite. No dry, boring cookies here.
- Simple pantry ingredients: Everything else here is standard stuff you probably already have. The mini eggs do all the heavy lifting flavor-wise.
- Kid-approved and crowd-pleasing: Lily and Noah fight over the last one every time. I have brought these to Easter parties and school events and the plate is always empty first.

Ingredients You'll Need
The ingredient list for these cookies is blessedly simple. There is nothing fancy here except for those gorgeous Cadbury Mini Eggs, and that is exactly the point. Let the star ingredient shine while everything else supports it.
- 280g (2 1/4 cups) all-purpose flour, spooned and leveled so you do not accidentally pack in too much and end up with dry cookies.
- 1 teaspoon baking soda, for lift and those perfectly crinkled tops.
- 1/2 teaspoon salt, which balances the sweetness and makes the chocolate taste more like chocolate.
- 226g (1 cup or 2 sticks) unsalted butter, softened, the foundation of every great cookie. Room temperature matters here, not melted.
- 150g (3/4 cup) granulated sugar, for structure and slight crisp on the edges.
- 165g (3/4 cup packed) light brown sugar, this is what gives you that chewy, caramel-y depth.
- 2 large eggs, at room temperature for the best emulsification.
- 2 teaspoons pure vanilla extract, do not skip this. It rounds out all the other flavors.
- 170g (1 cup) semi-sweet chocolate chips, for melty pockets of chocolate throughout the dough.
- 200g (about 1 1/2 cups) Cadbury Mini Eggs, roughly chopped, the hero of this whole recipe. Reserve some whole ones for pressing on top before baking.
Chop the mini eggs carefully. I put them in a zip-lock bag and give them a few firm whacks with a rolling pin. Some will break into halves and some into smaller shards and that mix of sizes is exactly what you want for different textures in every bite. Keep about a handful whole to press onto the tops of the dough balls so they look beautiful coming out of the oven.
If you love cookie recipes that lean into rich chocolate flavor, my Chocolate Brownie Cookies use a similar base technique and are another family favorite in our house. And for a totally different but equally irresistible baked treat, the S’mores Cookie Bars are a total crowd-pleaser that Lily requests constantly.
Note: Do not overbake these cookies. Pull them from the oven when the edges are set but the centers still look slightly underdone and glossy. They will continue cooking on the hot pan for another 2 to 3 minutes after you take them out and that is how you get that perfect soft, chewy center.
How to Make Cadbury Mini Egg Cookies
These cookies come together in about 30 minutes from start to finish. The most important thing is not rushing the butter temperature and not overbaking. Get those two things right and you will have bakery-level cookies every single time.
Step 1: Preheat the oven and prep your pans.
Preheat your oven to 190C (375F). Line two large baking sheets with parchment paper. I like to have both pans ready so I can rotate them in the oven and keep a steady batch rhythm going.
Lora’s Tip: Parchment paper is non-negotiable for me. It prevents the bottoms from getting too dark and makes cleanup so much easier. Silicone baking mats work great too.
Step 2: Whisk the dry ingredients.
In a medium bowl, whisk together the flour, baking soda and salt. Set this aside. Whisking rather than stirring makes sure the baking soda is evenly distributed so you get consistent rise across every single cookie.
Step 3: Cream the butter and sugars.
In a large bowl, beat the softened butter with both sugars using a hand mixer or stand mixer on medium speed for about 3 to 4 minutes. You want the mixture to be pale, fluffy and noticeably increased in volume. This step traps air in the dough and is what gives you those slightly puffed, tender cookies. Do not rush it.
Lora’s Tip: If your butter is too cold, your cookies will spread too little. If it is melted, they will spread too much and be greasy. Softened means it holds an indent when you press your finger in but does not smoosh completely flat.
Step 4: Add the eggs and vanilla.
Add the eggs one at a time, beating well after each addition. Then mix in the vanilla extract. The mixture might look slightly curdled at this point and that is perfectly fine. It will come together once the flour goes in.
Step 5: Combine wet and dry ingredients.
Reduce the mixer speed to low and slowly add the dry flour mixture. Mix just until no dry streaks remain. Overmixing at this stage develops gluten and makes cookies tough, so stop the moment it comes together.
Step 6: Fold in the chocolate chips and chopped mini eggs.
Using a spatula or wooden spoon, gently fold in the chocolate chips and most of the chopped mini eggs. Reserve a small handful of both for pressing onto the tops. The candy pieces will add cheerful little flecks of color through the dough. If you enjoy cookie dough-style desserts, my Slutty Brownies with Cookie Dough use a similar fold-in technique and are completely over the top in the best way.
Lora’s Tip: Fold gently. The less you work the dough at this stage the more tender your cookies will be.
Step 7: Scoop and press.
Use a cookie scoop or two tablespoons to portion the dough into balls about 45g (3 tablespoons) each. Place them about 5cm (2 inches) apart on the prepared baking sheets. Press a few reserved mini egg pieces and chocolate chips onto the top of each ball so they bake up looking gorgeous.
Step 8: Bake and cool.
Bake for 10 to 12 minutes until the edges are set and lightly golden but the centers still look soft and slightly underdone. Let the cookies cool on the baking sheet for 5 minutes before transferring to a wire rack. They firm up as they cool and that is where the magic happens.

Lora's Kitchen Tips
- Room temperature ingredients matter. Cold eggs and cold butter do not cream properly together. I set mine out about 45 minutes before I start baking and it makes a real difference in the final texture of the cookie.
- Measure your flour correctly. Scoop the flour into your measuring cup with a spoon rather than scooping the cup directly into the bag. Packing flour can add up to 30 percent more than you need and dry cookies are the sad result.
- Chill the dough if your kitchen is warm. In our Austin summers, the butter in my dough gets soft really fast. If the dough feels too soft or sticky to scoop, pop it in the fridge for 20 to 30 minutes. Chilled dough spreads less and bakes up thicker.
- Do not bake all your cookies at once. I always bake one test cookie first to check the spread and timing of my specific oven. Every oven runs slightly different and that one test cookie saves the whole batch.
- Bang the pan on the counter. Right when the pan comes out of the oven, give it one firm drop onto the counter from a few centimeters up. This deflates the cookies slightly and creates those gorgeous rippled edges you see on bakery cookies.
Variations and Substitutions
Once you have the base dough down, this recipe is really easy to play with. Here are a few directions I have taken it that all turned out wonderfully.
White Chocolate Mini Egg Cookies: Swap the semi-sweet chocolate chips for white chocolate chips. The sweetness level goes up and the contrast with the mini egg crunch is incredible. Lily’s personal request every year.
Brown Butter Version: Brown the butter before using it. Let it cool back to room temperature until it solidifies slightly, then cream as usual. It adds a deep, nutty, toffee-like flavor that pairs beautifully with the chocolate.
Extra Thick and Bakery Style: After scooping, refrigerate the dough balls for at least one hour or overnight. Bake straight from the fridge and they will be noticeably thicker and chewier. This is my go-to method when I want them to look really impressive.
Mini Egg Chocolate Chip Blondies: Press the entire batch of dough into a greased 23x33cm (9×13 inch) baking pan and bake at 175C (350F) for 22 to 25 minutes. Cut into bars. Same flavors, totally different format and a great option when you need to feed a crowd fast.
Dark Chocolate Version: Use dark chocolate chips and add one tablespoon of Dutch-process cocoa to the dry ingredients. It gives the cookies a richer, more sophisticated flavor while the colorful mini eggs keep them festive.
What to Serve with Cadbury Mini Egg Cookies

These cookies are perfect on their own, straight off the cooling rack while they are still slightly warm and the chocolate is soft. But if you are putting together an Easter dessert spread or a party platter, here are my favorite ways to serve them.
Stack them on a tiered cake stand with some extra whole mini eggs scattered around the base for a really pretty presentation. A glass of cold milk is the classic pairing and there is a reason classics are classic.
If you are making an Easter dessert table, pair these cookies alongside my Cheesecake Brownies for a gorgeous spread that covers all the bases. The creamy tang of the cheesecake brownies is a wonderful contrast to the sweet crunch of these cookies.
For a fun Easter brunch dessert situation, serve the cookies slightly warm with a small scoop of vanilla bean ice cream on the side. Noah thinks this is the greatest thing that has ever happened to him and I cannot say he is wrong.
Storage, Freezing, and Reheating
- Room temperature storage: Store completely cooled cookies in an airtight container at room temperature for up to 5 days. Layer them with parchment paper to prevent sticking.
- Freezing baked cookies: These cookies freeze beautifully. Once fully cooled, place them in a single layer on a baking sheet to freeze solid, then transfer to a zip-lock bag or airtight container. They keep well for up to 3 months.
- Freezing unbaked dough: Scoop the dough into balls and freeze on a lined baking sheet. Once frozen solid, transfer to a freezer bag. Bake straight from frozen at 190C (375F) for an extra 2 to 3 minutes beyond the normal bake time.
- Thawing: Frozen baked cookies can be thawed at room temperature for about 30 minutes. You can also warm them in a 150C (300F) oven for 5 minutes to bring them back to that fresh-baked softness.
- Make-ahead tip: Make the dough up to 3 days in advance and keep it covered in the fridge. The flavor actually deepens and improves with time. Scoop and bake whenever you are ready, adding 1 to 2 minutes to the bake time since the dough will be cold.
Frequently Asked Questions
Here are the questions I get asked most about this recipe:
Can I use milk chocolate chips instead of semi-sweet?
You absolutely can. Milk chocolate chips will make the overall cookie sweeter since mini eggs are already quite sweet. I personally love the slight bitterness of semi-sweet chips as a contrast to the candy shells, but if you or your kids prefer a sweeter cookie, milk chocolate is a great choice.
My cookies are spreading too much. What am I doing wrong?
The most likely culprit is butter that is too soft or melted. The butter should be softened to room temperature but still hold its shape. Another common cause is not chilling the dough, especially in a warm kitchen. Pop the portioned dough balls in the fridge for 30 minutes before baking and you should see much better results. Also make sure your baking soda is fresh and active.
Can I make these cookies without a mixer?
Yes, though your arm will get a good workout. Softened butter can be beaten by hand with a wooden spoon if you work at it for a few extra minutes. The key is getting the butter and sugar mixture really pale and fluffy before adding the eggs. A hand mixer makes this much easier but it is not strictly necessary.
Where can I buy Cadbury Mini Eggs outside of Easter season?
This is genuinely the hardest part of this recipe. Mini Eggs have a very seasonal window, usually from late January through Easter weekend. I buy as many bags as I reasonably can and store them in a cool dark place. Some online retailers also sell them year-round at a premium. Alternatively, M&Ms or other candy-coated chocolate eggs can be used as a substitute, though the flavor and shell texture will be slightly different.
Can I double this recipe?
Absolutely and I recommend it. This recipe doubles beautifully with no adjustments needed. Just make sure your mixer bowl is large enough to handle the extra volume. I almost always make a double batch and freeze half the dough balls so we have fresh-baked cookies ready to go throughout the season.
These Cadbury Mini Egg Cookies have become one of our most looked-forward-to traditions every spring. The moment those bags hit the stores, Lily already knows what we are making. There is something so wonderful about a recipe that signals a whole season, a feeling, a memory in the making. I really hope these cookies bring that same joy to your kitchen.
Whether you make them for Easter Sunday, a school party, a neighbour, or just yourself on a Tuesday afternoon with a cup of tea, they are worth every single minute. And I hope you save yourself at least three cookies before you share the plate.
With love and lots of mini eggs,
Lora x

Cadbury Mini Egg Cookies
24
servings15
minutes12
minutes210
kcalIngredients
280g (2 1/4 cups) all-purpose flour, spooned and leveled
1 teaspoon baking soda
1/2 teaspoon salt
226g (1 cup, 2 sticks) unsalted butter, softened to room temperature
150g (3/4 cup) granulated sugar
165g (3/4 cup packed) light brown sugar
2 large eggs, room temperature
2 teaspoons pure vanilla extract
170g (1 cup) semi-sweet chocolate chips
200g (about 1 1/2 cups) Cadbury Mini Eggs, roughly chopped, with a small handful reserved whole for topping
Directions
Preheat oven to 190C (375F). Line two large baking sheets with parchment paper and set aside.
In a medium bowl, whisk together the flour, baking soda and salt. Set aside.
In a large bowl, beat the softened butter with both sugars on medium speed for 3 to 4 minutes until pale and fluffy. Add the eggs one at a time, beating well after each. Mix in the vanilla extract.
Reduce mixer to low and add the flour mixture, mixing just until no dry streaks remain. Fold in the chocolate chips and most of the chopped mini eggs with a spatula.
Scoop dough into balls of about 45g (3 tablespoons) each and place 5cm (2 inches) apart on prepared baking sheets. Press reserved mini egg pieces and chocolate chips on top of each ball. Bake for 10 to 12 minutes until edges are set but centers still look slightly soft. Cool on the pan for 5 minutes then transfer to a wire rack.


