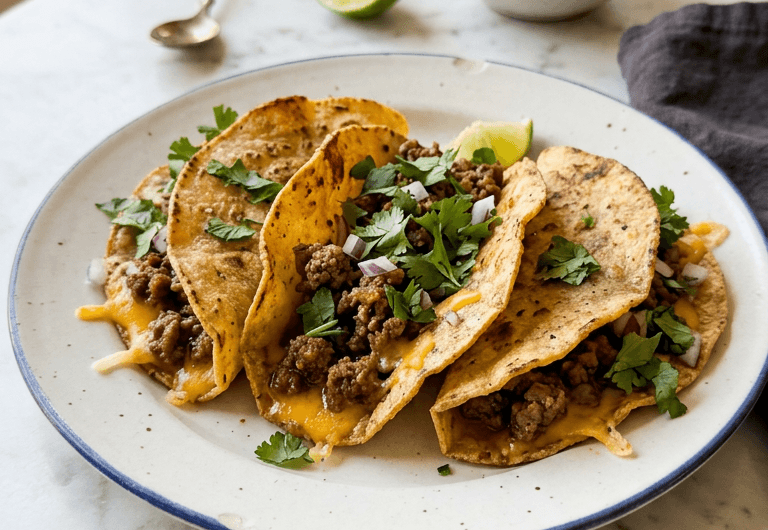
I discovered these crispy ground beef tacos completely by accident when I was trying to use up some flour tortillas before they went stale. Jake was skeptical at first, but after one bite, he was hooked. Now Lily and Noah request them at least twice a month, and I’ve perfected the technique to get that perfect golden, shattered crunch every single time.
What makes these tacos so special isn’t just the crispiness, though that’s definitely the star of the show. It’s the combination of seasoned, tender ground beef layered with melted mozzarella cheese, all wrapped in a tortilla that fries up to absolute perfection. This is comfort food that happens to come together in about 45 minutes from start to finish.
Why You'll Love This Recipe
- Impossibly crispy: These tacos have a shattered, golden exterior that's almost like a crispy shell, but better because you can actually tear into it without your filling falling out everywhere.
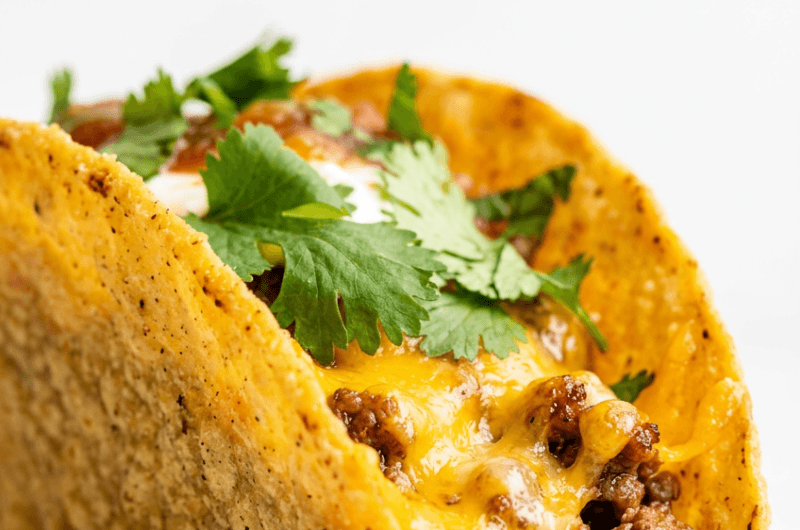
- Melty, cheesy filling: The mozzarella gets all bubbly and gooey, and somehow it stays contained inside the tortilla as it crisps up in the pan.
- Seasoned ground beef perfection: The beef gets browned beautifully with taco seasoning and tomato paste, creating a deeply savory filling that tastes like it took hours.
- Quick weeknight meal: This entire recipe takes less than an hour, and most of that is just cooking. Perfect for nights when you need something substantial but don't have all day.
- Customizable and fun: Everyone in my family makes their own taco just how they like it, and there's something really satisfying about assembling and cooking them.

Ingredients You'll Need
I use simple, quality ingredients that you probably have in your kitchen right now. The key is not skimping on the cheese, because that’s what creates the magic when the tortillas hit the hot oil.
- 1 lb (450g) ground beef, I use 90/10 for a good balance of flavor and fat content without being greasy.
- 1/2 medium onion, finely chopped, this softens down and flavors the beef beautifully as it cooks.
- 2 tablespoons taco seasoning, you can use store-bought or make your own blend at home.
- 2 tablespoons tomato paste, this deepens the savory flavor and creates a slightly thicker filling.
- 1/4 cup (60ml) water or beef broth, as needed to adjust the consistency of your filling.
- Salt to taste, always important to season as you go.
- 8 flour tortillas, 6-inch (15cm) size, these are the perfect size for hand-held tacos that fry beautifully.
- 2 to 3 cups (500-750ml) mozzarella cheese, shredded, don’t use pre-shredded if you can help it, as it contains anti-caking agents.
- Avocado or vegetable oil for frying, I prefer avocado oil for its higher smoke point and clean taste.
- Fresh cilantro for garnish, finely chopped, optional but it adds a fresh brightness that makes these really sing.
Ground beef choice matters. I specifically use 90/10 ground beef because it browns beautifully without releasing too much grease into the pan. If you use leaner beef, the filling might be a bit dry. Too much fat, and you’ll have grease pooling in your skillet.
Cheese is non-negotiable. The mozzarella is what creates those crispy, bubbly edges when the tortilla hits the hot oil. I’ve tried other cheeses, and nothing quite works the same way. Make sure you’re using a good quality mozzarella, not the pre-shredded kind if possible.
Prep your ingredients ahead. Since these come together quickly once you start, having your onion chopped, cheese shredded, and tortillas ready makes the cooking process so much smoother. I like to set up everything the night before, which is similar to how I prepare for my Loaded Potato Taco Bowl, another favorite in our house.
Note: The key to crispy tacos is not being afraid of the oil. Use enough oil so that the tortillas can actually sizzle and crisp up. If you use too little oil, you'll just get soft tacos that aren't quite right. The oil temperature also matters, so make sure your skillet is hot before you start cooking them.
How to Make Crispy Ground Beef Tacos
The process is straightforward once you understand each component. First, we’re making the filling, then assembling the tacos, and finally cooking them until they’re golden and crispy. Let me walk you through exactly how I do it.
Step 1: Cook the onions and beef filling.
Heat about 1 tablespoon (15ml) of oil in a large skillet over medium heat. Once it’s shimmering, add your finely chopped onion and cook until it’s softened and starting to become translucent, about 2 to 3 minutes. You should be able to smell the sweet, cooked onion aroma at this point. Then add your ground beef to the pan and use a large spoon to break it up as it cooks. I really press it against the bottom of the pan to help it brown evenly. This should take about 4 to 5 minutes until most of the beef has lost its pink color.
Lora’s Tip: Don’t just stir the beef constantly. Let it sit in the hot pan for a minute so the bottom can get a nice brown color. That’s where all the flavor develops.
Step 2: Add seasoning and create the filling.
Once your beef is mostly browned, mix in the tomato paste first, stirring it through the meat for about a minute. Then add your taco seasoning and stir to combine. The mixture should smell amazing at this point, really savory and spiced. Add your 1/4 cup (60ml) of water or beef broth if the filling looks dry. You want it to be moist but not soupy. Continue cooking until the beef is fully cooked through and most of the cooking liquid has evaporated, about 3 to 4 minutes. Taste and season with salt if needed. Then remove from heat and let it cool slightly so it’s easier to work with.
Lora’s Tip: I actually let my filling cool for about 10 minutes before assembling. It’s much easier to handle when it’s not piping hot, and the cheese will stay in place better.
Step 3: Assemble your tacos.
On a clean work surface, place down one tortilla. On the top half of the tortilla, add about 1.5 to 2 tablespoons (25-30ml) of shredded mozzarella cheese. Spoon a portion of the beef filling over that cheese, and then top with another 1.5 to 2 tablespoons (25-30ml) of cheese. The cheese on both sides is what creates those gorgeous crispy, golden edges. Fold the bottom half of the tortilla over the filling and gently press down to seal it. Transfer your assembled taco to a large baking sheet and repeat with the remaining beef filling, cheese, and tortillas until you have 8 tacos total.
Lora’s Tip: Don’t overstuff these. I learned this the hard way when I piled in too much filling and it squeezed out all over the oil when I was frying. A moderate amount is actually the key to success here.
Step 4: Heat your oil and fry the tacos.
Heat about 3 to 4 tablespoons (45-60ml) of oil in a large skillet over medium heat. You want the oil to be hot so it sizzles immediately when the taco hits the pan, but not so hot that it’s smoking. Test it with a tiny piece of tortilla first. Once the oil is ready, carefully place one taco into the pan and fry for about 1 minute per side, or until golden brown and crispy. The tortilla should sound crispy when you move it around the pan. Work in batches so you’re not overcrowding the pan.
Lora’s Tip: Transfer your fried tacos to a wire cooling rack placed over a baking sheet. This keeps them from getting soggy on the bottom as they cool. If you place them directly on a plate, they’ll steam themselves and lose that crispiness you worked so hard to achieve.
Step 5: Serve and enjoy.
Once all your tacos are cooked and crispy, garnish them with fresh cilantro if you like. Serve immediately while they’re still hot and crispy with your favorite sauce. I love serving these with a simple cilantro lime crema, hot salsa, or even just avocado slices. They’re also amazing with a side like my Creamy White Chicken Chili for a complete meal. The warm, crispy tacos paired with something cool and creamy is just perfection.

Lora's Kitchen Tips
- Use a meat thermometer for precision. Ground beef is fully cooked at 160°F (71°C). If you're unsure whether your beef is done, a meat thermometer takes the guesswork out of it completely.
- Don't skip the cooling rack. This is what keeps your tacos crispy and prevents them from becoming soft and steamed. It's a simple step that makes a huge difference in the final texture.
- Shred your own cheese. Pre-shredded cheese contains anti-caking agents that prevent it from melting as smoothly. Fresh-shredded mozzarella will give you those beautiful bubbly, crispy edges.
- Oil temperature is everything. Too cool and your tacos will absorb too much oil and become greasy. Too hot and the outside will burn before the inside heats through. Medium heat is your sweet spot.
- Make the filling ahead. You can brown your beef and make the filling up to 2 days in advance. Just store it in an airtight container in the refrigerator and reheat gently before assembling your tacos.
Variations and Substitutions
Once you master the basic version, there are so many fun ways to play with this recipe. I love experimenting with different fillings and seasonings to keep things interesting.
Seasoned ground chicken version: Substitute ground chicken for the beef and use the same seasoning. The chicken cooks a bit faster, so reduce the cooking time to about 3 minutes. It’s a lighter option that’s still really delicious.
Spicy chorizo tacos: Replace half the ground beef with chorizo. Remove the chorizo from its casing and cook it the same way as the beef. The extra spice is amazing, especially if you serve these with a cooling crema.
Cheese-forward tacos: Add a layer of pepper jack or sharp cheddar in addition to the mozzarella for extra flavor and spice. The combination of cheeses creates really interesting crispy edges.
Corn tortilla version: You can absolutely make these with corn tortillas instead of flour. They’ll fry up a bit differently, but they still get wonderfully crispy. They work better with a thicker filling, so reduce your liquid slightly.
What to Serve with Crispy Ground Beef Tacos

These tacos are delicious on their own, but they’re even better when you pair them with complementary sides and sauces.
I love serving these with a fresh cilantro lime crema made from sour cream, lime juice, and fresh cilantro. It adds a bright, tangy contrast to the rich, crispy tacos. A simple pico de gallo with tomatoes, onion, cilantro, and lime is also perfect. For something warm and hearty, serve alongside my High-Protein Cheeseburger Bowls, which has a similar comfort food vibe.
On hot days, I serve these with fresh avocado slices, shredded lettuce, and a squeeze of lime. My family also loves them with refried beans on the side, sour cream, and hot salsa. You could even crumble a taco and put it on top of rice for a taco bowl situation. The possibilities are really endless, and that’s part of what makes this such a fun recipe to make.
Storage, Freezing, and Reheating
- Storage: Store leftover cooked tacos in an airtight container in the refrigerator for up to 3 days. They're actually great the next day served cold or reheated.
- Freezing: You can freeze the uncooked assembled tacos on a baking sheet for up to 2 months. Once frozen solid, transfer them to a freezer bag and freeze until ready to cook.
- Thawing: If you've frozen uncooked tacos, you can fry them directly from frozen. They'll just take a bit longer to cook, about 2 minutes per side instead of 1 minute.
- Reheating: Reheat leftover cooked tacos in a skillet over medium heat for about 1 to 2 minutes per side to restore some of their crispiness. You can also reheat them in a 350°F (175°C) oven for about 5 minutes.
- Make-ahead tip: Make your beef filling the day before and store it in the refrigerator. You can assemble and fry the tacos fresh the day you want to eat them for the best texture and crispiness.
Frequently Asked Questions
Here are the questions I get asked most about this recipe:
Can I make these tacos ahead of time?
Yes! I actually recommend making the beef filling a day ahead. You can assemble the tacos up to 4 hours before frying them and keep them covered on a baking sheet in the refrigerator. Just fry them fresh when you’re ready to eat. Alternatively, you can freeze uncooked assembled tacos and fry them directly from frozen, which takes about 2 minutes per side.
What's the best oil to use for frying?
I use avocado oil because it has a high smoke point around 520°F (270°C) and a clean taste that doesn’t overpower the tacos. Vegetable oil works well too at 400°F (200°C). Avoid olive oil, which has a lower smoke point and will burn at these temperatures. The oil should be hot enough to sizzle immediately when the taco touches it.
Can I make these in an air fryer instead?
You can, though the result will be slightly different. Preheat your air fryer to 400°F (200°C) and spray your assembled tacos lightly with cooking spray. Air fry for about 8 to 10 minutes, shaking the basket halfway through. They won’t get quite as crispy as the pan-fried version, but they’re still really good and use less oil.
Why did my cheese melt out into the oil?
This usually happens when you overstuff the taco or use too much cheese. Make sure you’re using just 1.5 to 2 tablespoons of cheese on each side of the tortilla, not more. Also, make sure your cheese is evenly distributed and the tortilla is folded tightly. The oil temperature also matters, so if it’s too hot, the cheese melts faster than the tortilla can crisp up.
Can I use a different type of cheese?
You can, but mozzarella is really the best choice here because it melts smoothly and creates those beautiful bubbly, crispy edges. If you want to experiment, try mixing mozzarella with a small amount of sharp cheddar or pepper jack for extra flavor. Just make sure whatever cheese you use melts smoothly and doesn’t separate when heated.
These crispy ground beef tacos have become such a staple in our house, and I really hope they become a favorite in yours too. There’s something so satisfying about that first bite when you hear the crunch and all that melted cheese comes out. Jake says they’re restaurant-quality, and honestly, I think they’re even better because they’re made with love in our own kitchen.
I’d love to know if you make them and how you customize them for your family. This is the kind of recipe that gets better every time you make it because you figure out your own rhythm and preferences. Make it your own, and enjoy every crispy, cheesy bite.
With love and cheese,
Lora x
Crispy Ground Beef Tacos
4
servings15
minutes30
minutes450
kcalIngredients
1 lb (450g) ground beef
1/2 medium onion, finely chopped
2 tablespoons taco seasoning
2 tablespoons tomato paste
1/4 cup (60ml) water or beef broth, as needed
Salt to taste
1 tablespoon (15ml) oil for cooking the filling
8 flour tortillas, 6-inch (15cm) size
2 to 3 cups (500-750ml) shredded mozzarella cheese
3 to 4 tablespoons (45-60ml) avocado or vegetable oil for frying
Fresh cilantro for garnish, finely chopped (optional)
Directions
Step 1: Heat 1 tablespoon oil in a large skillet over medium heat. Add chopped onion and cook until softened, about 2-3 minutes. Add ground beef and break it up with a spoon, cooking until browned, about 4-5 minutes.
Step 2: Mix in tomato paste and stir for about 1 minute. Add taco seasoning and water as needed. Cook until beef is fully cooked and most liquid has evaporated, about 3-4 minutes. Taste and season with salt if needed. Remove from heat and let cool slightly.
Step 3: On a clean surface, place a tortilla. Add 1.5-2 tablespoons cheese to the top half, then a portion of beef filling, then another 1.5-2 tablespoons cheese. Fold the bottom half over the filling and gently press to seal. Repeat with remaining ingredients to make 8 tacos.
Step 4: Heat 3-4 tablespoons oil in a large skillet over medium heat until shimmering. Carefully place one taco in the pan and fry for about 1 minute per side until golden brown and crispy. Work in batches to avoid overcrowding.
Step 5: Transfer fried tacos to a wire cooling rack placed over a baking sheet. Garnish with fresh cilantro if desired and serve immediately while hot and crispy with your favorite sauce or toppings.


