Every Easter, Lily starts asking about these blondies before the eggs are even hidden in the backyard. Last year she stood at the kitchen counter in her pajamas at 7am, pointing at the bag of Cadbury Mini Eggs I had hidden (not very well) on the top shelf, and said, “Mama, those are for the blondies, right?” She was absolutely right, and I did not even try to argue.
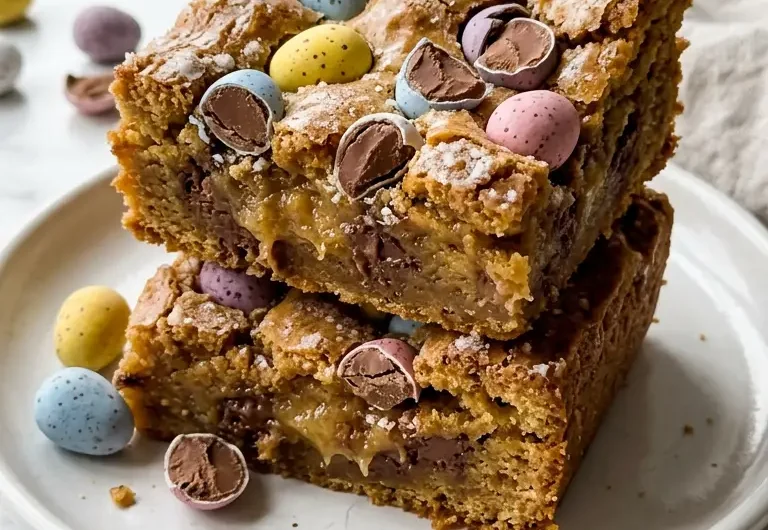
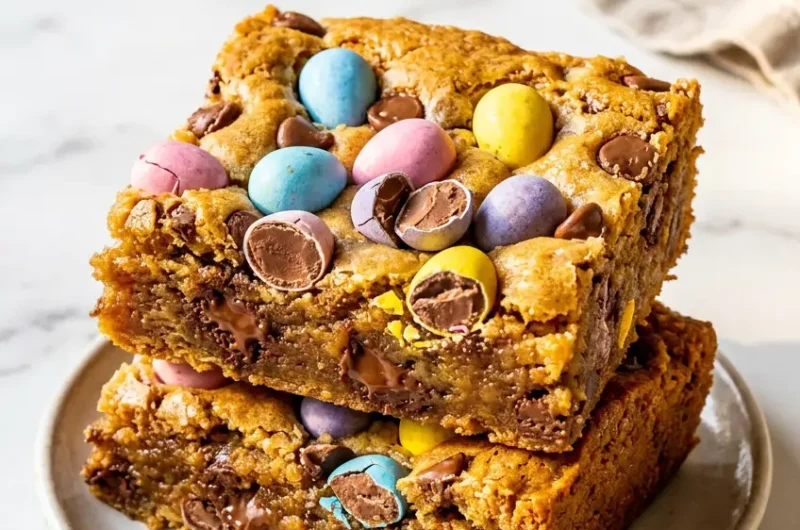
These Easter Cadbury Mini Egg Blondies are everything I want in a spring dessert. They are dense, chewy, and buttery with that deep brown sugar caramel flavor that makes blondies so irresistible. Then you press those pastel candy-coated Mini Eggs on top and the whole thing comes out of the oven looking like an Easter basket dream. The shells stay slightly crunchy, the centers stay soft and fudgy, and the whole kitchen smells like a candy shop crossed with a bakery. Jake ate three in one sitting and had zero regrets.
Why You'll Love This Recipe
- One Bowl, No Mixer: The entire batter comes together in a single saucepan and bowl. Less washing up means more time hiding Easter eggs.
- Perfectly Chewy Texture: Brown sugar and melted butter create that signature fudgy, dense blondie bite that never gets dry or crumbly.
- Stunning Pastel Topping: Cadbury Mini Eggs pressed into the batter before baking make these look bakery-beautiful with almost zero effort.
- Kid Approved: Lily and Noah both rate these as their top Easter treat, beating out the chocolate bunny. That is saying a lot.
- Make-Ahead Friendly: These blondies actually taste even better on day two once the flavors have settled and the texture firms up perfectly.

Ingredients You'll Need
You only need a handful of pantry staples to make these blondies, plus one very special seasonal star. I keep the base simple so the Cadbury Mini Eggs really get to shine. Here is everything you need:
- 115g (1/2 cup) unsalted butter, melted and slightly cooled. Melting the butter is the key to that fudgy, dense texture.
- 200g (1 cup packed) light brown sugar, the deeper the molasses flavor the better. Pack it firmly into the cup.
- 2 large eggs, at room temperature so they blend in smoothly without seizing the butter.
- 1 teaspoon pure vanilla extract, do not skip this. It rounds out the caramel notes beautifully.
- 190g (1 1/2 cups) all-purpose flour, spooned and leveled. Too much flour will make these cakey instead of fudgy.
- 1/2 teaspoon baking powder, just a small lift to keep the texture from being too dense.
- 1/2 teaspoon fine sea salt, this makes all the sweetness pop. Do not leave it out.
- 280g (about 1 1/2 cups) Cadbury Mini Eggs, roughly divided. Some get folded in, most go on top for that gorgeous pastel look.
Buy your Mini Eggs early in the season. They are only available for a limited time around Easter and they do sell out fast at supermarkets. I usually grab two or three bags so I have extras for snacking during baking. I am not ashamed of this.
If you want to add extra texture and richness to the base, you could fold in 60g (1/3 cup) of white chocolate chips alongside the Mini Eggs. The sweetness pairs beautifully with the brown sugar base. Speaking of gorgeous baked treats, my Slutty Brownies with Cookie Dough use a similar layered approach if you want another over-the-top bar recipe for your Easter spread.
Note: Do not overbake these blondies. They will look slightly underdone in the center when you pull them from the oven, and that is exactly right. They firm up as they cool and you will end up with that perfect fudgy middle. A toothpick should come out with a few moist crumbs, not clean.
How to Make Easter Cadbury Mini Egg Blondies
These blondies come together in about 35 minutes from start to finish. The hardest part is waiting for them to cool before cutting. I will walk you through every step so you get that perfect chewy, golden, Mini Egg-studded result every single time.
Step 1: Prep Your Pan and Preheat.
Preheat your oven to 175C (350F). Line a 23x23cm (9×9 inch) square baking pan with parchment paper, leaving some overhang on two sides so you can lift the blondies out easily later. Lightly butter the parchment. This step saves you so much stress when it comes to cutting clean squares.
Lora’s Tip: Use binder clips to hold the parchment overhang to the sides of the pan while you pour in the batter. It keeps everything tidy and stops the paper from folding into the batter.
Step 2: Melt and Mix the Wet Ingredients.
In a medium saucepan over low heat, melt the 115g (1/2 cup) of unsalted butter. Once melted, remove from the heat and let it cool for about 5 minutes. You want it warm but not hot enough to scramble your eggs. Stir in the 200g (1 cup packed) brown sugar until combined, then add both eggs one at a time, stirring well after each addition. Add the 1 teaspoon of vanilla extract and stir until the mixture is glossy and smooth.
Lora’s Tip: Stirring vigorously after adding the eggs creates a slightly shiny batter, which is a good sign that your blondies will have that beautiful crinkle top once baked.
Step 3: Add the Dry Ingredients.
Sprinkle the 190g (1 1/2 cups) of flour, 1/2 teaspoon of baking powder, and 1/2 teaspoon of salt directly into the wet mixture. Stir with a spatula until just combined, stopping as soon as you can no longer see streaks of flour. Overmixing develops gluten and can make your blondies tough instead of tender. The batter will be thick and a little sticky, and that is perfect.
Step 4: Fold in Mini Eggs and Fill the Pan.
Set aside about half your Mini Eggs for the top. Gently fold the remaining Mini Eggs into the batter, then spread the batter evenly into your prepared pan. It will be thick, so use the back of a damp spatula to smooth it out to the edges. Press the reserved Mini Eggs firmly into the top of the batter, distributing them so every future square gets a few. The more colorful the top, the prettier each piece will look.
Lora’s Tip: Lightly crushing a few of the top Mini Eggs with the flat of a knife before pressing them in gives you gorgeous colorful shards and extra crunch on top. Lily loves this part because I let her do the crushing.
Step 5: Bake and Cool.
Bake for 22 to 25 minutes, until the edges are set and golden and the center looks just barely done. It will still have a slight jiggle. Remove from the oven and let the blondies cool completely in the pan, at least 45 minutes to 1 hour, before lifting them out using the parchment overhang and cutting into squares. If you want ultra-clean cuts, refrigerate for 30 minutes before slicing. For another impressive Easter dessert that uses a similar one-bowl method, take a look at my Cheesecake Brownies.

Lora's Kitchen Tips
- Room temperature eggs matter. Cold eggs can cause the melted butter to seize and solidify into lumps. Pull your eggs out of the fridge 30 minutes before you start baking.
- Spoon and level your flour. Scooping flour directly with the measuring cup compacts it and you can end up with 20 to 30 percent more flour than you need. Spoon it in lightly and level off the top with a straight edge.
- Brown your butter for extra flavor. Instead of just melting the butter, cook it a minute or two longer until it turns golden and smells nutty. Let it cool completely before adding the sugar. This adds an incredible depth of flavor to the blondies.
- Do not skip the salt. Half a teaspoon might sound like a lot in a sweet recipe but it is what makes every other flavor taste sharper and more complex. The contrast between the salt and the sweet Mini Eggs is what makes people go back for a second piece.
- Use a metal pan for best results. Glass or ceramic baking dishes hold heat differently and can result in undercooked middles or overdone edges. A light-colored metal 23x23cm (9x9 inch) pan gives you the most even bake.
Variations and Substitutions
Once you have the base blondie recipe down, there are so many fun ways to make it your own. Here are some of my favorite variations to try:
White Chocolate Blondies: Fold 90g (1/2 cup) of white chocolate chips into the batter alongside the Mini Eggs. The extra creaminess takes the sweetness to a new level and makes them even more indulgent.
Brown Butter Version: Brown the butter in the saucepan before mixing in the sugar. The nutty, caramel-like flavor from the browned milk solids adds an incredible complexity that makes people ask what your secret is.
Sprinkle Party Blondies: Fold 2 tablespoons of pastel Easter sprinkles into the batter alongside the Mini Eggs for extra festive color throughout every slice. Lily’s personal favorite variation.
Salted Caramel Drizzle: Once the blondies have cooled, drizzle a few tablespoons of store-bought salted caramel sauce over the top before cutting. The salty-sweet combination is absolutely stunning.
Mini Egg Blondie Bars with Cream Cheese Swirl: Drop tablespoons of sweetened cream cheese (60g cream cheese, 1 tablespoon sugar, 1/2 teaspoon vanilla) over the batter before baking and swirl gently with a skewer. It adds a tangy richness that cuts through the sweetness beautifully.
What to Serve with Easter Cadbury Mini Egg Blondies

I like to serve these blondies at room temperature, cut into generous squares and arranged on a pretty platter. They look beautiful with their pastel Mini Egg tops and that golden caramel color underneath. A light dusting of powdered sugar makes them look extra bakery-special without any extra effort.
For an Easter dessert table, these pair perfectly alongside some fresh fruit like sliced strawberries or raspberries to cut through the richness. A scoop of good vanilla ice cream on the side turns a single blondie square into a full dessert moment.
If you are putting together a full Easter baking spread, my Mini Lemon Cakes with Lavender Glaze are a gorgeous companion recipe. The bright citrus flavor is such a nice contrast to the warm, caramel richness of these blondies, and together they look stunning on an Easter dessert table.
Storage, Freezing, and Reheating
- Storage: Store cooled blondies in an airtight container at room temperature for up to 4 days. Place a piece of parchment between layers to stop them sticking together.
- Freezing: These blondies freeze beautifully. Wrap individual squares tightly in plastic wrap and place in a freezer-safe bag or container for up to 2 months.
- Thawing: Thaw frozen blondies on the counter at room temperature for about 1 hour. They taste just as good as fresh once they come to room temperature.
- Reheating: For a warm, just-baked experience, microwave a single square for 12 to 15 seconds. The edges get slightly warm and the center goes wonderfully gooey again.
- Make-ahead tip: Bake these blondies the day before your Easter gathering. They actually taste better on day two as the flavors deepen and the texture becomes even more fudgy and settled.
Frequently Asked Questions
Here are the questions I get asked most about this recipe:
Can I use a different size pan?
You can use a 23x33cm (9×13 inch) pan for thinner blondies. Reduce the baking time to 18 to 20 minutes and watch closely. Thinner blondies set faster and you still want that slightly underdone center. I would not go smaller than a 20x20cm (8×8 inch) pan or the blondies will be very thick and may not cook through evenly.
Why did my blondies come out cakey instead of fudgy?
There are a few common reasons. Too much flour is the most likely culprit, so make sure you are spooning and leveling rather than scooping. Overbaking is the second reason. Pull them when the center still looks slightly underdone. Also, make sure you are using melted butter rather than softened butter, as the fat ratio is key to that fudgy texture.
Can I use a different candy instead of Cadbury Mini Eggs?
Absolutely. M&Ms work really well and are available year-round if you want to make these outside of the Easter season. Reese’s Pieces give a peanut butter flavor that is incredible. You could also use chopped-up Cadbury Creme Eggs if you want to go full Easter indulgence, though they can get quite sticky as they bake.
Do I need to crush the Mini Eggs before baking?
You do not have to, but I love lightly crushing a few of the ones on top. It gives you those beautiful colorful shards and extra crunch. The whole ones on top look gorgeous and stay mostly intact during baking. The ones folded into the batter will break down slightly but create lovely little pockets of chocolate throughout the blondie.
Can I make this recipe gluten-free?
I have tested this with a 1-to-1 gluten-free baking flour blend and it works well. The texture is very slightly more crumbly but still delicious. Make sure your Mini Eggs are also gluten-free certified if this is important for your household. Standard Cadbury Mini Eggs do not contain gluten ingredients but always check the label for cross-contamination warnings.
These Easter Cadbury Mini Egg Blondies have become one of those recipes our family just cannot imagine Easter without. From Lily spotting the candy bag on the shelf to Noah stealing a square before they have fully cooled, every moment of making them feels special. They are simple enough to whip up on Easter morning and impressive enough to bring to any spring gathering. I really hope they become your family tradition too.
With love and all the Mini Eggs,
Lora x
Easter Cadbury Mini Egg Blondies
16
servings10
minutes25
minutes248
kcalIngredients
115g (1/2 cup) unsalted butter, melted and slightly cooled
200g (1 cup packed) light brown sugar
2 large eggs, room temperature
1 teaspoon pure vanilla extract
190g (1 1/2 cups) all-purpose flour, spooned and leveled
1/2 teaspoon baking powder
1/2 teaspoon fine sea salt
280g (about 1 1/2 cups) Cadbury Mini Eggs, divided
Directions
Preheat your oven to 175C (350F). Line a 23x23cm (9x9 inch) metal baking pan with parchment paper, leaving overhang on two sides. Lightly butter the parchment.
In a medium saucepan over low heat, melt the butter. Remove from heat and cool for 5 minutes. Stir in the brown sugar until combined, then add the eggs one at a time, stirring well after each. Stir in the vanilla until the mixture is glossy.
Add the flour, baking powder, and salt to the wet mixture. Stir with a spatula until just combined and no dry streaks remain. Do not overmix. The batter will be thick.
Set aside roughly half the Mini Eggs. Fold the remaining Mini Eggs into the batter. Spread the batter evenly into the prepared pan using a damp spatula. Press the reserved Mini Eggs firmly into the top, distributing evenly.
Bake for 22 to 25 minutes, until the edges are set and golden and the center looks just barely done with a slight jiggle. Cool completely in the pan for at least 1 hour before lifting out and cutting into 16 squares. For cleaner cuts, refrigerate for 30 minutes before slicing.


