
Some nights call for a kitchen hero and for me, that is always garlic butter chicken thighs. I am talking about the kind of meal that fills the house with a warm, nutty aroma and makes everyone, even little Noah, stop and ask what is for dinner. Last Tuesday was chaos, with Lily’s soccer practice running late and Jake stuck in traffic. I needed something quick but also something that felt like a hug on a plate.
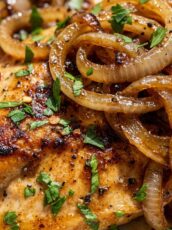
This is where these garlic butter chicken thighs save the day. They are pan-seared until the skin is impossibly crispy, then bathed in a rich, golden garlic butter sauce that is honestly good enough to eat with a spoon. Every bite has that perfect contrast of crunch and melting tenderness.
Why You'll Love This Garlic Butter Chicken Thighs
- Ready in 30 Minutes: You get deep, slow-cooked flavor on a weeknight schedule with very little hands-on work.
- Perfect Crispy Skin: A cold pan start is the secret to shatteringly crispy skin without drying out the meat.
- Rich Pan Sauce: The garlic, butter, and chicken juices create a luscious sauce that clings to every bite. No dry chicken here.
- Minimal Cleanup: Everything cooks in one skillet which means more time with your family and less time at the sink.
- A Family Favorite: It is simple enough for Noah but the sauce feels fancy enough for a dinner party with friends.

Garlic Butter Chicken Thighs Ingredients
You only need a handful of pantry staples to make these garlic butter chicken thighs truly shine. The key is using fresh garlic and good quality butter. I use bone-in, skin-on thighs because the bone keeps the meat juicy and the skin gets shatteringly crisp.
- 900g (2 lbs) bone-in skin-on chicken thighs, patted completely dry. This is the most important step for crispy skin.
- 1 teaspoon kosher salt, plus a pinch more for the sauce.
- 1/2 teaspoon freshly cracked black pepper.
- 2 tablespoons olive oil, just enough to get the skin sizzling.
- 4 tablespoons (60g) unsalted butter, divided.
- 8-10 fresh garlic cloves, thinly sliced.
- 120ml (1/2 cup) low-sodium chicken broth, to deglaze the pan and build the sauce.
- 1 tablespoon fresh lemon juice, for a little brightness at the end.
- 2 tablespoons fresh parsley, finely chopped for a pop of green.
Pat those thighs completely dry. I mean it. Any moisture on the skin will steam your chicken instead of frying it. Use paper towels and press firmly. This is the hill I will die on for perfect garlic butter chicken thighs. For another garlic-forward dinner winner, check out my Garlic Steak Tortellini which is another family favorite in our Austin kitchen.
Avoid pre-minced garlic in a jar. Fresh cloves are essential here. They toast slowly in the butter and become sweet, nutty, and mellow. According to Healthline, fresh garlic also retains more of its beneficial compounds compared to processed options.
Note: Do not move the chicken thighs for the first 8 minutes of searing. Leave them alone. This contact time with the hot pan is what creates that deep golden, sticky brown crust on your garlic butter chicken thighs.
How to Make Garlic Butter Chicken Thighs
The magic of these garlic butter chicken thighs happens in one pan with a simple technique. Do not be intimidated by crispy skin because I have a couple of tricks up my sleeve that make it foolproof. Let me walk you through it step by step so you feel confident every inch of the way.
Step 1: Prepare the chicken.
Pull your chicken thighs from the fridge 20 minutes before cooking. This is my secret to even cooking. Pat them brutally dry with paper towels and season generously on both sides with salt and pepper. No other seasonings are needed right now.
Step 2: The cold pan sear.
Place the chicken thighs skin-side down in a large cold cast iron skillet. Yes, a cold pan. Drizzle the olive oil lightly over the skin. Now, set the burner to medium heat and do not touch anything. This allows the fat to render slowly. You will hear a gentle sizzle at first, then it will get louder. After about 12 to 15 minutes, the skin will be deep golden, crispy, and it will release naturally from the pan. Flip and cook for 3 more minutes on the flesh side. This is what makes this garlic butter chicken thighs recipe so incredibly good. After you remove the chicken to a plate, you will see gorgeous brown bits stuck to the pan. Do not wipe those out.
Step 3: Build the garlic butter sauce.
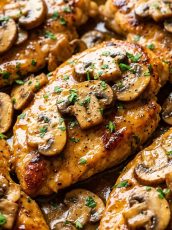
Lower the heat to medium-low. Add 2 tablespoons of your butter and the sliced garlic to the hot pan. Stir constantly for 45 to 60 seconds until the kitchen smells amazing and the garlic is just turning lightly golden at the edges. You do not want it to burn because bitter garlic will ruin your sauce. If you love learning about butter-basting techniques, you might enjoy the tips in my Pan Seared Steak with Garlic Butter post.
Step 4: Deglaze and finish.
Carefully pour in the chicken broth and lemon juice. Use a wooden spoon to scrape up all those crispy brown bits from the bottom of the pan. This is pure flavor. Let it bubble and reduce for 3 minutes until it looks glossy and slightly thickened. Swirl in the remaining 2 tablespoons of butter and the fresh parsley. Return the chicken to the pan, skin-side up, and spoon the sauce over the top. This keeps the skin crisp while the meat soaks up that butter bath.
Lora’s Tip: If your sauce looks too thin, do not panic. Let it simmer 2 more minutes and it will thicken as it cools. Also, taste it after you add the lemon juice and adjust the salt. A pinch more salt can make the flavors explode.

Lora's Kitchen Tips
- Master the cold pan technique. Starting your chicken thighs in a cold cast iron pan over medium heat gives the fat time to render without burning the skin. The result is perfectly crisp garlic butter chicken thighs and a splatter-free stovetop.
- Toast your garlic to perfection. Slice the garlic rather than mincing it. Thin slices are more forgiving in hot butter and less likely to burn. You are looking for a soft gold color around the edges, not dark brown, to keep your garlic butter chicken thighs sweet and fragrant.
- Use a spoon for basting. Tilt the pan gently and use a large spoon to scoop the butter sauce over the crispy skin while the chicken warms through. This adds moisture without sacrificing the crunch you worked hard for.
- Check your internal temperature. The best way to ensure juicy garlic butter chicken thighs is to use a meat thermometer. Pull the chicken off the heat when it hits 74 degrees C (165 degrees F) at the thickest part of the thigh.
- No cast iron, no problem. A heavy stainless steel skillet works brilliantly too. Just make sure the pan is large enough so the chicken thighs are not crowded. Overcrowding creates steam and ruins your chance at crispy skin.
Garlic Butter Chicken Thighs Variations and Substitutions
This recipe is a beautiful blank canvas. Once you master the base garlic butter chicken thighs, you can change the flavor profile to fit any mood.
Creamy Tuscan Version: After deglazing the pan, stir in 120ml (1/2 cup) of heavy cream and 45g (1/3 cup) of sun-dried tomatoes. Let it bubble until thick and spoon the creamy mixture over your garlic butter chicken thighs.
Spicy Honey Glaze: Add 1 tablespoon of hot honey and a pinch of red pepper flakes to the sauce. The sweetness balances the savory garlic.
Herb Garden Butter: Swap the parsley for a mix of fresh thyme, rosemary, and chives. It gives your garlic butter chicken thighs a rustic, earthy flavor. For a deep dive into rosemary-heavy cooking, Serious Eats has some wonderful guides on using fresh woody herbs.
What to Serve with Garlic Butter Chicken Thighs
I always serve these garlic butter chicken thighs over something that can soak up every drop of the glorious pan sauce. My go-to is creamy mashed potatoes or a simple buttered egg noodle.
For a lighter side, try a vinegary salad to cut through the richness. My Cucumber Tomato Avocado Salad is a bright, juicy pairing that Jake requests constantly. Some crusty bread on the side is also non-negotiable for wiping the plate clean.
How to Store Garlic Butter Chicken Thighs
- Storage: Place any leftover garlic butter chicken thighs in an airtight container and store them in the refrigerator for up to 3 days.
- Freezing: You can freeze the chicken thighs in a freezer-safe bag or container for up to 2 months. Store the sauce separately if possible to keep the skin from getting too soft.
- Thawing: Thaw your garlic butter chicken thighs overnight in the refrigerator. This safe thaw keeps the texture firm.
- Reheating: The best way to bring back the crisp skin is to reheat the thighs in a 180 degree C (350 degree F) oven for 10 minutes. Avoid the microwave, which will make the skin rubbery.
- Make-ahead tip: You can season the chicken thighs a day in advance and leave them uncovered in the fridge. This dries out the skin even more for your garlic butter chicken thighs.
Garlic Butter Chicken Thighs FAQ
Here are the questions I get asked most about this recipe:
Can I make garlic butter chicken thighs with boneless chicken?
Yes, you absolutely can. You will need to shorten the cooking time significantly. Boneless skin-on thighs cook faster but you will miss the moisture from the bone. Sear them skin-side down for about 8 minutes instead of 12, then flip and cook until the internal temperature reaches 74 degrees C (165 degrees F).
How do I stop my butter from burning during cooking?
This is a common worry with garlic butter chicken thighs. The trick is dual heat control. I use olive oil for the initial sear, which has a higher smoke point. I then lower the heat before adding the butter and garlic. Cooking the garlic in melted butter over medium-low heat ensures it toasts gently without burning.
What is the best pan for garlic butter chicken thighs?
A large 12-inch cast iron skillet is my favorite tool for garlic butter chicken thighs. It retains heat evenly and creates a beautiful sear. A heavy-bottomed stainless steel pan also works well. Just steer clear of non-stick pans if you want that deep brown crust.
Can I prepare garlic butter chicken thighs ahead of time?
Indeed you can. These garlic butter chicken thighs reheat wonderfully in the oven. Cook the dish fully, cool it, and store it in the fridge. When you are ready, warm it in a 180 degree C (350 degree F) oven until hot. The skin will crisp back up nicely that way.
Why are my chicken thighs not getting crispy?
The most likely culprit is moisture. For truly crispy garlic butter chicken thighs, the skin must be bone dry before it hits the pan. Also, starting your pan cold and leaving the chicken untouched for at least 10 to 12 minutes is vital. Moving them too soon will tear the skin.
I really hope these garlic butter chicken thighs become a staple on your dinner table just like they are on ours. There is something so satisfying about pulling a golden, crispy skillet from the oven and hearing that contented quiet that falls over the table as everyone takes their first bite. It is simple food done right.
With love and butter,
Lora x
Garlic Butter Chicken Thighs
4
10
minutes20
minutes420
kcalIngredients
900g (2 lbs) bone-in skin-on chicken thighs, patted dry
1 teaspoon kosher salt
1/2 teaspoon freshly cracked black pepper
2 tablespoons olive oil
4 tablespoons (60g) unsalted butter, divided
8-10 fresh garlic cloves, thinly sliced
120ml (1/2 cup) low-sodium chicken broth
1 tablespoon fresh lemon juice
2 tablespoons fresh parsley, chopped
Directions
Set chicken thighs on a plate and pat completely dry with paper towels. Season generously on both sides with salt and pepper.
Place chicken skin-side down in a cold large cast iron skillet. Drizzle with olive oil. Turn heat to medium and cook without moving for 12-15 minutes until skin is deep golden and crisp. Flip and cook 3 more minutes. Remove to a plate.
Lower heat to medium-low. Add 2 tablespoons of the butter and the sliced garlic. Stir constantly for about 1 minute until the garlic is fragrant and lightly golden.
Pour in chicken broth and lemon juice. Scrape up any browned bits from the bottom of the pan. Simmer for 3 minutes until the sauce reduces slightly.
Remove pan from heat. Swirl in remaining 2 tablespoons of butter and the parsley. Return garlic butter chicken thighs to the pan skin-side up. Spoon sauce over the top and serve.


