I made this recipe for the first time on a Tuesday night when I had absolutely nothing planned for dinner. Jake was stuck in traffic, Lily was doing homework at the kitchen table, and Noah was dragging a toy truck around my feet. I had chicken breasts in the fridge, a jar of honey in the pantry, and a whole lot of garlic. Thirty minutes later, everyone was at the table and the pan was practically licked clean.
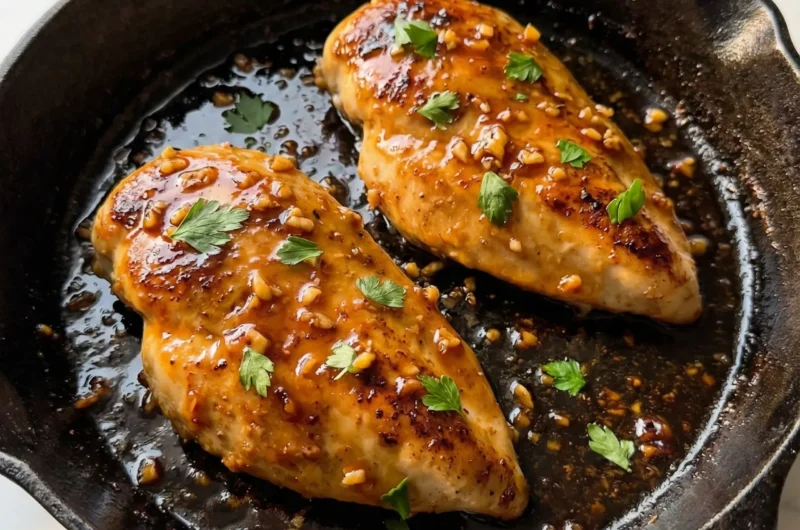
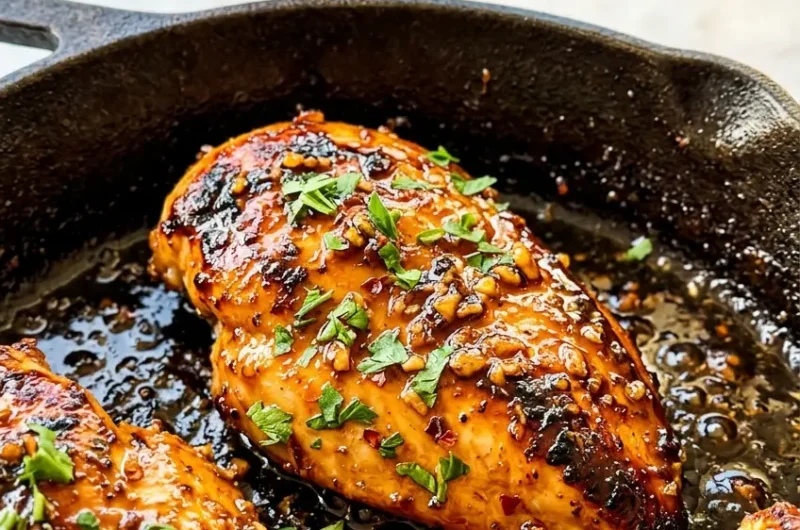
These Honey Garlic Chicken Breasts have become one of my most-requested dinners. The chicken gets a beautiful golden sear on the outside, and then it gets coated in this sticky, garlicky, sweet sauce that caramelizes in the pan and clings to every inch. It smells incredible while it cooks, that warm toasty garlic mixing with the honey going golden and slightly smoky. It is the kind of dinner that makes your whole house smell like something worth coming home to.
Why You'll Love This Recipe
- Ready in 35 minutes: From cold chicken to glossy sauced perfection, this is a genuine weeknight hero that does not require any advance planning.
- One pan, easy cleanup: Everything happens in a single skillet, which means less washing up and more time on the couch after dinner.
- Kids absolutely devour it: Lily asks for this by name, and Noah eats every bite without complaint. That is the highest compliment I know.
- Sweet, savory, and tangy all at once: The sauce hits every note. Honey for sweetness, soy sauce for depth, a little apple cider vinegar for that subtle tang that keeps it from being cloying.
- Totally pantry-friendly: Every ingredient is something I keep on hand at all times. No special trips to the grocery store required.

Ingredients You'll Need
The ingredient list here is short and approachable, which is exactly what I love about this recipe. Nothing fancy, nothing hard to find. Just good quality basics that work together beautifully.
- 4 boneless skinless chicken breasts (about 700g / 1.5 lb total), pounded to an even thickness for consistent cooking. If yours are very thick, just butterfly them open.
- 2 tablespoons olive oil, for searing the chicken to that deep golden crust we are after.
- Salt and black pepper, to season the chicken generously on both sides before it hits the pan.
- 80ml (1/3 cup) honey, the star of the sauce. Use a good quality runny honey for the best flavor and glossiest finish.
- 3 tablespoons soy sauce (45ml), for that savory, salty depth that balances the sweetness perfectly. Low sodium works great here too.
- 4 cloves garlic, minced, about 1 tablespoon minced. Fresh garlic is non-negotiable in this house. It makes the whole sauce come alive.
- 1 tablespoon apple cider vinegar, this adds a gentle tang that keeps the sauce from being too sweet and gives it a little brightness.
- 1 teaspoon fresh ginger, grated (optional), I add this whenever I have it on hand. It adds a warm, slightly spicy note that Jake especially loves.
- 1 teaspoon cornstarch mixed with 2 tablespoons water, this slurry thickens the sauce so it coats the chicken like a proper glaze rather than running off.
- Fresh parsley or sliced green onions, for garnish, a little freshness and color to finish the plate.
Use chicken breasts of similar size. This makes the biggest difference in getting everything cooked through at the same time. If one breast is twice the size of another, you will end up with one overcooked and one underdone. I either buy them pre-portioned or pound them to roughly the same thickness with a rolling pin in a zip-lock bag.
Do not skip the cornstarch slurry. It transforms the sauce from a thin glaze into that thick, sticky coating you see in restaurant dishes. You only need a tiny amount but the difference is huge. If you love bold garlic flavors in your chicken dinners, you might also enjoy my Parmesan Crusted Chicken, which has a beautiful crispy garlic crust that Lily always fights Noah over at the table.
Note: Pounding the chicken to an even 1.5cm (about half an inch) thickness is the single best thing you can do for this recipe. It means the chicken cooks evenly all the way through without drying out, and you get that gorgeous golden crust on every inch of the surface.
How to Make Honey Garlic Chicken Breasts
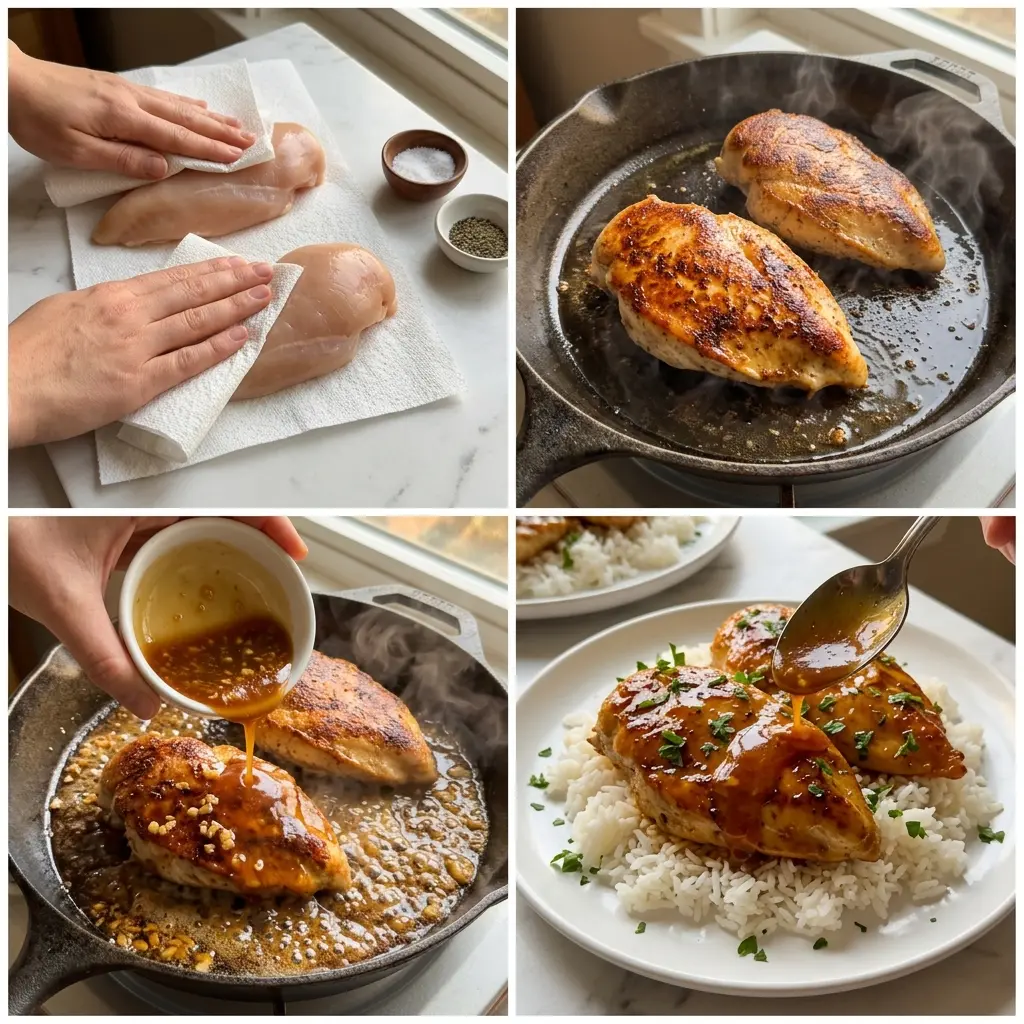
The method here is simple: sear, then sauce. You build the crust first, then you build the glaze right in the same pan so all those lovely browned bits get incorporated into the sauce. Let me walk you through it.
Step 1: Season and prep the chicken.
Pat the chicken breasts dry with paper towels. This is so important for getting a good sear. Wet chicken steams instead of browns. Season both sides generously with salt and black pepper. If your breasts are thicker than about 1.5cm (half an inch), place them between two pieces of cling film and pound them gently with a rolling pin until even.
Lora’s Tip: Patting the chicken completely dry is the number one thing that separates a pale, steamed-looking breast from one with that beautiful dark golden crust. Do not skip this step even if you are in a rush.
Step 2: Make the honey garlic sauce.
In a small bowl, whisk together the honey, soy sauce, minced garlic, apple cider vinegar, and grated ginger if using. In a separate small bowl, mix the cornstarch with 2 tablespoons of cold water until smooth. Set both bowls right next to the stove so they are ready to go the moment you need them.
Step 3: Sear the chicken.
Heat the olive oil in a large skillet over medium-high heat. You want the pan properly hot before the chicken goes in. When a drop of water flicked into the pan sizzles and evaporates immediately, you are ready. Add the chicken breasts and cook without moving them for 5 to 6 minutes until deep golden brown on the first side. Flip and cook for another 4 to 5 minutes. The internal temperature should reach 74 degrees C (165 degrees F). Remove the chicken to a plate and set aside.
Lora’s Tip: Resist the urge to move the chicken around while it is searing. Leave it completely alone and it will release naturally from the pan when it has a proper crust. If it is sticking, it is not ready to flip yet. This same principle applies when making my Melt in Your Mouth Chicken Breast, which uses a similar hands-off searing technique.
Step 4: Build the sauce.
Lower the heat to medium. In the same pan (do not wipe it out, those brown bits are flavor), pour in the honey garlic sauce mixture. Stir and let it bubble for about 1 minute, scraping up any browned bits from the bottom of the pan. Pour in the cornstarch slurry and stir continuously. The sauce will thicken quickly, in about 30 to 60 seconds, into a glossy, sticky glaze.
Step 5: Coat and finish.
Return the chicken breasts to the pan and spoon the sauce over them generously. Turn them so every surface gets coated. Let them sit in the sauce for 1 to 2 minutes over low heat to absorb all that flavor and warm back through. Scatter with fresh parsley or sliced green onions and serve immediately straight from the pan.
Lora's Kitchen Tips
- Let the pan get properly hot. A hot pan gives you that deep golden sear that locks in the juices and adds so much flavor. A pan that is not hot enough will cause the chicken to stick and steam rather than brown.
- Use a meat thermometer. I know it sounds extra but it is the only way to guarantee juicy chicken every single time. Pull the chicken at exactly 74 degrees C (165 degrees F) and it will be perfect. Even one or two degrees over and it starts to dry out.
- Let the chicken rest before slicing. Even just 3 to 5 minutes resting on the plate before you cut into it allows the juices to redistribute. If you slice it immediately, all those juices run straight out onto the board.
- Do not crowd the pan. If your skillet is not large enough to fit all four breasts with some space between them, cook them in two batches. Crowding causes steaming instead of searing and you lose that gorgeous crust.
- Adjust the sweetness to your taste. If you like a less sweet sauce, reduce the honey to 60ml (1/4 cup) and add an extra splash of soy sauce. If you want it sweeter and stickier, add another tablespoon of honey right at the end.
Variations and Substitutions
Once you have mastered the base recipe, this one is really easy to riff on. Here are a few of my favorite ways to change it up depending on what I have in the kitchen or what mood the family is in.
Spicy Honey Garlic: Add half a teaspoon of red chili flakes or a teaspoon of sriracha to the sauce mixture. The heat plays beautifully against the sweetness of the honey and the whole family can adjust their own portion at the table by adding more chili oil if they want.
Lemon Honey Garlic: Swap out the apple cider vinegar for the juice and zest of half a lemon. This version is brighter and a little more summery. I make this one a lot in spring when I want something that feels a bit lighter.
Bone-In Thighs Version: Chicken thighs work absolutely beautifully in this recipe, they are juicier and a little more forgiving if you go slightly over temperature. Just increase the cooking time to about 7 to 8 minutes per side and make sure the internal temp hits 74 degrees C (165 degrees F).
Air Fryer Method: Season the chicken as directed, air fry at 200 degrees C (400 degrees F) for 16 to 18 minutes flipping halfway, then toss in the sauce you have made separately on the stovetop. You still get great results with a slightly crispier exterior.
Sheet Pan Version: Lay the seasoned chicken on a lined baking sheet, pour the sauce over the top, and bake at 200 degrees C (400 degrees F) for 22 to 25 minutes basting halfway through. Great for when I need to be doing three other things at once.
What to Serve with Honey Garlic Chicken Breasts

This chicken is so versatile and works with so many different sides. My go-to on a weeknight is steamed jasmine rice, because it soaks up all that sticky honey garlic sauce like a dream. I spoon extra sauce from the pan right over the rice and Lily always asks for seconds.
Roasted broccoli or green beans are also absolutely perfect alongside this. The slightly bitter, charred edges of roasted vegetables balance out the sweetness of the sauce in a way that feels really satisfying. If you want an incredibly easy veggie side that cooks at the same time, my Garlic Butter Chicken and Green Beans uses a similar flavor profile and you could easily adapt it as a side dish here.
For something a little different, serve the sliced chicken over a simple noodle bowl or tucked inside a wrap with shredded cabbage and a drizzle of sesame oil. Noah loves it stuffed inside a soft flatbread with cucumber slices, which has become his Thursday night staple. And if you are thinking about what to make for the rest of the week, the One Pan Honey Garlic Kielbasa and Veggies uses the same sweet garlic flavor profile and is just as quick to pull together on a busy evening.
Storage, Freezing, and Reheating
- Storage: Allow the chicken to cool completely before storing. Keep leftovers in an airtight container in the refrigerator for up to 4 days. Store any extra sauce separately so the chicken does not get soggy.
- Freezing: This chicken freezes really well. Place cooled chicken breasts in a freezer-safe bag or container and freeze for up to 3 months. I recommend storing the sauce separately for the best texture on reheating.
- Thawing: Transfer frozen chicken to the refrigerator the night before you plan to eat it and let it thaw overnight. Do not thaw on the counter at room temperature as this affects the texture and is not food safe.
- Reheating: The best way to reheat is in a skillet over medium-low heat with a splash of water or chicken broth to loosen the sauce. This keeps the chicken moist and the sauce glossy. You can also microwave on medium power in 90-second intervals but the skillet method gives much better results.
- Make-ahead tip: You can make the honey garlic sauce up to 3 days ahead and keep it in a jar in the refrigerator. When you are ready to cook, the sauce is already done and dinner comes together even faster on a busy weeknight.
Frequently Asked Questions
Here are the questions I get asked most about this recipe:
Can I use chicken thighs instead of chicken breasts?
Absolutely, and I actually think boneless skinless thighs are even more forgiving in this recipe. They are naturally juicier and a little fattier, which means they are harder to dry out. Cook them for 7 to 8 minutes per side and check that the internal temperature reaches 74 degrees C (165 degrees F) before adding the sauce.
My sauce is too thin. What did I do wrong?
The most common reason is that the cornstarch slurry was not fully dissolved before adding it, or the heat was too low when you added it. Make sure the sauce is actively bubbling when you pour in the slurry and stir constantly for a full minute. If it is still too thin, mix another half teaspoon of cornstarch with a tablespoon of cold water and add it in while the pan is on medium heat.
Can I make this gluten-free?
Yes, very easily. Simply swap the regular soy sauce for tamari or a certified gluten-free soy sauce. Everything else in the recipe is naturally gluten-free. The cornstarch is also gluten-free so the thickening method stays exactly the same.
How do I know when the chicken is fully cooked without a thermometer?
The most reliable way without a thermometer is to cut into the thickest part of the breast. The meat should be completely white with no pink anywhere and the juices should run clear, not pink. That said, I really do recommend getting a basic meat thermometer. They cost about five dollars and they take all the guesswork out of cooking chicken.
Can I double this recipe to feed a crowd?
Definitely. Just double every ingredient in the list. The key thing is to cook the chicken in batches rather than crowding the pan. Too many breasts at once will drop the pan temperature and you will lose that gorgeous golden sear. Cook in two batches, then make the sauce once and toss all the cooked chicken back in together at the end.
This recipe has saved dinner in our house more times than I can count. It is the kind of dish that feels special enough for a weekend but is easy enough for a Tuesday night when you have absolutely nothing left in the tank. I hope it brings as many empty plates and satisfied faces to your table as it has to mine.
If you make it, I really want to hear how it went. Did you do the spicy version? Did the kids go back for seconds? Leave a comment and let me know. Recipes always taste better when they are shared.
With love and sticky fingers,
Lora x
Honey Garlic Chicken Breasts
4
servings10
minutes20
minutes345
kcalIngredients
4 boneless skinless chicken breasts (about 700g / 1.5 lb), pounded to even thickness
2 tablespoons olive oil
1/2 teaspoon salt
1/4 teaspoon black pepper
80ml (1/3 cup) runny honey
3 tablespoons (45ml) soy sauce
4 cloves garlic, minced
1 tablespoon apple cider vinegar
1 teaspoon fresh ginger, grated (optional)
1 teaspoon cornstarch mixed with 2 tablespoons cold water
Fresh parsley or sliced green onions, for garnish
Steamed rice or roasted vegetables, to serve alongside
Directions
Pat the chicken breasts completely dry with paper towels and season both sides generously with salt and black pepper. If the breasts are thicker than 1.5cm (half an inch), pound them to an even thickness between two sheets of cling film.
In a small bowl, whisk together the honey, soy sauce, minced garlic, apple cider vinegar, and grated ginger if using. In a separate small bowl, stir the cornstarch into 2 tablespoons of cold water until completely smooth. Set both aside near the stove.
Heat the olive oil in a large skillet over medium-high heat until hot and shimmering. Add the chicken breasts in a single layer without crowding. Cook undisturbed for 5 to 6 minutes until deep golden brown. Flip and cook for another 4 to 5 minutes until the internal temperature reaches 74 degrees C (165 degrees F). Transfer to a plate and set aside.
Reduce the heat to medium. Pour the honey garlic sauce into the same pan and stir, scraping up any browned bits. Let it bubble for 1 minute. Add the cornstarch slurry and stir constantly for 30 to 60 seconds until the sauce thickens into a glossy glaze.
Return the chicken to the pan and spoon the sauce over every surface. Turn to coat. Let the chicken sit in the sauce for 1 to 2 minutes over low heat to warm through and absorb the flavor. Garnish with fresh parsley or green onions and serve immediately with steamed rice.


