It was a Tuesday, one of those weeks where the calendar was completely out of control. Lily had gymnastics, Noah had his toddler music class, and Jake had a dinner meeting that ran late. I had exactly twenty minutes between drop-offs and pickups to get something on the table that was not cereal. I spotted the rotisserie chicken in the fridge, grabbed the block of cream cheese I always keep on hand, and started mixing. By the time Jake walked through the door, I had a plate of the crispiest, most golden, cheesy wraps waiting for him. He ate two before he even took his jacket off.
These Low Carb Cheesy Garlic Chicken Wraps have become my go-to when I need dinner that feels indulgent but does not derail a week of clean eating. You get all the gooey, melty, garlicky satisfaction of a restaurant-style wrap in a version that is high in protein, low in carbs, and genuinely ready in under twenty minutes. Shredded chicken, three kinds of cheese, fresh garlic, and a crispy golden tortilla — this Low Carb Cheesy Garlic Chicken Wraps recipe is the kind of weeknight win that earns a permanent spot in your rotation.
Why You'll Love This Recipe
- Ready in 20 Minutes Flat: From cold fridge to crispy golden wrap on your plate in under twenty minutes, which means it works on the most chaotic school nights without any stress or planning.
- High Protein, Low Carb Perfection: Each wrap packs around 35g of protein and stays under 10g of net carbs, making this a genuinely satisfying option whether you are eating keto, low-carb, or just trying to be a little more intentional about dinner.
- Crispy Outside, Gooey Inside: That golden, pan-toasted exterior with the molten mozzarella and cream cheese filling inside is the kind of texture contrast that makes you close your eyes on the first bite.
- Kids and Adults Both Go Wild: Lily calls these her cheesy chicken tacos and Noah eats an entire one by himself, which is basically the highest endorsement a recipe can get in our house.
- Built for Meal Prep: Mix the filling ahead, store it in the fridge, and pan-toast fresh wraps in minutes all week long. These Low Carb Cheesy Garlic Chicken Wraps are a meal prepper's best friend.

Ingredients You'll Need
This recipe uses two simple components: a creamy garlic chicken filling and your low-carb tortillas. Everything comes together in one bowl and one skillet with zero fuss.
- For the Cheesy Garlic Chicken Filling:
- 2 cups (about 280g) cooked chicken breast, shredded — rotisserie chicken is the fastest and most flavorful option here; pick up one on the way home and you are already halfway done.
- 115g (4 oz) full-fat cream cheese, fully softened — this is the secret weapon that binds the filling and makes it incredibly creamy without adding a lot of carbs; make sure it is completely softened or you will have lumps.
- 1 cup (100g) shredded mozzarella cheese — shred it yourself from a block for the best melt and stretch; pre-shredded bags have a coating that makes them melt less smoothly.
- 1/2 cup (50g) shredded cheddar cheese — adds a sharp, slightly tangy depth that the mozzarella alone does not have; medium or sharp both work beautifully.
- 3 cloves garlic, minced (or 1 tsp garlic powder in a pinch) — fresh garlic blooms as it cooks inside the wrap and fills your kitchen with the most incredible aroma; do not skip this.
- 2 tbsp fresh flat-leaf parsley, finely chopped — adds a bright, fresh note that lifts the whole filling and makes it taste less heavy.
- 1/2 tsp salt and 1/4 tsp black pepper — season to taste; the cheeses already add some saltiness, so start here and adjust after mixing.
- 1 cup (30g) baby spinach, optional — stir it straight into the filling raw; it wilts beautifully inside the warm wrap and adds iron and fiber without anyone at the table noticing.
- For the Wraps:
- 4 large low-carb tortillas — look for tortillas with around 4 to 6g net carbs each; Mission Carb Balance and Ole Xtreme Wellness are both great options that crisp up beautifully in the skillet.
- 1 tbsp olive oil — for pan-toasting the wraps to that perfect golden, slightly blistered finish.
A note on the tortillas: Standard flour tortillas work in this recipe but they are higher in carbs and do not crisp up quite as satisfyingly as low-carb varieties. If you cannot find low-carb tortillas, almond flour tortillas are another excellent option and have a slightly nutty flavor that pairs really nicely with the garlic chicken filling. Warm your tortilla for just 10 to 15 seconds in the microwave before rolling — cold tortillas crack and split, and all that beautiful cheesy filling falls right out.
On the cream cheese: please use full-fat block cream cheese, not the spreadable kind from a tub. The tub versions have a much higher water content and will make your filling loose and wet rather than thick and creamy. Full-fat block, softened to room temperature, is what gives these wraps that incredible gooey, cohesive filling that holds together perfectly when you bite in.
Note: Do not overfill your tortillas. It is tempting to pile in as much cheesy chicken as possible, but overfilled wraps burst open in the skillet and leave a cheesy mess instead of a clean, crispy wrap. Stick to about 1/2 cup of filling per tortilla and roll firmly, tucking the sides in as you go. You will get four perfectly packed, golden wraps every single time.
How to Make Low Carb Cheesy Garlic Chicken Wraps
Take your cream cheese out of the fridge at least 30 minutes before you start so it softens fully and blends without lumps. If you are using rotisserie chicken, shred it while still slightly warm — it pulls apart so much more easily than cold chicken.
Step 1: Warm the tortillas and prep the skillet.
Heat a large non-stick skillet or cast iron pan over medium heat and add the olive oil. While it heats, warm each low-carb tortilla individually for 10 to 15 seconds in the microwave, covered with a slightly damp paper towel. This crucial step makes the tortillas pliable so they roll without cracking. A tortilla straight from the fridge will split the moment you try to fold it, no matter how gently you go.
Lora’s Tip: Warm all four tortillas at once, stacked with the damp paper towel on top, for 30 to 40 seconds total. Stack them on a plate and cover with the towel while you mix the filling so they stay flexible and warm.
Step 2: Mix the cheesy garlic filling.
In a large mixing bowl, combine the shredded chicken, softened cream cheese, shredded mozzarella, shredded cheddar, minced garlic, chopped parsley, salt, and pepper. If you are adding spinach, add it now. Mix everything together with a large fork or rubber spatula until the cream cheese coats every piece of chicken and the mixture looks thick, uniform, and creamy with no white streaks of unmixed cream cheese. Taste and adjust the seasoning — it should be well-seasoned and noticeably garlicky.
Lora’s Tip: Use a fork to really mash the cream cheese into the chicken first before adding the other cheeses. Starting with just those two ingredients and breaking the cream cheese up completely means no cold lumps hiding in your final filling.
Step 3: Assemble the wraps.
Lay one warmed tortilla flat on your work surface. Spoon approximately 1/2 cup of the chicken filling into the center of the lower third of the tortilla, spreading it into a rough log shape and leaving at least 2.5cm (1 inch) clear on the sides. Fold the left and right sides of the tortilla inward over the filling, then roll firmly from the bottom up, tucking as you go, exactly like rolling a burrito. Press the seam closed gently and place seam-side down. Repeat with the remaining three tortillas.
Step 4: Pan-toast to golden perfection.
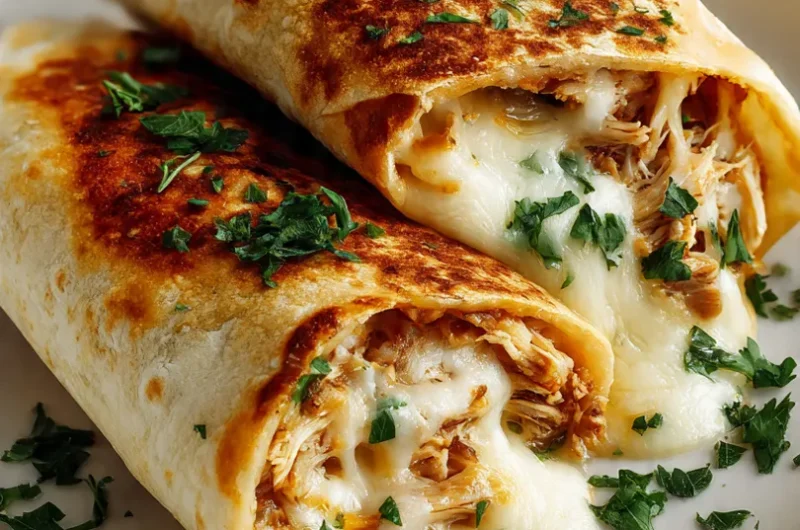
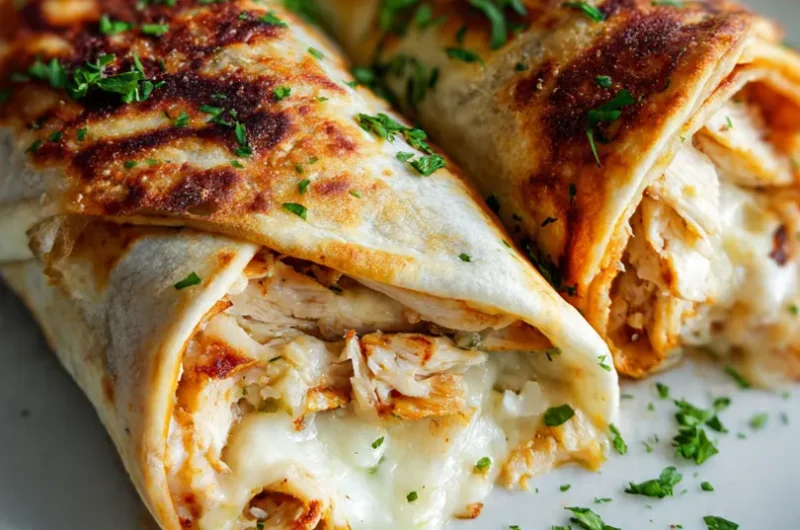
Place the assembled wraps seam-side down in your preheated oiled skillet. You may need to work in two batches if they do not all fit with space around them. Cook undisturbed for 2 to 3 minutes until the bottom is deep golden and slightly blistered. Press down gently with a spatula to ensure full contact between the wrap and the pan. Flip carefully and cook the second side for another 2 to 3 minutes. The wrap should be golden brown on both sides with the cheese visibly melted and gooey at the edges.
Lora’s Tip: Reduce the heat to medium-low after flipping if the outside is browning faster than the filling is heating through. A slightly lower heat for the second side gives the cheeses time to fully melt without burning the tortilla.
Step 5: Slice and serve immediately.
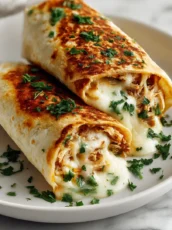
Transfer the wraps to a cutting board and let them rest for just 60 seconds before slicing. Cut each wrap diagonally in half with a sharp knife in one confident downward press — no sawing. The diagonal cut shows off that gorgeous cheesy filling cross-section and makes them so much more satisfying to pick up and eat. Garnish with extra chopped parsley and serve immediately while hot and gooey.

Lora's Kitchen Tips
- Rotisserie chicken is your best friend here. A store-bought rotisserie chicken shreds in about 3 minutes and has more flavor than plain poached chicken breast. One whole bird gives you way more than enough for this recipe, and the leftover chicken is perfect for these Greek Chicken Bowls the next day.
- Cook seam-side down first, without moving it. Resist the urge to shift the wraps around in the pan. Leaving them completely undisturbed for the full 2 to 3 minutes is what creates that deep, even golden crust that holds everything together when you slice.
- Add a pinch of red pepper flakes to the filling. Just a quarter teaspoon of crushed red pepper mixed into the chicken filling adds a gentle background warmth that makes the garlic and cheese flavors pop without making the wraps noticeably spicy — even Lily approves.
- Make the filling the night before. The cheesy garlic chicken filling keeps beautifully in an airtight container in the fridge for up to 24 hours. Morning-you will thank evening-you when dinner takes less than 10 minutes to get on the table.
- Cover the pan with a lid for the first minute. Placing a lid on the skillet right after you put the wraps in creates a little steam that heats the filling all the way through before the outside gets too dark. Lift the lid and finish uncovered for the last minute for maximum crispiness.
Variations and Substitutions
Once you have the base recipe down, these Low Carb Cheesy Garlic Chicken Wraps are incredibly easy to adapt with different flavors, proteins, and dietary needs.
The Buffalo Ranch Version: Add two tablespoons of your favorite hot sauce and a tablespoon of ranch seasoning powder to the chicken filling before mixing. The tangy heat against the cool cream cheese is absolutely incredible and wildly popular with Jake on game nights.
The Mediterranean Twist: Swap the cheddar for crumbled feta and add a handful of sliced kalamata olives and sun-dried tomatoes to the filling. This version pairs perfectly alongside a simple Greek-inspired meal if you are doing a themed dinner night.
The Turkey Swap: Replace the shredded chicken with shredded leftover roast turkey or ground turkey browned with the same garlic and seasoning. The flavor is slightly milder but just as satisfying, and it is a brilliant way to use Thanksgiving leftovers.
The Dairy-Free Option: Use a full-fat dairy-free cream cheese block and dairy-free shredded mozzarella and cheddar. Look for brands that melt well (Violife and Miyoko’s are both good options). The texture stays close to the original and the garlic flavor still absolutely shines through.
The Baked Version: Skip the skillet entirely. Arrange the assembled wraps seam-side down on a parchment-lined baking sheet and bake at 190°C (375°F) for 12 to 15 minutes, flipping halfway through, until golden and crispy all over. This hands-off method is perfect when you are making a big batch for the week.
What to Serve with Low Carb Cheesy Garlic Chicken Wraps

These wraps are completely satisfying on their own for a quick lunch or weeknight dinner, but pairing them with a simple side turns them into a full, balanced meal.
A simple arugula salad dressed with olive oil, lemon juice, and a pinch of salt is my personal favorite alongside these wraps. The peppery bite of the arugula cuts beautifully through all that rich cheese and garlic and adds some bright freshness to the plate without any extra carbs. A handful of cherry tomatoes halved on the side works just as well.
For a heartier meal with the whole family, serve these wraps with a side of Garlic Butter Green Beans or roasted cauliflower florets. Both keep the meal completely low-carb while adding vegetables and fiber. Jake usually requests a small bowl of garlic aioli on the side for dipping, which I make by simply stirring a grated garlic clove and a squeeze of lemon into a few tablespoons of mayonnaise.
If you are serving these for a lighter lunch and want a protein-focused pairing that stays within your macros, these wraps go incredibly well with a simple cup of bone broth or a clear chicken soup. The warmth and the light savoriness of the broth complement the richness of the wraps perfectly without competing with the flavors. If you love garlicky chicken dishes as much as we do, you also need to try our Garlic Parmesan Chicken Pasta, it is another weeknight staple in our house.
Storage, Freezing, and Reheating
- Storing cooked wraps: Keep leftover cooked wraps in an airtight container in the refrigerator for up to 2 days. Layer them with parchment paper between each wrap to prevent sticking and moisture buildup.
- Storing the filling separately: The chicken filling on its own keeps in the fridge for up to 3 days in a sealed container. Storing it unassembled gives you the freshest possible wraps because you pan-toast them to order each time.
- Freezing: Freeze assembled but uncooked wraps for up to 1 month. Wrap each one tightly in plastic wrap then place in a freezer-safe bag. Cook directly from frozen in a covered skillet over medium-low heat for 5 to 6 minutes per side.
- Reheating cooked wraps: Reheat in a dry skillet over medium heat for 2 to 3 minutes per side to restore the crispy exterior. Avoid the microwave if you want them crispy — a quick 10 seconds in the microwave works for warming through but will make the tortilla soft and slightly rubbery.
- Meal prep tip: Mix and refrigerate the filling on Sunday and you have the base for four lunches or dinners ready to go all week. Each wrap takes under 6 minutes from filling to plate when you start with pre-made filling.
Frequently Asked Questions
Here are the questions I get asked most about these Low Carb Cheesy Garlic Chicken Wraps:
Can I use regular flour tortillas instead of low-carb ones?
You absolutely can, and they taste great — you will just lose the low-carb benefits. Standard large flour tortillas add roughly 35 to 45g of carbs per wrap depending on the brand. If you are not watching carbs and just want a quick cheesy chicken wrap for the family, flour tortillas work perfectly and actually crisp up quite nicely in the skillet.
How do I keep the wraps from bursting open in the pan?
Two things solve this: do not overfill (stick to about 1/2 cup of filling per tortilla) and always start seam-side down in the pan without moving them for the full 2 to 3 minutes. The heat seals the seam shut before you flip. If your wraps are still popping open, a light press with a spatula right after placing them seam-side down helps seal everything in place.
Can I bake these instead of pan-frying?
Yes, and the baked version is excellent for batch cooking. Place assembled wraps seam-side down on a parchment-lined baking sheet, spray or brush lightly with olive oil, and bake at 190°C (375°F) for 12 to 15 minutes, flipping halfway through. They come out golden and crispy all over rather than just on two sides, which is actually a nice bonus when you are making six or eight at once for meal prep.
What is the best way to shred chicken quickly?
The fastest method by far is the stand mixer trick: place warm cooked chicken breast in the bowl of a stand mixer with the paddle attachment and run it on low for 20 to 30 seconds. It shreds the entire chicken in seconds with zero effort. Alternatively, two forks work perfectly for smaller amounts. Rotisserie chicken shreds most easily when it is still slightly warm — cold chicken from the fridge takes noticeably more effort to pull apart.
Are these Low Carb Cheesy Garlic Chicken Wraps actually keto-friendly?
Yes, when made with low-carb tortillas containing 4 to 6g net carbs each, these wraps fit comfortably within standard keto macros. Each wrap delivers approximately 35g of protein and around 18g of fat from the cheeses and olive oil, which is exactly what the keto framework calls for. Just check the label on your specific tortilla brand since net carb counts do vary between products.
These Low Carb Cheesy Garlic Chicken Wraps are proof that eating well on a busy week does not require a sacrifice. Twenty minutes, one bowl, one skillet, and you have a meal that hits every note — crispy, gooey, garlicky, satisfying, and genuinely nourishing. I hope these become as much of a staple in your kitchen as they have become in ours. If you are looking for more quick high-protein chicken dinners, our Creamy Garlic Chicken Ramen and Garlic Parmesan Chicken Pasta are both fan favorites that are on the table in under 30 minutes.
With love and a very garlicky kitchen,
Lora x
Low Carb Cheesy Garlic Chicken Wraps
4
servings10
minutes10
minutes325
kcalIngredients
2 cups (280g) cooked chicken breast, shredded
115g (4 oz) full-fat cream cheese, softened
1 cup (100g) mozzarella cheese, shredded
1/2 cup (50g) cheddar cheese, shredded
3 cloves garlic, minced
2 tbsp fresh flat-leaf parsley, finely chopped
1/2 tsp salt
1/4 tsp black pepper
1 cup (30g) baby spinach, optional
4 large low-carb tortillas
1 tbsp olive oil
Directions
Heat a large non-stick skillet over medium heat with olive oil. Warm tortillas in the microwave for 10–15 seconds each, covered with a damp paper towel.
In a large bowl, combine shredded chicken, softened cream cheese, mozzarella, cheddar, minced garlic, parsley, salt, and pepper. Add spinach if using. Mix until cream cheese coats everything evenly.
Place about 1/2 cup filling in the center-lower third of each tortilla. Fold sides in, then roll tightly from bottom up like a burrito. Place seam-side down.
Cook wraps seam-side down, undisturbed, for 2–3 minutes until deep golden. Press gently with a spatula. Flip and cook another 2–3 minutes until golden on both sides and cheese is melted.
Rest for 60 seconds, then slice diagonally. Garnish with extra parsley and serve immediately.
![Best Cheesy Potato Burritos [Taco Bell Copycat, 35 Min]](https://fresherrecipes.com/wp-content/uploads/2026/03/Cheesy-Potato-Closeup-172x230.webp)