I discovered this recipe on a Tuesday night when Noah had already melted down twice, Lily was asking for a snack every four minutes, and I had exactly zero energy left to stand over a stove. I threw everything onto one pan, slid it into the oven, and sat down with a glass of water for the first time all day. Twenty minutes later, the kitchen smelled like roasted garlic, bubbling cheese, and something that actually resembled a real dinner.
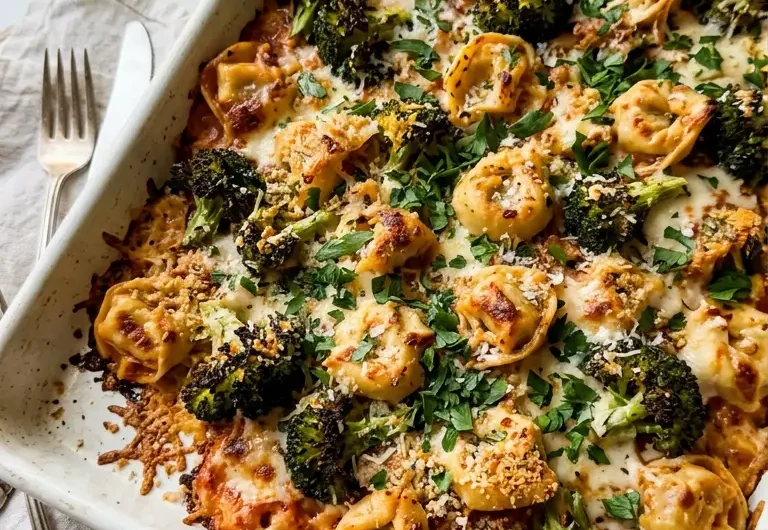
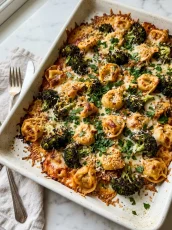
This Sheet Pan Broccoli Tortellini Bake has become one of those recipes I come back to week after week. Pillowy cheese tortellini gets tossed with tender broccoli florets, a simple olive oil and garlic coating, and finished with a shower of Parmesan that turns golden and crispy at the edges. It is hearty enough to satisfy Jake after a long day, easy enough that I can pull it together in under fifteen minutes of actual effort, and colorful enough that even Lily cleans her plate.
Why You'll Love This Recipe
- One pan, zero stress. Everything roasts together on a single sheet pan, which means minimal cleanup and maximum weeknight sanity.
- Ready in about 35 minutes. From fridge to table in just over half an hour, making it one of the fastest comfort food dinners I know.
- Crispy Parmesan edges. The cheese melts onto the tortellini and broccoli and then crisps up beautifully at the edges, which is honestly the best part of the entire dish.
- Kid-approved every single time. Lily picks out the tortellini first, Noah eats the broccoli like it is candy when it is golden and slightly charred, and Jake goes back for seconds.
- Easily customizable. You can swap proteins, change up the cheese, add extra vegetables, or make it spicy. The base recipe is a flexible starting point that works with whatever you have on hand.

Ingredients You'll Need
The ingredient list here is short and relies on pantry staples you likely already have. The real magic is in the olive oil ratio and the combination of garlic, lemon zest, and Parmesan, which turn simple ingredients into something that tastes far more impressive than the effort involved.
- 450g (1 lb) refrigerated or fresh cheese tortellini, the stuffed kind from the refrigerated aisle works best here because it cooks through perfectly without going mushy on the sheet pan.
- 500g (about 4 cups) broccoli florets, cut into similar-sized pieces so they roast evenly and get those gorgeous caramelized edges.
- 3 tablespoons (45ml) extra-virgin olive oil, coating everything generously is what allows the tortellini to crisp up rather than steam.
- 4 garlic cloves, minced, fresh garlic is non-negotiable here. It blooms in the oven and perfumes the entire pan.
- 1 teaspoon Italian seasoning, a simple blend that ties the flavors together without fussing with multiple spice jars.
- 1/2 teaspoon red pepper flakes (optional), for a little warmth that both Jake and I love, though I leave it off Noah’s corner of the pan.
- Salt and black pepper to taste, season generously before roasting since the oven concentrates everything.
- Zest of 1 lemon, this small addition brightens the whole dish and keeps it from feeling heavy.
- 60g (2/3 cup) freshly grated Parmesan cheese, freshly grated melts and crisps far better than the pre-shredded kind. Do not skip this step.
- 2 tablespoons fresh parsley, chopped (for serving), adds a pop of color and a fresh herby note right at the end.
Use refrigerated tortellini, not dried. Dried tortellini needs to be pre-boiled before going on the sheet pan, which adds an extra step and makes timing trickier. Refrigerated tortellini goes straight from the bag to the pan and comes out perfectly cooked with slightly chewy, golden edges.
If you love cheese-forward pasta dinners, you are also going to adore this Garlic Steak Tortellini, which uses similar tortellini in a completely different flavor direction. It is a great recipe to have in your back pocket for nights when you want something a bit more indulgent.
Cut your broccoli into uniform florets. Pieces that are roughly the same size will roast at the same rate, giving you consistently caramelized edges rather than a mix of burnt bits and undercooked stems. I usually aim for pieces about the size of a large grape.
Note: If your broccoli florets are very large or particularly thick-stemmed, give them a five-minute head start on the sheet pan before adding the tortellini. This ensures everything finishes cooking at the same time and nothing ends up overcooked.
How to Make Sheet Pan Broccoli Tortellini Bake
This recipe comes together in three simple stages: toss, roast, and finish with cheese. There is very little hands-on time and the oven does all the heavy lifting. I like to get everything prepped and tossed while the oven is preheating so I can slide the pan straight in the moment it is ready.
Step 1: Preheat your oven and prep the pan.
Preheat your oven to 220 degrees Celsius (425 degrees Fahrenheit). Line a large rimmed sheet pan (approximately 46cm x 33cm or 18×13 inches) with parchment paper or give it a good coating of cooking spray. You want plenty of space so the ingredients roast rather than steam, so if your pan is on the smaller side, use two.
Lora’s Tip: A hot oven is what gives you those caramelized, slightly crispy edges on both the broccoli and the tortellini. Do not rush the preheat step. Let the oven come fully up to temperature before the pan goes in.
Step 2: Toss everything together.
In a large mixing bowl, combine the cheese tortellini, broccoli florets, minced garlic, Italian seasoning, red pepper flakes (if using), lemon zest, salt, and black pepper. Drizzle the olive oil over everything and toss well until every piece is evenly coated. This is the most important step for getting good color and flavor on the final dish, so take your time and make sure nothing is dry.
Lora’s Tip: If you are worried about the garlic burning before the tortellini cooks through, toss the minced garlic with the olive oil first and let it sit for a minute before adding it to the rest of the ingredients. This softens the garlic slightly and reduces the chance of any bitter burned spots.
Step 3: Spread on the sheet pan and roast.
Spread the mixture in a single even layer across your prepared sheet pan. Make sure nothing is piled on top of itself. Slide the pan into the preheated oven and roast for 18 to 20 minutes, until the broccoli is tender with charred edges and the tortellini is golden and slightly crispy on the outside. If you enjoy a sheet pan dinner with a different flavor profile, my Hawaiian Chicken Sheet Pan uses the same single-pan technique with a sweet and savory tropical twist.
Lora’s Tip: Resist the urge to stir the pan halfway through. Leaving everything undisturbed allows the bottoms to get properly golden. If you want to rotate the pan for even browning, do it only once at the halfway point and do it quickly.
Step 4: Add the Parmesan and finish.
Remove the pan from the oven and immediately scatter the freshly grated Parmesan over everything in an even layer. Return the pan to the oven for 3 to 5 more minutes until the cheese is melted, bubbling, and starting to turn golden at the edges. Watch it closely during this stage because the difference between perfect and overdone happens fast.
Step 5: Garnish and serve.
Pull the pan out of the oven and let it rest for two minutes. Scatter the fresh parsley over the top, add a squeeze of fresh lemon juice if you like a bit more brightness, and serve straight from the pan. This is a dinner that is best eaten hot, right out of the oven, when the cheese is still melty and the tortellini edges are at their crispiest.

Lora's Kitchen Tips
- Do not overcrowd the pan. This is the single most common mistake with sheet pan dinners. If the ingredients are piled on top of each other, they will steam instead of roast and you will lose all of those caramelized edges. Use two pans if needed.
- Freshly grated Parmesan is worth it. Pre-shredded Parmesan contains anti-caking agents that prevent it from melting smoothly. Buy a wedge and grate it yourself. It takes two extra minutes and the difference in texture and flavor is significant.
- Pat the broccoli dry before tossing. Any excess moisture on the broccoli will create steam in the oven. If your broccoli was washed, give it a good pat down with a clean kitchen towel before adding it to the bowl.
- Add the lemon zest before roasting, not after. Roasting the zest directly on the pan allows it to infuse the olive oil and the other ingredients with its fragrant oils rather than just sitting on top as a garnish.
- Line your pan for easy cleanup. Parchment paper is your best friend here. The melted cheese will stick to a bare pan and require serious scrubbing. Parchment makes cleanup a two-minute job.
Variations and Substitutions
This recipe is genuinely flexible and I have made at least six different versions of it over the past year. Here are some of my favorites that have all gotten the Jake-approved stamp.
Add Italian sausage: Slice 2 to 3 Italian sausage links (about 300g or 10 oz) into rounds and toss them onto the pan alongside everything else. They cook through at the same time and add a savory, slightly fennel-scented depth that makes the dish even more substantial.
Swap the broccoli for broccolini or cauliflower: Both vegetables roast beautifully at the same temperature and timing. Broccolini has thinner stalks that get wonderfully crispy, while cauliflower adds a nutty, caramelized sweetness.
Make it creamy: After pulling the pan from the oven, drizzle 60ml (1/4 cup) of heavy cream over everything and toss gently before adding the Parmesan. The cream partially evaporates and creates a light sauce that clings to the tortellini.
Add sun-dried tomatoes: Scatter 60g (about 1/3 cup) of oil-packed sun-dried tomatoes over the pan before roasting. They shrivel and intensify in the oven and add a tangy, umami-rich note that is absolutely delicious against the broccoli.
Use spinach and artichoke tortellini: Swap the plain cheese tortellini for spinach and artichoke-filled tortellini if you can find it. The filling adds extra flavor and makes the dish feel a bit more special for a Friday night dinner.
What to Serve with Sheet Pan Broccoli Tortellini Bake

I usually serve this straight from the sheet pan with a simple green salad on the side and some crusty bread for mopping up any cheesy bits that have stuck to the parchment. It is a complete meal on its own but it loves company.
If I am making this for a dinner with friends, I will start with a big Chickpea Feta Avocado Salad as an appetizer. The bright, lemony flavors in the salad complement the roasted garlic richness of the tortellini bake perfectly and it takes about five minutes to throw together.
For a heartier spread, this pairs really well alongside a bowl of Creamy White Chicken Chili. I know that might sound like a lot of food, but when Jake’s college friends come over, having two hearty dishes means nobody leaves hungry and there are usually still leftovers for lunch the next day.
A squeeze of fresh lemon juice over the finished dish right before serving is something I always recommend. It wakes everything up and cuts through the richness of the cheese in the best possible way. A light drizzle of good olive oil at the end does the same thing.
Storage, Freezing, and Reheating
- Refrigerating leftovers: Store any cooled leftovers in an airtight container in the fridge for up to 3 days. The tortellini will soften slightly overnight but the flavors deepen and it is still very good the next day.
- Freezing: I do not recommend freezing this dish. The tortellini becomes mushy and the broccoli loses its texture completely after freezing and thawing. This one is best eaten fresh or within a few days from the fridge.
- Thawing: Since freezing is not ideal for this recipe, thawing is not typically needed. If you have refrigerated leftovers that have been chilled solid, let them sit at room temperature for 10 to 15 minutes before reheating so they warm through evenly.
- Reheating: The best way to reheat leftovers is back in the oven or toaster oven at 190 degrees Celsius (375 degrees Fahrenheit) for about 8 to 10 minutes. This revives some of the crispiness. A microwave works in a pinch but the texture will be softer.
- Make-ahead tip: You can toss the tortellini and broccoli with the olive oil, garlic, and seasonings up to 4 hours ahead and store the bowl covered in the fridge. When you are ready to cook, spread it on the pan and roast as directed. This makes weeknight dinner even faster.
Frequently Asked Questions
Here are the questions I get asked most about this recipe:
Can I use frozen tortellini instead of refrigerated?
You can, but I recommend thawing it first and patting it very dry before tossing it with the other ingredients. Frozen tortellini releases a lot of moisture as it cooks, which can make the broccoli steam instead of roast and you will lose those crispy edges. Thawing and drying it first solves the problem. Refrigerated tortellini is genuinely the easiest option here because it requires no extra prep.
My broccoli is burning before the tortellini is cooked. What am I doing wrong?
This usually happens when the broccoli pieces are too small or when they are placed near the edges of the pan where the heat is most intense. Cut your broccoli into larger, more uniform florets and make sure they are tucked in among the tortellini rather than on the outside edges. You can also give the tortellini a five-minute head start on the pan before adding the broccoli if this keeps happening.
Can I make this recipe dairy-free?
You can make a version of it. Use a dairy-free cheese-filled tortellini if you can find one (some specialty grocery stores carry them), and swap the Parmesan for a good quality dairy-free Parmesan alternative. The flavor will be slightly different but the technique works the same way. The lemon zest and garlic do a lot of the flavor work here so it still tastes really good without the dairy.
Can I add chicken to this dish?
Yes, and it makes it even more filling. Cut 300g to 400g (about 10 to 14 oz) of boneless chicken breast or thigh into bite-sized pieces, toss them with a little extra olive oil and seasoning, and spread them on the pan alongside everything else. Chicken breast pieces that size will cook through in the same 18 to 20 minutes at 220 degrees Celsius (425 degrees Fahrenheit). Just make sure to check that the internal temperature reaches 74 degrees Celsius (165 degrees Fahrenheit) before serving.
What size sheet pan do I need?
You need a large rimmed sheet pan, ideally the standard half-sheet pan size which is approximately 46cm x 33cm (18×13 inches). This gives enough surface area for all the ingredients to spread out in a single layer, which is what you need for roasting rather than steaming. If you only have smaller pans, divide the ingredients between two pans and roast them on separate racks, rotating once halfway through cooking.
This Sheet Pan Broccoli Tortellini Bake is one of those recipes that has genuinely changed how I approach weeknight cooking. It proved to me that a dinner can be fast, require almost no effort, use simple ingredients, and still taste like something you would happily serve to company. The golden cheese edges, the caramelized broccoli, the pillowy tortellini soaking up all that garlicky olive oil. It is comfort food that does not ask much of you and gives back everything.
I hope it becomes a regular in your rotation the way it has in ours. If Lily, Noah, and Jake are any indication, it will be gone before you even finish plating it.
With love and a very full sheet pan,
Lora x

Sheet Pan Broccoli Tortellini Bake
4
servings12
minutes23
minutes420
kcalIngredients
450g (1 lb) refrigerated cheese tortellini
500g (about 4 cups) broccoli florets, cut into even pieces
3 tablespoons (45ml) extra-virgin olive oil
4 garlic cloves, minced
1 teaspoon Italian seasoning
1/2 teaspoon red pepper flakes (optional)
1/2 teaspoon salt, or to taste
1/4 teaspoon black pepper, or to taste
Zest of 1 lemon
60g (2/3 cup) freshly grated Parmesan cheese
2 tablespoons fresh parsley, chopped
Fresh lemon juice for serving (optional)
Directions
Preheat your oven to 220 degrees Celsius (425 degrees Fahrenheit). Line a large rimmed sheet pan with parchment paper or grease it well with cooking spray.
In a large bowl, combine the tortellini, broccoli florets, minced garlic, Italian seasoning, red pepper flakes (if using), lemon zest, salt, and black pepper. Drizzle with olive oil and toss until every piece is evenly and generously coated.
Spread the mixture across the prepared sheet pan in a single even layer, making sure nothing overlaps. Roast in the preheated oven for 18 to 20 minutes until the broccoli is tender with charred edges and the tortellini is golden in spots.
Remove the pan from the oven and scatter the freshly grated Parmesan evenly over the top. Return to the oven for 3 to 5 more minutes until the cheese is melted, bubbling, and starting to turn golden at the edges.
Remove from the oven and let rest for 2 minutes. Scatter fresh parsley over the top, add a squeeze of fresh lemon juice if desired, and serve immediately straight from the pan while the cheese is still melty and the edges are crispy.