
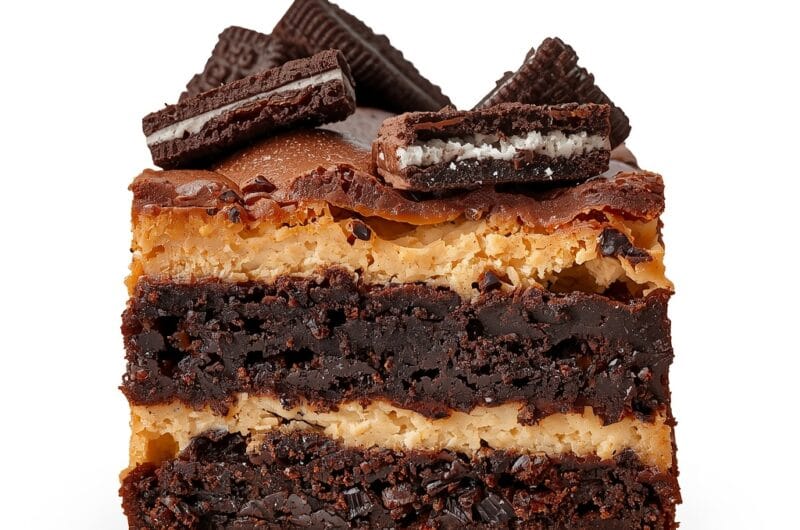
I’ll be honest, the first time I made these, I called them by their proper name and Lily looked at me like I’d lost my mind. Now she asks for “those brownies with the funny name” almost every week. These slutty brownies with cookie dough are exactly what they sound like, unapologetically decadent with three layers of chocolate, cookie, and Oreo goodness all baked together into one seriously delicious dessert.
The beauty of this recipe is that it looks far more impressive than it actually is to make. You’re essentially building three simple layers in one pan, and the oven does most of the heavy lifting. The result is a fudgy brownie base, a chewy cookie dough middle, and crunchy Oreos throughout, all combining into something that tastes like you spent hours in the kitchen when you really only spent minutes prepping.
Why You'll Love This Recipe
- Three distinct layers: Each bite has the fudgy brownie, chewy cookie dough, and crunchy Oreo texture all at once, which means you never get bored.
- Actually uses raw cookie dough safely: Since we're using heat-treated flour and pasteurized eggs, you don't have to worry about foodborne illness while still getting that signature cookie dough flavor.
- Impressive but easy: Your friends will think you spent all day on these when they take about 15 minutes to assemble and 25 minutes to bake.
- Endlessly customizable: Swap the Oreos for other cookies, use different brownie mixes, or add mix-ins like chocolate chips or nuts to make them your own.
- Perfect for any occasion: Whether you need a weeknight dessert or something to bring to a potluck, these brownies never disappoint.

Ingredients You'll Need
These brownies use simple, pantry-friendly ingredients that come together in three distinct layers. The base is a rich brownie, the middle is a spiced, cookie dough situation, and the top layer has crushed Oreos mixed throughout. Let me walk you through what each component needs and why it matters.
- 1 box brownie mix (plus ingredients listed on box), the foundation that bakes up fudgy and delicious without any fussing.
- 170g (6 oz) raw cookie dough, either store-bought or homemade with heat-treated flour, for the chewy middle layer with that signature cookie flavor.
- 15 Oreo cookies, roughly crushed but not into fine crumbs, so you still get crunchy pieces throughout.
- 60g (1/4 cup) unsalted butter, melted, to help bind the Oreo layer and add richness.
- 30g (1/4 cup) all-purpose flour, heat-treated for food safety if you want to use raw dough, which helps it set without baking too hard.
- 1 large egg, preferably pasteurized, which helps the dough layer hold together during baking.
- 60g (1/4 cup) granulated sugar, sweetens the cookie dough layer to balance the bitterness of the chocolate.
- A pinch of salt, enhances all the flavors and prevents the brownies from tasting one-note.
About the cookie dough layer: I always make my own because I can control the texture and know exactly what’s in it. If you’re using store-bought, just make sure it’s labeled as safe to eat raw. The dough won’t bake into traditional cookies here, it will stay chewy and gooey, which is exactly what we want.
Choosing your Oreos: Regular Oreos work perfectly, but I’ve also had success with Double Stuf and even the golden ones. Crush them by hand so you get a mix of fine crumbs and chunky pieces, which gives better texture than a food processor would. You can also try this technique with other cookies, like S’mores Cookie Bars for inspiration on how different cookie layers can shine.
Note: If you're concerned about raw eggs, use pasteurized eggs for the dough layer. Heat-treated flour is readily available online or in specialty stores, and it means you can safely eat the dough without baking it fully. The cookie dough layer won't bake into cookies but will set enough to hold together when you cut the brownies.
How to Make Decadent Slutty Brownies with Cookie Dough: Three-Layer Indulgence
This recipe comes together in three easy phases: prepare the brownie base, make and spread the cookie dough layer, and top everything with Oreos. Each step builds on the last, and the whole assembly takes less than 15 minutes of hands-on time.
Step 1: Prepare your pan and preheat.
Preheat your oven to 350F (175C). Line a 9×9 inch (23×23 cm) square baking pan with parchment paper, leaving some overhang on two sides so you can lift the brownies out later. This prevents sticking and makes cleanup infinitely easier.
Lora’s Tip: I always spray the parchment paper with cooking spray too. It’s extra insurance against sticking, and the brownies slide out perfectly every time.
Step 2: Make the brownie layer.
Prepare your brownie mix according to the package directions. Pour it into the prepared pan and smooth the top with a spatula. This will be the base that everything else sits on, so try to get it relatively even, though it doesn’t need to be perfect.
Lora’s Tip: Don’t overbake the brownie layer at this stage. You’re not baking these brownies fully yet. They’ll bake more when you add the other layers.
Step 3: Spread the cookie dough layer.
In a small bowl, combine your cookie dough with the melted butter, egg, sugar, flour, and salt. Mix until everything is well combined and smooth. Gently spread this mixture over the brownie base. It will be thicker than you might expect, and that’s perfect. This layer stays chewy during baking instead of crisping up.
Lora’s Tip: Use an offset spatula or the back of a spoon to spread the dough. If it’s too thick to spread, let it sit for a minute or two to soften slightly. The dough will continue to spread as it bakes, so don’t stress about perfect coverage.
Step 4: Add the Oreo layer.
Distribute the crushed Oreos evenly over the cookie dough layer. Press them down gently so they stick to the dough but don’t crush them into oblivion. You want to maintain some texture and crunch in the final brownies. If you’re making a thicker brownie, you might want to fold some Oreos into the dough itself rather than just topping with them.
Step 5: Bake until set.
Bake for 20 to 25 minutes, until the brownie layer is set when you touch it gently but still has a little give. The top should look slightly matte rather than shiny. A toothpick inserted into the brownie base should come out with a few moist crumbs, not completely clean. The cookie dough layer won’t look fully baked, and that’s intentional. It will set as it cools.
Lora’s Tip: Don’t overbake these. The cookie dough layer needs to stay soft and chewy. If you bake them too long, the Oreos can become hard and bitter. Start checking at 20 minutes, especially if your oven runs hot.
Step 6: Cool and cut.
Let the brownies cool in the pan for at least 30 minutes before cutting. This allows the layers to set properly and makes cutting cleaner. Once they’re cool enough to handle, use the parchment paper overhangs to lift the entire batch out of the pan and onto a cutting board. Cut into 9 to 12 squares depending on how indulgent you’re feeling. For more ideas on layered chocolate desserts, check out Cheesecake Brownies, which uses a similar assembly technique.

Lora's Kitchen Tips
- Make-ahead option: You can assemble these brownies up through step 4 in the morning and refrigerate them for up to 8 hours before baking. Just add a few extra minutes to the bake time since they'll be cold.
- Room temperature matters: Pull your cookie dough out of the fridge about 15 minutes before you plan to spread it. It's much easier to work with when it's not rock hard, and it spreads more evenly.
- Don't skip the cooling time: I know it's tempting to dig in right away, but cooling for at least 30 minutes prevents the layers from sliding around when you cut them. Patience here means neater squares that look impressive.
- Use a sharp knife: A clean, sharp knife dipped in hot water and wiped dry between cuts gives you the cleanest edges. This is especially important with the Oreo pieces, which can crack and crumble with a dull blade.
- Invest in parchment paper overhangs: Leaving extra parchment paper hanging over the sides of the pan is genuinely the easiest way to get the whole batch out in one piece. Lift from opposite corners and the brownies slide right out.
Variations and Substitutions
The beautiful thing about this recipe is how adaptable it is. The base structure stays the same, but you can swap nearly every component based on what you love or what you have on hand.
Mint chocolate version: Use mint Oreos instead of regular, and add 1/4 teaspoon of peppermint extract to the cookie dough layer. The cool mint paired with the fudgy brownie is absolutely heavenly.
PB lover’s twist: Mix 2 tablespoons of peanut butter into the cookie dough layer, and swap the Oreos for crushed peanut butter cookies. You can also drizzle melted peanut butter over the top before baking for even more flavor.
White chocolate take: Use a white chocolate brownie mix instead of regular, pair it with vanilla cookies, and add 30g (1 oz) of chopped white chocolate to the cookie dough. This creates a milder, sweeter version that’s still deeply satisfying.
Cookie overload: Mix different types of crushed cookies together, like Oreos, Thin Mints, and Nutter Butters. Use about 15 total cookies, mixed and matched. Each bite becomes a surprise.
Add some crunch: Stir 60g (1/2 cup) of chopped pretzels into the cookie dough layer before spreading. The salty, crunchy texture against the sweet brownie and chewy dough is seriously addictive.
What to Serve with Decadent Slutty Brownies with Cookie Dough: Three-Layer Indulgence

These brownies are rich enough to eat on their own, but they’re also perfect with a few simple accompaniments that either balance or amplify that decadent feeling.
A cold glass of whole milk is the classic pairing, and for good reason. The milk cuts through the richness and complements the chocolate perfectly. Vanilla ice cream melting on top of a warm brownie is another obvious choice, but I love pairing these with something unexpected like Prebiotic Iced Tea Lemonade for a refreshing contrast to the richness.
For fancier occasions, serve them with a dollop of whipped cream and a sprinkle of sea salt on top, which heightens the flavors without making them any more work. Coffee is also essential, either a simple cup of black coffee or an espresso that cuts through the sweetness. If you’re feeding kids, pair them with juice or a fun smoothie to keep things balanced.
Storage, Freezing, and Reheating
- Storage: Keep leftover brownies in an airtight container at room temperature for up to 4 days. They actually taste better on day two or three as the flavors meld together and the layers set even more firmly.
- Freezing: Wrap individual brownies tightly in plastic wrap, then place them in a freezer-safe container. They'll keep for up to 2 months. The texture stays remarkably good even after freezing, with the cookie dough layer remaining chewy.
- Thawing: Remove brownies from the freezer and let them come to room temperature in their wrapping, which takes about 30 minutes. This prevents condensation from making them soggy. You can also eat them partially frozen on a hot day, which is absolutely delightful.
- Reheating: If you want to serve them warm, wrap a brownie in a damp paper towel and microwave for 15 to 20 seconds. This warms them through without drying them out. You can also pop them in a 300F (150C) oven for 5 minutes for a gentler reheat.
- Make-ahead tip: Assemble the brownies through step 4, cover the pan with plastic wrap, and refrigerate for up to 8 hours. Bake them fresh whenever you're ready, adding just a minute or two to the bake time since they'll be cold. This is perfect for when you want to surprise Jake with fresh brownies waiting when he gets home from work.
Frequently Asked Questions
Here are the questions I get asked most about this recipe:
Can I use homemade brownie batter instead of a box mix?
Absolutely. Use your favorite brownie recipe and prepare it according to directions, then spread it in the pan and proceed with the recipe as written. The bake time might vary slightly depending on how thick your brownie layer is, so start checking at 18 minutes. Homemade brownies work beautifully here.
What if I don't have heat-treated flour for the cookie dough?
You can buy heat-treated flour online, but if that’s not an option, use pasteurized eggs instead. The eggs are the main food safety concern with raw dough, and using pasteurized versions eliminates that risk entirely. Just make sure the label explicitly says they’re pasteurized.
Can I make these in a larger pan?
Yes, but the bake time will be shorter. Use a 9×13 inch (23×33 cm) pan and reduce the bake time to 15 to 18 minutes, since the brownies will be thinner. Start checking at 15 minutes to make sure you don’t overbake. The layers will be less dramatic but still delicious.
Why is my cookie dough layer spreading during baking?
This happens when the dough is too warm or too thin when it goes into the oven. Make sure your dough is at room temperature, not warm, and spread it to about 1/2 inch (1 cm) thickness. If it’s spreading too much, it might be slightly too soft, so chill the whole pan for 10 minutes before baking.
Can I make mini versions in a muffin tin?
Yes, and they bake much faster. Line a muffin tin with paper liners, divide the brownie batter among the cups, add a small amount of cookie dough and a crushed Oreo to each. Bake at 350F (175C) for 12 to 15 minutes. They’re perfect for portion control and make great lunch box treats for Lily’s school.
These brownies have become a staple in our house because they hit that sweet spot between impressive and easy. Noah will eat his weight in these if I let him, and Jake sneaks extras from the container when he thinks I’m not looking. They’re the kind of dessert that feels fancy enough for company but simple enough to make on a random Tuesday when you need something sweet.
I really hope these become your favorite go-to indulgence too. There’s something special about layered desserts that taste far more complicated than they actually are, and these slutty brownies deliver on that promise every single time. Make a batch this week and let me know how they turn out.
With love and chocolate,
Lora x
Decadent Slutty Brownies with Cookie Dough: Three-Layer Indulgence
9
servings15
minutes25
minutes380
kcalIngredients
1 box brownie mix plus ingredients listed on package
170g (6 oz) raw cookie dough, store-bought or homemade with heat-treated flour
60g (1/4 cup) unsalted butter, melted
1 large egg, preferably pasteurized
60g (1/4 cup) granulated sugar
30g (1/4 cup) all-purpose flour, heat-treated for food safety
A pinch of salt
15 Oreo cookies, roughly crushed
Directions
Preheat oven to 350F (175C). Line a 9x9 inch (23x23 cm) square baking pan with parchment paper, leaving overhang on two sides. Spray the parchment with cooking spray.
Prepare brownie mix according to package directions. Pour into prepared pan and smooth the top with a spatula.
In a small bowl, combine cookie dough, melted butter, egg, sugar, flour, and salt. Mix until smooth and well combined.
Gently spread the cookie dough mixture evenly over the brownie base using an offset spatula or the back of a spoon.
Distribute crushed Oreos evenly over the cookie dough layer. Press down gently to help them adhere.
Bake for 20 to 25 minutes, until the brownie layer is set with a slight give when touched. The cookie dough layer will look underbaked, which is correct. A toothpick in the brownie should have a few moist crumbs.
Allow brownies to cool in the pan for at least 30 minutes. Lift out using parchment paper overhang and cut into 9 squares. Cool completely before serving.

