I remember the first time I made this Spicy Dragon Chicken at home, Jake looked at me like I’d lost my mind when I told him the ingredient list. Ketchup? In a spicy Asian dish? But then he took one bite, and suddenly he understood. This isn’t your typical takeout chicken recipe, and that’s exactly what makes it so irresistible. It’s the kind of dish that tastes complicated but comes together in about 30 minutes, which means weeknight dinner wins in our house.
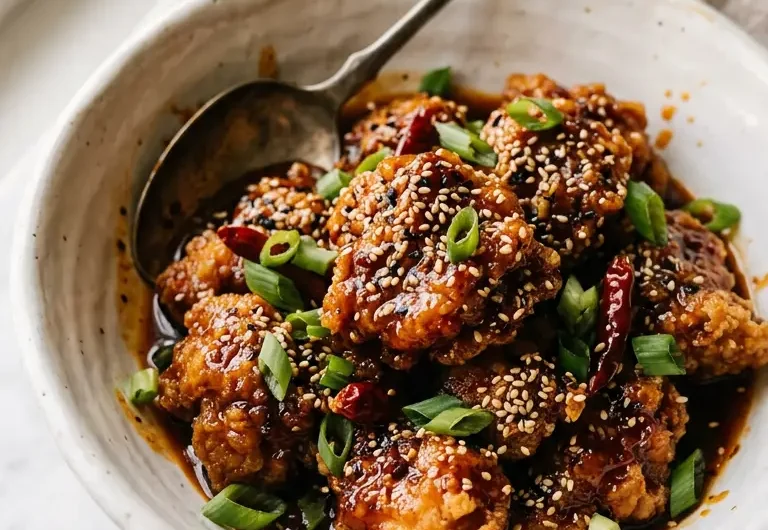
Dragon Chicken is pure comfort with a serious kick. You get crispy, golden chicken pieces coated in this incredible sweet-spicy sauce that somehow hits every flavor note at once. There’s garlic, ginger, a whisper of sesame, and this addictive heat that makes you reach for another piece before you’ve even finished chewing the first one. Lily actually eats this without complaining (a rare miracle), and Noah will dip his in rice like it’s his job. It’s the kind of meal that feels like you’ve been cooking all day, but really you’ve just been smart with your time.
Why You'll Love This Recipe
- Ready in 30 minutes: From prep to plate, this is a genuine weeknight wonder. I can have dinner on the table before Noah gets completely bored with his toy kitchen.
- Crispy meets saucy: The chicken stays golden and textured even after tossing in sauce, because we do it all in one skillet with minimal fuss.
- Sweet and spicy balance: The ketchup and sugar balance the heat perfectly, so it's not just a one-note spice bomb. Everyone at the table gets something they love.
- One-skillet magic: I do the chicken, then the sauce in the same pan. Minimal cleanup means more time with family instead of at the sink.
- Completely customizable heat: Use more dried chilies if you like serious fire, or dial it back if you're feeding little ones. It's flexible enough to work for anyone.

Ingredients You'll Need
The beauty of Dragon Chicken is that most of these ingredients are probably already in your kitchen. That’s my favorite kind of recipe because it means less fussing at the store and more time actually cooking. The combination of pantry staples and fresh aromatics creates something that tastes restaurant-quality but costs a fraction of what you’d pay for takeout.
- 1 kg (2.2 lb) boneless, skinless chicken breasts or thighs, sliced into bite-sized pieces. I prefer thighs because they stay so much more tender and juicy, even if you accidentally cook them a minute longer than planned.
- 60ml (1/4 cup) cornstarch, essential for that crispy exterior. This is what gives you that golden crust that doesn’t get soggy even after sauce hits it.
- 1 egg white, whisked, which helps the cornstarch stick and creates an even crispier coating than cornstarch alone.
- 2.5ml (1/2 teaspoon) salt, for seasoning the chicken before cooking.
- 2.5ml (1/2 teaspoon) black pepper, freshly ground if you have a grinder. Pre-ground works fine but the flavor is so much more alive when it’s fresh.
- Vegetable oil for frying, about 480ml (2 cups). Use something with a high smoke point like canola or peanut oil so it doesn’t break down in the hot pan.
- 15ml (1 tablespoon) sesame oil, for the sauce base. This adds a nutty, toasted depth that makes the whole dish taste more sophisticated.
- 30ml (2 tablespoons) minced garlic, about 6 to 8 cloves. I always use fresh because garlic powder just doesn’t compare.
- 15ml (1 tablespoon) minced ginger, that fresh, peppery heat that wakes up your entire mouth.
- 2 to 3 dried red chilies or 5ml (1 teaspoon) crushed red pepper flakes, adjust this based on who’s eating. Our family goes for the higher end, but I dial it back when Lily’s having a particularly spicy-sensitive day.
- 120ml (1/2 cup) tomato ketchup, yes really. This is your sweet balance and umami base.
- 30ml (2 tablespoons) soy sauce, for salty depth and that savory umami quality.
- 15ml (1 tablespoon) chili garlic sauce, store-bought is totally fine. This amplifies the heat without overpowering the other flavors.
- 15ml (1 tablespoon) vinegar, white or rice vinegar, gives you that tangy brightness.
- 15ml (1 tablespoon) sugar or honey, extra sweetness to balance everything.
- 60ml (1/4 cup) water, to loosen the sauce to your preferred consistency.
- Fresh green onions, sliced, for garnish and that fresh bite at the end.
- Toasted sesame seeds, for crunch and nuttiness.
Don’t skip the egg white coating. I know it seems like an extra step, but it’s what separates homemade crispy chicken from the sad, damp version. The egg white creates a seal that keeps the outside crunchy even when the sauce hits.
Fresh ginger and garlic make all the difference. I learned this lesson the hard way after trying this with jarred versions. The fresh stuff has a brightness and complexity that carries the entire dish. Keep ginger in a small container in the fridge and use it weekly, because you’ll start finding reasons to add it to everything.
If you want to explore similar crispy-coated proteins, try my Crispy Ground Beef Tacos, which uses the same cornstarch technique to achieve that golden crust.
Note: The key to keeping your chicken crispy is not stirring too aggressively when you add the sauce. Fold it in gently, coating the pieces without breaking them apart. Also, make sure your oil is actually hot before you add the chicken, around 180°C (350°F). If it's too cool, the chicken absorbs oil and gets greasy instead of crispy.
How to Make Spicy Dragon Chicken: Quick Indo-Chinese Delight
This dish comes together quickly because we’re working in stages: marinate, fry, then sauce. Each step is simple on its own, which means even if you’re cooking while simultaneously breaking up a sibling argument (speaking from experience here), you can still make something amazing.
Step 1: Marinate the chicken for maximum tenderness.
In a medium bowl, combine your sliced chicken with the egg white, cornstarch, salt, and black pepper. Toss everything together until the chicken is completely coated in a light, even layer. Let it sit for 10 to 15 minutes while you get everything else ready. This isn’t a long marinate, but it’s enough time for the cornstarch to fully adhere and start creating that crucial crispy coating.
Lora’s Tip: If you’re in a real rush, you can skip ahead after just 5 minutes. It won’t be quite as crispy, but life happens and good enough is sometimes perfect enough.
Step 2: Fry the chicken until golden and crispy.
Heat your vegetable oil in a large skillet over medium-high heat until it shimmers and a tiny piece of chicken immediately sizzles when it hits the pan. Working in batches so you don’t crowd the pan, carefully add your marinated chicken pieces. Let them cook undisturbed for about 3 to 4 minutes on the first side so they develop that golden crust, then flip and cook another 2 to 3 minutes until the second side is equally golden.
Remove the chicken with a slotted spoon and drain on paper towels. This is where patience pays off, because if you crowd the pan or flip too early, you get steamed chicken instead of crispy chicken, and that’s not what we’re going for.
Lora’s Tip: If you’re making this for a crowd, keep the first batch warm in a 120°C (250°F) oven while you cook the rest. It stays crispy and everyone eats hot food.
Step 3: Make the sauce in the same skillet.
Pour out most of the oil, leaving just about 15ml (1 tablespoon) in the pan. Add the sesame oil over medium-high heat, then add your minced garlic, ginger, and dried chilies. Stir constantly for just 1 to 2 minutes until the kitchen smells absolutely incredible and the garlic starts to turn golden. This is the moment where you know you’re about to create something special.
Add the ketchup, soy sauce, chili garlic sauce, vinegar, and sugar. Stir everything together and let it bubble for 2 to 3 minutes, then add the water a little at a time until you reach your desired sauce consistency. I like mine somewhere between a thick glaze and a proper sauce, so about 60ml (1/4 cup) total, but you might prefer it thinner or thicker.
Lora’s Tip: If your sauce seems too thin, just let it keep cooking for a minute or two and it’ll concentrate. Too thick? Add a splash more water. Sauce should feel forgiving.
Step 4: Combine chicken and sauce.
Gently fold your crispy chicken back into the sauce, stirring carefully so the pieces stay intact and get evenly coated. Let everything simmer together for just 1 minute so the flavors meld. You want the chicken to absorb some of that sauce while still maintaining its crispy exterior.
Step 5: Garnish and serve immediately.
Transfer to a serving bowl or platter, scatter fresh green onions and toasted sesame seeds over the top, and serve right away. Serve with steamed rice, fried rice, or even in lettuce wraps if you’re going low-carb. This dish is best enjoyed hot, straight from the pan when everything is still crispy and saucy and perfect.

Lora's Kitchen Tips
- Oil temperature is everything. If your oil isn't hot enough, you get greasy chicken. Too hot and it burns before the inside cooks. The sweet spot is when a small piece of chicken immediately sizzles and floats to the top.
- Don't skip the paper towels. Draining the chicken on paper towels for just a minute removes excess oil and keeps the final dish from being heavy. It's a small step that makes a real difference.
- Make your sauce while the chicken cooks. This isn't just time-saving, it's also about keeping ingredients fresh. Garlic and ginger are brightest when they're freshly hit with heat.
- Taste as you go with the sauce. Everyone's heat tolerance is different, so adjust the chilies and chili sauce to your family's preference. You can always add more spice, but you can't take it out.
- Serve immediately for maximum crispiness. This dish stays good for a few hours, but it's honestly best eaten right out of the pan. If it sits, the sauce softens the chicken coating slightly.
Variations and Substitutions
The beauty of Dragon Chicken is how adaptable it is. Once you master the basic technique, you can play with variations to keep your dinner rotation interesting.
Vegetarian Dragon Cauliflower: Swap the chicken for cauliflower florets and follow the exact same process. The sauce clings beautifully to the florets, and you get that same crispy-saucy texture. Lily actually asks for this version sometimes, which tells you everything about how good it is.
Shrimp Dragon Bowl: Use medium shrimp instead of chicken and reduce the cooking time to 2 minutes per side. Everything else stays exactly the same. It’s elegant enough for date night but quick enough for Tuesday.
Dragon Tofu: Press extra-firm tofu, cut into cubes, and follow the exact same breading and frying method. The tofu gets this incredible golden crust and soaks up the sauce like a dream.
Low-Spice Version: If you’re cooking for a mixed heat-tolerance table, make a mild batch by using half the chilies and cutting the chili garlic sauce in half. You can add a drizzle of hot sauce on the side for anyone who wants more heat.
What to Serve with Spicy Dragon Chicken: Quick Indo-Chinese Delight

Dragon Chicken is flexible enough to work with almost any side you have on hand. I always serve it with steamed jasmine rice or brown rice because the sauce soaks into the rice beautifully and every bite becomes more delicious. Fried rice works too if you want to use up leftover rice from earlier in the week.
Fresh sides balance all that sauce and heat perfectly. Cucumber slices, fresh cilantro, or a simple green salad cuts through the richness. We also do steamed bok choy or broccoli on the side when we want to feel virtuous about vegetables.
For a complete meal experience, serve this alongside Korean Ground Beef Bowl, which has complementary Asian-inspired flavors and similar quick cooking time. Or pair it with Easy Clean High Protein Meal components if you’re building a mixed protein dinner.
Storage, Freezing, and Reheating
- Storage: Leftovers keep in an airtight container in the fridge for up to 3 days. The chicken will soften a bit as the sauce continues to penetrate, which honestly still tastes good, just different from the fresh version.
- Freezing: You can freeze the cooked dish for up to 2 months, though the chicken texture changes slightly after freezing. I find it's better to freeze the sauce and chicken separately if you want to maintain crispiness.
- Thawing: Thaw overnight in the fridge, never on the counter. This keeps food safety in check and prevents the sauce from separating.
- Reheating: Reheat gently in a skillet over medium heat with a splash of water to revive the sauce. The oven at 160°C (325°F) also works well for reheating without further cooking the chicken.
- Make-ahead tip: You can do all your prep the night before, coating the chicken and storing it in the fridge. You can also make the sauce ingredients list and store them in separate containers, then you're literally just frying and mixing when dinner time hits.
Frequently Asked Questions
Here are the questions I get asked most about this recipe:
Can I use chicken breast instead of thighs?
Absolutely, though thighs stay juicier if you happen to overcook them by a minute. Breast meat is leaner and technically healthier, so use whatever you prefer. Just watch it a bit closer since it can dry out faster.
What if I don't have sesame oil?
You can use a little more vegetable oil, though you’ll lose that subtle nutty flavor that makes the sauce feel special. If you have any Asian cooking staple oils on hand, use those instead. The sesame oil really does make a difference though, so grab some next time you’re at the store.
How spicy is this really?
With the amount of chilies I’ve listed, it’s moderately spicy, maybe a 6 out of 10 on my personal heat scale. You can absolutely dial it down to a 3 by using less chili or more sauce, or crank it up to an 8 by adding more dried chilies and extra chili garlic sauce. Start conservative and build up because you can’t take heat out once it’s in.
Can I make this in bulk for meal prep?
You can fry the chicken and make the sauce separately, then store them in the fridge and combine them when you’re ready to eat. This keeps the chicken crispier for longer. Combine them right before eating for best texture, though eating them together after a day or two still tastes delicious, just slightly softer.
What's the difference between ketchup and tomato sauce in this?
Ketchup has added sugar and spices that give you a more complex flavor base, while tomato sauce is more neutral. Ketchup is actually what makes this dish work so well because it brings its own sweetness and tang. I wouldn’t swap it for tomato sauce, but if you absolutely can’t use ketchup, you’d need to add extra sugar and vinegar to compensate.
I hope Dragon Chicken becomes a regular on your dinner table like it has on ours. There’s something so satisfying about a meal that tastes indulgent but comes together in less than half an hour. Jake devours this, the kids ask for seconds without complaint, and I get to feel like I’ve actually cooked something impressive even though it’s genuinely easy. That’s my favorite kind of recipe.
With love and sesame oil,
Lora x
Spicy Dragon Chicken: Quick Indo-Chinese Delight
4
servings15
minutes20
minutes350
kcalIngredients
1 kg (2.2 lb) boneless, skinless chicken breasts or thighs, sliced into bite-sized pieces
60ml (1/4 cup) cornstarch
1 egg white, whisked
2.5ml (1/2 teaspoon) salt
2.5ml (1/2 teaspoon) black pepper
Vegetable oil for frying, about 480ml (2 cups)
15ml (1 tablespoon) sesame oil
30ml (2 tablespoons) minced garlic
15ml (1 tablespoon) minced ginger
2 to 3 dried red chilies or 5ml (1 teaspoon) crushed red pepper flakes
120ml (1/2 cup) tomato ketchup
30ml (2 tablespoons) soy sauce
15ml (1 tablespoon) chili garlic sauce
15ml (1 tablespoon) vinegar
15ml (1 tablespoon) sugar or honey
60ml (1/4 cup) water
Fresh green onions, sliced
Toasted sesame seeds
Directions
In a medium bowl, combine sliced chicken with egg white, cornstarch, salt, and black pepper. Toss until completely coated and let sit for 10 to 15 minutes.
Heat vegetable oil in a large skillet over medium-high heat until it shimmers. Working in batches, fry marinated chicken 3 to 4 minutes per side until golden and crispy. Drain on paper towels.
Pour out most of the oil, leaving about 15ml (1 tablespoon). Add sesame oil, then sauté garlic, ginger, and chilies for 1 to 2 minutes until fragrant and golden.
Add ketchup, soy sauce, chili garlic sauce, vinegar, and sugar. Stir and let bubble for 2 to 3 minutes, then add water until you reach desired sauce consistency.
Gently fold fried chicken back into sauce and simmer for 1 minute. Transfer to serving bowl, garnish with fresh green onions and toasted sesame seeds, and serve immediately with rice.
