I still remember the first time I made these for Lily and Noah. It was a rainy Saturday afternoon and we were all going a little stir-crazy inside. I had a package of Oreos sitting in the pantry, a batch of cookie dough ready to go, and suddenly it hit me: what if I just baked the Oreos inside the cookie dough? The result was so ridiculous and so perfect that Jake actually did a little happy dance in the kitchen. I am not exaggerating.
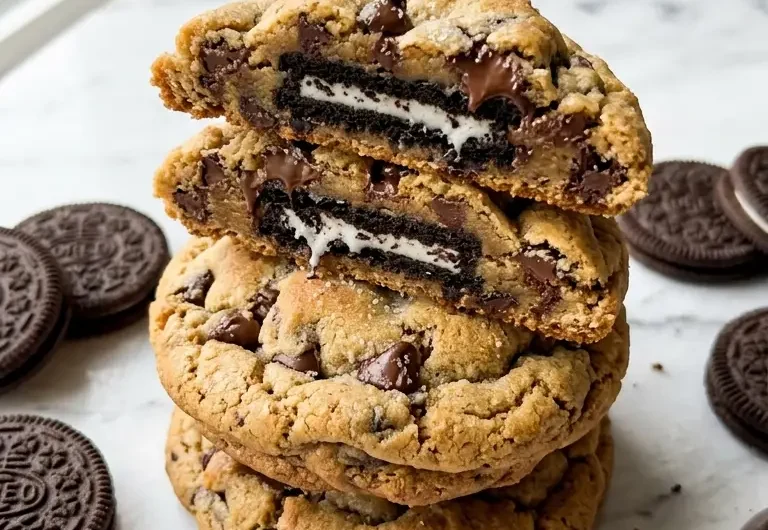
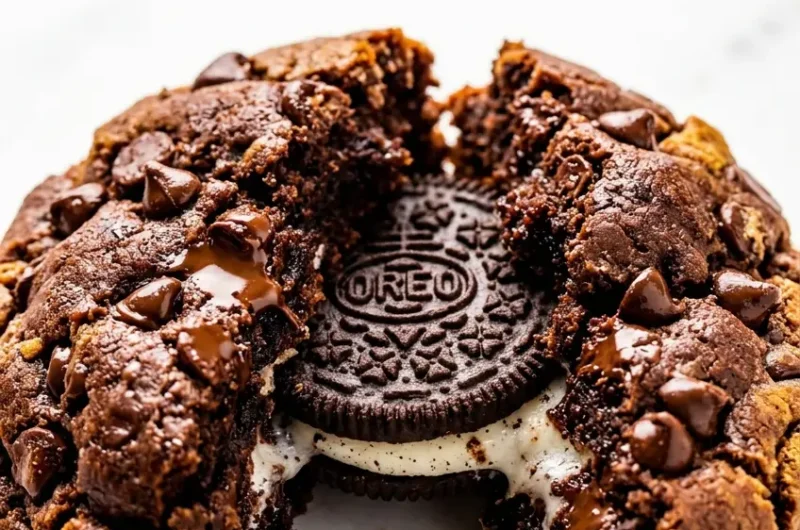
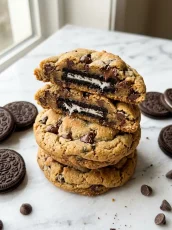
These stuffed Oreo cookies are exactly what they sound like: a whole Oreo cookie completely encased inside a thick, chewy chocolate chip cookie. When you bite in, you get that crisp Oreo snap hidden inside a soft, buttery, slightly gooey cookie. The cream filling half-melts into the dough and creates this incredible layer of sweet vanilla in the middle. They are over the top in the best possible way.
I have made these at least a dozen times now. They are always the first thing to disappear at bake sales, birthday parties, and every school event Lily has ever dragged me to. They look like they took serious skill, but I promise they are completely beginner-friendly. If you can wrap dough around a cookie, you can absolutely make these.
Why You'll Love This Recipe
- Two Cookies in One: Every single bite delivers both a chewy chocolate chip cookie AND a whole Oreo hidden inside, which is basically dessert magic.
- Completely Beginner-Friendly: There is no special equipment, no candy thermometers, and no complicated techniques. Just dough, Oreos, and an oven.
- Kid-Approved and Kid-Fun to Make: Lily and Noah beg to help wrap the dough around the Oreos. It is one of the easiest ways to get little hands involved in the kitchen.
- Seriously Impressive Results: These look like something from a fancy bakery but come together in about 30 minutes total. People will think you spent hours.
- Endless Customization: You can swap in Golden Oreos, Mint Oreos, Double Stuf, or any flavor you love and completely change the personality of the cookie.

Ingredients You'll Need
The ingredient list here is beautifully simple. You are essentially making a classic cookie dough and then using it as a blanket for your Oreos. Every ingredient plays a specific role in creating that thick, chewy, bakery-style result, so I want to walk you through each one.
- 300g (2.5 cups) all-purpose flour, spooned and leveled into the measuring cup, not scooped. Too much flour makes the cookies cakey and dry instead of chewy.
- 1 tsp baking soda, which gives the cookies just enough lift without making them puff up too much and lose that dense, chewy center.
- 1 tsp fine sea salt, because salt makes chocolate taste more like chocolate. Do not skip it.
- 225g (1 cup / 2 sticks) unsalted butter, softened to room temperature, the fat that creates the rich, tender crumb. If your butter is too cold the dough will be stiff and hard to wrap.
- 200g (1 cup) granulated white sugar, for spread and crisp edges.
- 165g (3/4 cup packed) light brown sugar, for moisture, chew, and that deep caramel note.
- 2 large eggs, room temperature, for structure and richness. Cold eggs can cause the butter to seize.
- 2 tsp pure vanilla extract, because this dough is the star alongside the Oreo and it needs to taste genuinely great on its own.
- 340g (2 cups) semi-sweet chocolate chips, I prefer a mix of regular and mini chips so you get pockets of chocolate in every bite.
- 24 Oreo cookies (1 standard package), one per stuffed cookie. Classic Oreos work perfectly, but any flavor is fair game.
Use room temperature butter and eggs for the best dough. Cold butter will not cream properly with the sugars, and you will end up with a dense dough that is hard to work with. I usually pull everything out of the fridge about 45 minutes before I start baking.
Double Stuf Oreos are a popular choice because the extra cream filling melts even more dramatically into the center of the cookie. That said, classic Oreos give you a more balanced cookie-to-filling ratio. Both are incredible, so use whichever you have on hand. If you love making indulgent layered desserts, you might also enjoy my Slutty Brownies with Cookie Dough, which uses a very similar concept of stacking treats inside other treats.
For extra thick cookies, chill the assembled stuffed dough balls in the refrigerator for at least 30 minutes before baking. Cold dough spreads more slowly in the oven, which means taller, thicker, chewier cookies. This is the single most impactful tip I can give you for this recipe.
Note: These cookies are large by design since each one contains a full Oreo inside. Expect each cookie to be about 115g (4 oz) of dough. Do not try to make them smaller or the Oreo will not be fully enclosed and the dough will tear open during baking.
How to Make Oreo Cookie in a Cookie (Stuffed Oreo Cookies)
I want to walk you through each step in real detail because the wrapping process is the one place where people sometimes get tripped up. Once you do it two or three times, it feels completely natural. Let me show you exactly how I do it.
Step 1: Make the Cookie Dough.
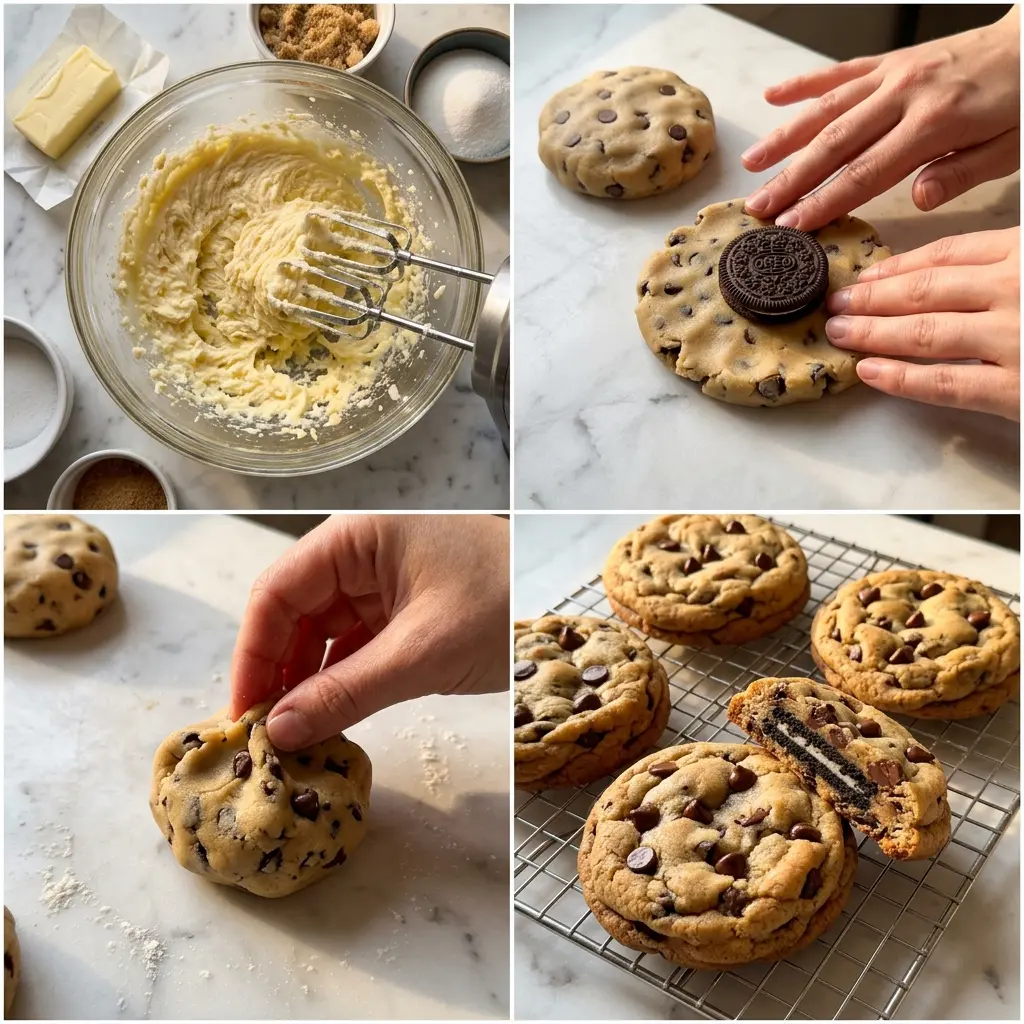
Preheat your oven to 175C (350F) and line two large baking sheets with parchment paper. In a medium bowl, whisk together 300g (2.5 cups) all-purpose flour, 1 tsp baking soda, and 1 tsp fine sea salt. Set aside. In a large bowl using a hand mixer or stand mixer fitted with the paddle attachment, beat 225g (1 cup) softened butter with 200g (1 cup) granulated sugar and 165g (3/4 cup) brown sugar on medium-high speed for about 3 minutes, until the mixture is pale, fluffy, and noticeably increased in volume. Add the 2 eggs one at a time, beating for 30 seconds after each addition, then mix in 2 tsp vanilla extract.
Lora’s Tip: Do not rush the creaming step. Those 3 full minutes of beating butter and sugar together are what create the light, airy base that gives these cookies their chewy-but-not-dense texture. I set a timer so I am not tempted to cut it short.
Step 2: Finish the Dough and Fold in Chocolate Chips.
Reduce the mixer to low speed and add the flour mixture gradually, mixing just until no dry streaks remain. Do not overmix at this stage or the gluten will develop too much and your cookies will be tough. Switch to a rubber spatula and fold in 340g (2 cups) semi-sweet chocolate chips by hand. The dough will be thick and slightly sticky, which is exactly what you want.
Step 3: Portion and Wrap the Dough Around Each Oreo.
Scoop out approximately 60g (2 oz) of cookie dough per cookie. Divide each portion in half. Flatten one half into a disc in the palm of your hand, place one Oreo in the center, then flatten the second half of dough and lay it over the top. Pinch the edges together firmly all the way around, then roll the whole thing gently between your palms to create a smooth ball. Make sure there are no gaps or thin spots, especially around the edges where the two pieces of dough meet.
Lora’s Tip: If the dough is sticking to your hands, lightly wet your palms with cold water. This makes the wrapping process so much cleaner and easier, especially if you are working in a warm kitchen.
Step 4: Chill the Dough Balls (Highly Recommended).
Place the wrapped dough balls on your prepared baking sheets, spacing them at least 7.5cm (3 inches) apart. At this point, I strongly encourage you to refrigerate the trays for 30 minutes before baking. Cold dough spreads more slowly, which means thicker, chewier cookies with a better texture. If you are short on time you can bake them straight away, but the chilled version is noticeably better. For more ideas using similar thick, stuffed dessert techniques, check out my S’mores Cookie Bars, which use the same principle of layering in the pan.
Step 5: Bake and Cool.
Bake for 13 to 15 minutes at 175C (350F), until the edges are set and lightly golden but the centers still look slightly underdone and glossy. This is the correct visual cue. The cookies will continue cooking on the hot pan for several minutes after you pull them from the oven, so pulling them early is what gives you that soft, gooey center. Let the cookies cool on the baking sheet for 10 full minutes before transferring to a wire rack. I know it is hard to wait, but they need that time to firm up or they will fall apart.
Lora’s Tip: For perfectly round cookies, immediately after they come out of the oven, use a large round cookie cutter or a glass to gently scoot the edges inward in a circular motion. This reshapes any cookies that spread a little unevenly and gives them that beautiful bakery-style circle.
Lora's Kitchen Tips
- Weigh your flour. Measuring flour by volume is the most common baking mistake. I use a kitchen scale and aim for exactly 300g every time. Scooping directly from the bag can add up to 30 percent more flour, which will make your cookies dry and crumbly.
- Do not overbake. The number one enemy of a great stuffed cookie is overbaking. The centers should look just barely set and slightly glossy when you pull them from the oven. They will finish cooking from residual heat on the pan.
- Chill the dough balls before baking. Even 20 minutes in the fridge makes a meaningful difference in thickness and chew. If you have time, an overnight rest in the fridge deepens the flavor beautifully.
- Press a few extra chocolate chips into the tops of the balls before baking. This is a trick I learned from a bakery years ago. It makes the finished cookies look professional and photogenic, with visible chocolate chips on the surface.
- Use a cookie scoop for consistent sizing. Since these cookies are already large, using a scoop ensures every cookie is the same size and bakes evenly. If some are larger than others, the smaller ones will overbake before the larger ones are done.
Variations and Substitutions
Once you have made the original version, the variations are where things get really fun. I have tried quite a few of these in my kitchen and every single one has been a crowd-pleaser.
Golden Oreo Version: Swap classic Oreos for Golden Oreos and use white chocolate chips in the dough instead of semi-sweet. The result is a buttery, vanilla-forward cookie that is completely different in flavor but just as addictive.
Mint Chocolate Chip: Use Mint Oreos inside and replace half the chocolate chips with mint chocolate chips. The cool, refreshing mint against the warm cookie is genuinely stunning. These are Noah’s personal favorite.
Peanut Butter Stuffed: Spread a thin layer of peanut butter on each Oreo before wrapping in dough. The peanut butter melts into the cookie center and creates a peanut butter cup-like experience that Jake could not stop talking about.
Birthday Cake Oreos: Use Birthday Cake Oreos and add 2 tablespoons of rainbow sprinkles to the dough. These are absolutely perfect for children’s birthday parties and Lily has already requested them for her next birthday.
Double Chocolate: Replace 40g (1/3 cup) of the flour with unsweetened cocoa powder to create a chocolate cookie dough exterior. Use classic Oreos inside and you get chocolate on chocolate on chocolate, which is exactly as good as it sounds.
What to Serve with Oreo Cookie in a Cookie (Stuffed Oreo Cookies)

These cookies are spectacular warm from the oven when the chocolate chips are still melty and the Oreo center is slightly soft. I usually plan to serve them about 15 minutes after they come out of the oven for that perfect warm cookie experience.
A cold glass of whole milk is the classic pairing and honestly it is classic for a reason. The richness of the cookie against the cool, creamy milk is one of those simple pleasures that never gets old. For something a little more grown-up, serve alongside a scoop of vanilla bean ice cream and let the warm cookie melt the ice cream slightly around the edges.
These also make an incredible ice cream sandwich. Let the cookies cool completely, then sandwich a generous scoop of cookies and cream ice cream between two of them. Wrap individually in plastic wrap and freeze for at least 2 hours. They are even better than the ones at the fair. If you love easy baked desserts that are equally at home at a party or a weeknight treat, you might also love my Cadbury Mini Egg Cookies, which have that same fun, shareable energy.
Storage, Freezing, and Reheating
- Storage: Store baked cookies in an airtight container at room temperature for up to 5 days. Place a piece of bread in the container to keep the cookies soft. The bread will go stale instead of the cookies.
- Freezing Baked Cookies: Baked cookies freeze beautifully for up to 3 months. Layer them between sheets of parchment paper in a freezer-safe container or zip-lock bag.
- Freezing Unbaked Dough Balls: The assembled unbaked dough balls can be frozen on a sheet pan until solid, then transferred to a freezer bag. Bake from frozen at 175C (350F) for 16 to 18 minutes, adding 2 to 3 minutes to the baking time.
- Thawing: Thaw frozen baked cookies at room temperature for about 30 minutes. To revive that fresh-baked softness, microwave a single cookie for 15 to 20 seconds.
- Make-Ahead Tip: Assemble all the dough balls, place on a parchment-lined tray, cover tightly with plastic wrap, and refrigerate for up to 48 hours before baking. This actually improves the flavor as the dough rests and the sugars caramelize more deeply during baking.
Frequently Asked Questions
Here are the questions I get asked most about this recipe:
Can I use store-bought cookie dough instead of homemade?
Yes, absolutely. A tube of refrigerated chocolate chip cookie dough from the store works perfectly well here. The cookies will be a little thinner and the flavor will not be quite as rich, but they will still be delicious and the concept works exactly the same way. This is a great shortcut if you are short on time or baking with young kids who just want to get to the fun wrapping part.
My dough keeps tearing when I try to wrap the Oreo. What am I doing wrong?
A few things could be causing this. First, make sure you are dividing the dough into large enough portions. Each cookie needs about 60g (2 oz) of dough total, which is more than it sounds. Second, if your dough is cold and stiff from the fridge, let it sit at room temperature for 10 minutes to soften slightly before wrapping. Third, work slowly and gently, pressing the dough flat before placing the Oreo rather than trying to stretch it over the top.
Can I use any flavor of Oreo?
Yes, and I really encourage you to experiment. Golden Oreos, Mint Oreos, Birthday Cake Oreos, Peanut Butter Oreos, and Strawberry Oreos all work beautifully. The flavor of the Oreo filling melts slightly into the surrounding dough during baking and subtly changes the whole character of the cookie. It is a really fun way to customize this recipe for different occasions or personal preferences.
Why did my cookies spread so flat?
Flat cookies usually come down to one of three things: butter that was too warm or melted instead of softened, not enough flour, or dough that was not chilled before baking. Make sure your butter is properly softened but not melted, measure your flour by weight if possible, and always refrigerate the assembled dough balls for at least 20 to 30 minutes before they go into the oven. That chill time is the single biggest factor in preventing flat cookies.
How do I know when the cookies are done if the center still looks raw?
This is the most common source of confusion with thick, stuffed cookies. The centers SHOULD look underdone when you pull them from the oven. The edges will be lightly golden and set, but the middle will look glossy and slightly soft. This is correct. The cookies continue baking from the residual heat of the pan for about 5 to 8 minutes after you remove them from the oven. If you wait until the centers look fully baked before pulling them, they will be dry and overbaked by the time they cool. Trust the process and pull them early.
There is something so joyful about a cookie that has another cookie hiding inside it. Every time I make a batch of these, no matter who I am making them for, people take a bite and immediately say “wait, is there an Oreo in there?” and then their eyes go wide. That reaction never gets old. It is the kind of recipe that makes baking feel playful and fun, which is exactly what I want cooking to feel like in my kitchen.
I really hope these become a staple in your home the way they have become one in mine. Lily asks for them on every special occasion, Noah tries to eat three before dinner, and Jake considers them the gold standard for homemade cookies. They are silly and indulgent and absolutely worth every single calorie. Make them, share them, and enjoy every bite.
With love and Oreos,
Lora x
Oreo Cookie in a Cookie (Stuffed Oreo Cookies)
24
servings20
minutes15
minutes385
kcalIngredients
300g (2.5 cups) all-purpose flour
1 tsp baking soda
1 tsp fine sea salt
225g (1 cup / 2 sticks) unsalted butter, softened to room temperature
200g (1 cup) granulated white sugar
165g (3/4 cup packed) light brown sugar
2 large eggs, room temperature
2 tsp pure vanilla extract
340g (2 cups) semi-sweet chocolate chips
24 Oreo cookies (1 standard 312g package)
Directions
Preheat oven to 175C (350F). Line two large baking sheets with parchment paper. In a medium bowl, whisk together the flour, baking soda, and salt. Set aside.
In a large bowl using a hand or stand mixer, beat the softened butter, granulated sugar, and brown sugar on medium-high speed for 3 full minutes until pale and fluffy. Add the eggs one at a time, beating 30 seconds after each, then mix in the vanilla extract.
Reduce mixer to low and add the flour mixture gradually, mixing just until no dry streaks remain. Fold in the chocolate chips by hand with a rubber spatula. The dough will be thick and slightly sticky.
Scoop approximately 60g (2 oz) of dough per cookie. Divide each portion in half. Flatten one half into a disc, place one Oreo in the center, flatten the second half over the top, and pinch all edges together firmly. Roll into a smooth ball. Place on prepared baking sheets 7.5cm (3 inches) apart. Refrigerate assembled balls for 30 minutes if time allows.
Bake for 13 to 15 minutes until the edges are set and lightly golden but the centers still look slightly underdone. Cool on the baking sheet for 10 minutes before transferring to a wire rack. The centers will firm up as they cool.


